How to Clean AirPods: Complete Guide for All Models (Case, Mesh & Ear Wax)
How to clean AirPods is one of the most common tech cleaning questions I get, which surprised me at first – I’m a house cleaner, not a tech expert. But after 18 years cleaning professionally, I’ve learnt that whether you’re removing dust from a shelf or ear wax from AirPods, the principles are the same: gentle methods, the right tools, and patience. I’ve cleaned dozens of pairs of AirPods over the years (mine, my kids’, and clients who’ve asked), and I’ll tell you exactly what works safely and what ruins them. In the next few minutes, you’ll learn how to clean your AirPods properly, remove stubborn ear wax from the mesh, restore muffled sound quality, and clean the case without damaging anything. This works for all models – standard AirPods, AirPods Pro, and even AirPods Max.
What Makes This Different
I’m not selling you fancy cleaning kits or specialist products. I’ll show you methods using items you already have at home that actually work. I’ve tested everything from toothbrushes to Blu Tack (spoiler: some work brilliantly, others are disasters), and I’ll be completely honest about what’s worth your time.
Quick Summary
Time needed: 5 minutes regular clean / 15 minutes deep clean
Difficulty: Easy
You’ll need: Dry soft-bristled toothbrush, cotton buds, lint-free cloth, 70% isopropyl alcohol (optional)
Key takeaway: Never use water, sharp objects, or excessive pressure. Clean at least weekly for best sound quality. Always let dry completely before use.
What You'll Need
The tools that actually work for cleaning AirPods:
- Soft-bristled toothbrush (clean and completely dry)
- Cotton buds (or cotton swabs)
- Lint-free cloth or microfibre cloth
- 70% isopropyl alcohol or alcohol wipes (optional, for disinfecting)
- Blu Tack or similar adhesive putty (surprisingly effective for mesh cleaning)
- Good lighting – you need to see what you’re doing
Important Safety Rules Before You Start
AirPods are water-resistant, not waterproof. There’s a crucial difference. Here’s what you must never do:
- Never submerge in water or cleaning solutions – This will destroy them
- Don’t use running water – Even a “quick rinse” can damage internal components
- Avoid getting moisture in openings – The mesh, charging contacts, and ports must stay dry
- Never use bleach or hydrogen peroxide – These damage the finish and internal parts
- Don’t use sharp objects – Pins, needles, and paperclips damage the delicate mesh
- Never store wet – Always let AirPods dry completely before putting them in the case
How to Clean AirPods – Step-by-Step Method
This method works for all standard AirPods (Gen 1, 2, 3, and 4). For AirPods Pro and Max, see the dedicated sections below.
Step 1 – Wipe Down the Exterior
Using a clean, dry, lint-free cloth, wipe down the entire outer surface of each AirPod. This removes surface dust, fingerprints, and oils. Pay attention to the stem (handle), the main body, and around the speaker mesh.
For stubborn marks or if they’ve been somewhere particularly grubby, you can very lightly dampen the cloth with water – and I mean barely damp, not wet. Wipe gently, then immediately dry with a clean, dry cloth.
Step 2 – Clean the Speaker Mesh
This is where most of the grime builds up, and it’s why your AirPods sound quieter over time. The mesh collects ear wax, dust, and debris that blocks sound.
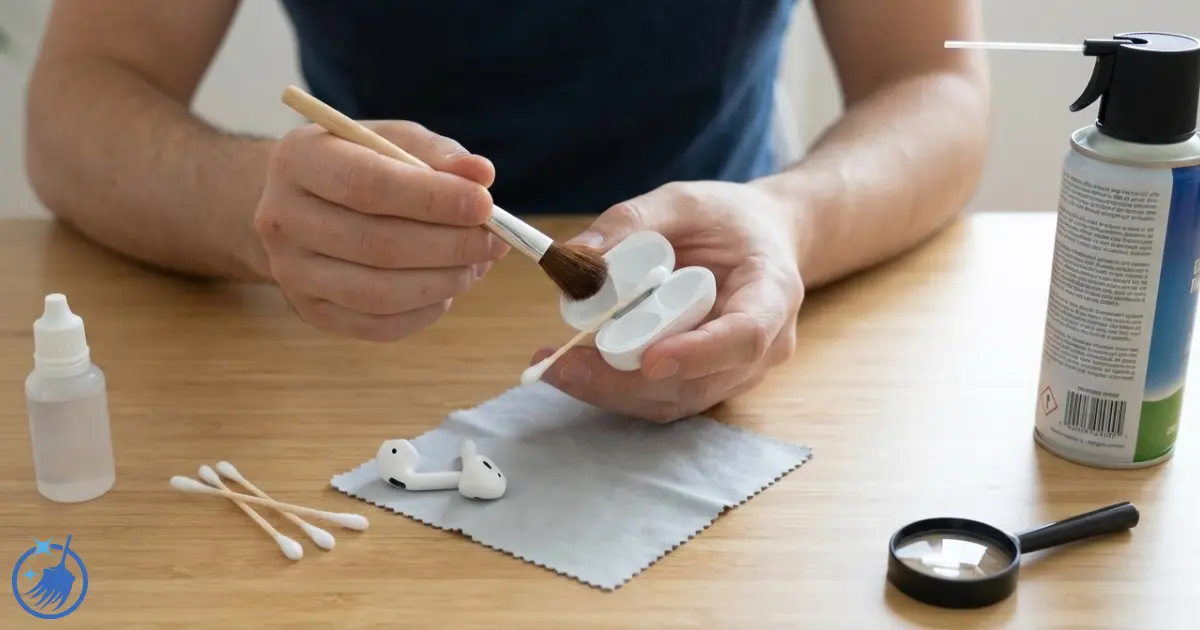
Method 1 – Soft Toothbrush (Best for regular cleaning):
Take your dry soft-bristled toothbrush and very gently brush the speaker mesh in small circular motions. Hold the AirPod with the mesh facing downward whilst you brush – this lets gravity help pull debris out rather than pushing it further in.
Don’t press hard. Think of it like brushing dust off a delicate ornament. The bristles should just tickle the surface, loosening debris without pushing it through the mesh.
Method 2 – Blu Tack (Best for stubborn ear wax):
This sounds odd, but it works brilliantly. Take a small piece of Blu Tack and gently dab it onto the mesh. The sticky putty pulls ear wax and debris out without pushing anything through. Press lightly, lift straight up, and repeat with a clean section of Blu Tack until no more debris transfers.
I’ve removed shocking amounts of ear wax using this method. It’s particularly good for compacted buildup that brushing alone won’t shift.
Step 3 – Clean the Microphone Mesh
The microphone openings are usually on the stem or back of the AirPod. Use a dry cotton bud and very gently wipe these areas. Don’t poke the cotton bud into the openings – just sweep across the surface.
For standard AirPods, there are typically two or three small microphone holes. They’re easy to miss but collect dust just like the speaker mesh.
Step 4 – Clean Hard-to-Reach Areas
Use a dry cotton bud to clean around the edges where the different parts meet, the seams, and any grooves. These areas trap dirt and oil from your fingers.
You can very lightly wrap a cotton bud with a tiny bit of Blu Tack to reach into crevices – the tackiness picks up dust whilst the cotton bud gives you control.
Step 5 – Inspect and Final Wipe
Hold your AirPods up to good light and inspect the mesh. It should look clear, not dark or clogged. If you still see debris, repeat steps 2-3.
Give them one final wipe with your dry cloth, and you’re done. If you’ve used any moisture at all (even a barely-damp cloth), wait 5 minutes before putting them in the case.
How to Clean AirPods Pro (Including Silicone Tips)
AirPods Pro have silicone ear tips that need special attention, plus they have additional mesh areas for noise cancellation.
Cleaning the Ear Tips
Step 1: Remove the silicone ear tips by gently pulling them off the AirPod. They twist off easily – don’t yank them.
Step 2: Rinse the silicone tips only (not the AirPods themselves) under lukewarm running water. You can use a tiny drop of washing up liquid if they’re particularly waxy. Rub them gently between your fingers.
Step 3: Rinse thoroughly until no soap remains, then dry them completely with a lint-free cloth. Leave them to air dry for at least 30 minutes before reattaching. They must be bone dry.
Step 4: Clean the AirPods themselves using the method above, paying special attention to the mesh where the ear tip attaches.
Step 5: Once both ear tips and AirPods are completely dry, reattach the tips by aligning them and pushing gently until they click into place.
Cleaning AirPods Pro Mesh and Microphones
AirPods Pro have three mesh areas: the main speaker mesh, the outward-facing microphone mesh, and the inward-facing vent mesh. All three need cleaning for optimal noise cancellation and sound quality.
Use the same Blu Tack dabbing method described above for all mesh areas. Be especially gentle with the smaller vents – they’re particularly delicate.
How to Clean AirPods Max
AirPods Max are different beasts entirely – they’re over-ear headphones with fabric ear cushions that need different care.
Cleaning the Ear Cushions
Step 1: Remove the ear cushions by pulling firmly (they’re magnetic, so they come off easily).
Step 2: Dampen a lint-free cloth with fresh water only – no soap, no cleaning products. Wring it out so it’s barely damp, not wet.
Step 3: Wipe the cushions thoroughly, paying attention to the mesh areas and fabric surfaces. You’ll likely see dirt transferring to your cloth.
Step 4: Use a dry cloth to remove excess moisture, then leave them to air dry completely for at least 24 hours before reattaching. Never use heat to speed up drying.
Cleaning the Headband and Body
Wipe the headband and main body with a dry or very slightly damp cloth. The mesh on the outer ear cups can be cleaned with a soft brush or Blu Tack method. Avoid getting moisture in any openings.
How to Clean AirPods Case
The case collects just as much grime as the AirPods themselves, plus it develops that magnetic dust buildup around the hinge.
Cleaning the Exterior
Step 1: Wipe the entire outside of the case with a dry lint-free cloth. For stubborn marks, use a cloth very lightly dampened with water or 70% isopropyl alcohol. Dry immediately.
Step 2: For scuff marks or stains on white cases, a very slightly damp cloth with a tiny bit of washing up liquid can help. Wipe gently, then clean off any soap residue with a damp cloth, then dry thoroughly.
Cleaning the Inside
Step 1: Open the case and use a dry soft-bristled brush to clean the charging wells where the AirPods sit. Brush gently to remove dust and debris. Hold the case upside down whilst doing this so debris falls out.
Step 2: Use a dry cotton bud to clean around the charging contacts (the small metal pieces). These must stay clean for proper charging. Don’t use anything wet here.
Step 3: For the hinge area and that mysterious magnetic dust that accumulates there, Blu Tack works brilliantly. Dab it along the hinge to pick up all the metallic particles.
Cleaning the Charging Port
If your case won’t charge, the Lightning or USB-C port might be blocked with lint.
Use a wooden toothpick (never metal) to very gently remove any debris from the charging port. Work carefully and don’t force anything. A soft brush can also help sweep dust out.
How often should you clean AirPods?
Cleaning frequency depends on how much you use them and your ear wax production (which varies enormously between people).
| Usage Level | Quick Clean | Deep Clean | Why |
|---|---|---|---|
| Daily use (2+ hours) | After each use | Weekly | Prevents buildup, maintains sound quality |
| Regular use (few times weekly) | Twice weekly | Fortnightly | Keeps them hygienic and functioning well |
| Occasional use | Before/after use | Monthly | Prevents dust accumulation during storage |
| After workouts | Every time | Twice weekly | Sweat and moisture need immediate attention |
| Shared between people | Between each user | Daily | Hygiene – you’re sharing earwax and bacteria |
Signs You Need to Clean Now:
- Sound quality has decreased or sounds muffled
- One AirPod is quieter than the other
- Visible wax or dirt on the mesh
- Microphone quality has deteriorated
- They look or feel grimy
How to Remove Ear Wax From AirPods
Ear wax is the biggest enemy of AirPods. It clogs the mesh and dramatically reduces sound quality. Here’s how to tackle stubborn buildup:
For Light Wax Buildup
- Use a dry soft-bristled toothbrush on the mesh, brushing gently with the AirPod mesh-side down
- Follow with the Blu Tack dabbing method
- Finish with a dry cotton bud around the edges
For Heavy Wax Buildup
- Start with Blu Tack – dab repeatedly, using fresh sections of putty each time
- Use a toothbrush to loosen remaining wax whilst holding mesh-side down
- Dab again with Blu Tack to pull out what the brushing loosened
- Repeat until mesh looks clear
- For extremely stubborn wax, you can very lightly dampen a cotton bud with 70% isopropyl alcohol and sweep (don’t press) across the mesh surface. Let dry completely before use.
What NOT to Use for Wax Removal
- Sharp objects (damage the mesh)
- Excessive alcohol (can damage coatings)
- Cotton buds poked into the mesh (pushes wax deeper)
- Sticky tape (leaves residue)
- Toothpicks (too aggressive)
How to Fix Muffled or Quiet AirPods
If your AirPods sound muffled, quiet, or one is quieter than the other, it’s almost always blocked mesh. Here’s the fix:
- Check the mesh under good light – you’ll probably see it’s dark or clogged
- Use the Blu Tack method extensively on the affected AirPod
- Follow with gentle brushing (mesh facing down)
- Clean the opposite side mesh as well (the microphone/vent areas)
- For AirPods Pro, remove and clean the silicone tips, then clean the mesh where the tip attaches
- Check your iPhone’s Bluetooth audio balance isn’t shifted to one side (Settings > Accessibility > Audio/Visual > Balance)
In my experience, about 90% of muffled AirPods are fixed by proper mesh cleaning. If cleaning doesn’t help, you might have a hardware fault.
How to Disinfect AirPods Safely
Regular cleaning removes dirt and wax, but sometimes you need to disinfect – after illness, if they’ve been somewhere particularly grotty, or if sharing between people.
Safe Disinfecting Method:
- Use a 70% isopropyl alcohol wipe or a cloth lightly dampened with 70% isopropyl alcohol
- Wipe down the exterior surfaces only – not the mesh
- For the mesh, use a cotton bud barely dampened with alcohol and sweep gently across (don’t press)
- Let air dry completely for 5 minutes before using or storing
What NOT to Use:
- Bleach or products containing bleach
- Hydrogen peroxide
- Window cleaner
- Antibacterial hand gel (contains moisturisers that leave residue)
- Kitchen disinfectant sprays
Common AirPods Cleaning Problems and Solutions
Yellow Staining on White AirPods/Case
White AirPods and cases yellow over time from UV exposure, skin oils, and oxidation. Unfortunately, this is largely permanent. You can minimise it by:
- Wiping them down after each use
- Storing them away from direct sunlight
- Cleaning regularly before oils set in
For existing yellow stains, try a cloth very lightly dampened with 70% isopropyl alcohol. This can help lighten (but won’t eliminate) staining.
Scratches on the Case
Scratches are permanent damage to the plastic. You can’t remove them, but you can minimise their appearance with a silicone case cover. These cost £5-10 and protect against future scratching.
Magnetic Dust on the Case
That black metallic dust around the hinge is iron particles from your bag, pockets, or environment sticking to the magnets. Blu Tack removes it perfectly – just dab along the hinge and lift. The magnetic particles stick to the putty.
Water Damage
If you’ve dropped AirPods in water or got them properly wet:
- Dry them immediately with a lint-free cloth
- Leave them out to air dry for 24-48 hours – don’t put them in the case
- Don’t try to speed up drying with heat
- Don’t use rice (it doesn’t work and leaves dust)
- Test carefully after they’re completely dry
Water-resistant doesn’t mean waterproof. Some will survive a brief splash, but submersion or extended wetness usually causes permanent damage.
Metal Shavings in Case
If you’ve carried your AirPods in a bag with keys or metal objects, you might find metal shavings stuck to the magnets inside the case. Use Blu Tack to remove these – it works better than any other method I’ve tried.
Alternative Cleaning Methods – What Works and What Doesn't
I’ve tested various methods people recommend online. Here’s what actually works:
Works Well:
- Blu Tack/adhesive putty (brilliant for mesh and magnetic dust)
- Soft toothbrush (essential for all cleaning)
- Cotton buds (versatile and safe)
- 70% isopropyl alcohol (for disinfecting)
- Microfibre cloths (leaves no lint)
Doesn’t Work or Risky:
- Compressed air (can damage speakers and force debris deeper)
- Sharp objects like pins or needles (damage mesh permanently)
- Regular sticky tape (leaves residue)
- Cotton wool (too fluffy, leaves fibres)
- Toothpaste (far too abrasive, leaves residue)
- Sanitiser gel (leaves sticky residue)
- Makeup remover wipes (contain oils and moisturisers)
Professional Cleaning vs DIY
When to DIY:
- Regular maintenance cleaning
- Removing ear wax and dust
- Cleaning the case
- Improving muffled sound
When to See Apple:
- Hardware damage suspected
- Cleaning doesn’t restore sound quality
- Under warranty – better safe than sorry
- Uncomfortable cleaning them yourself
Apple Stores offer free AirPods cleaning at the Genius Bar. They’ll clean the exterior and case but won’t deep-clean blocked mesh (that’s your job). If there’s a hardware fault, they’ll diagnose it properly.
Tips to Keep Your AirPods Cleaner Longer
- Wipe after each use – A 10-second wipe with a dry cloth prevents buildup
- Store only when dry – Never put sweaty or damp AirPods in the case
- Keep the case clean – A dirty case dirties your AirPods
- Clean your ears regularly – Less ear wax means cleaner AirPods
- Use a protective case – Silicone cases (£5-10) prevent scratches and some dirt
- Don’t share without cleaning – Sharing earwax is grim and unhygienic
- Store properly – Don’t throw them loose in bags with keys and dirt
Honest Opinion on AirPods Cleaning Kits
Those £15-20 cleaning kits marketed specifically for AirPods contain: a small brush, some cotton swabs, cleaning putty, and maybe a cloth. You can buy all of this separately for under £4 total, and it’ll last you years.
The “special” cleaning putty is just rebranded Blu Tack. The “precision brush” is just a soft brush. The “microfibre cloth” is available anywhere. You’re paying £12+ for packaging and marketing. Don’t bother.
Frequently Asked Questions
How often should you clean AirPods?
Clean AirPods after every use if you use them daily for multiple hours or workouts. For regular users, a quick wipe down twice weekly and a deep clean fortnightly keeps them in good condition. Occasional users should clean before and after use, with a deep clean monthly. If you notice muffled sound, visible wax, or one AirPod quieter than the other, clean them immediately regardless of schedule. Regular cleaning maintains sound quality and hygiene.
Can you clean AirPods with alcohol?
Yes, you can use 70% isopropyl alcohol to clean and disinfect AirPods, but use it carefully. Lightly dampen a cloth or cotton bud with the alcohol and wipe the exterior surfaces. For the mesh, use a cotton bud barely dampened with alcohol and sweep gently across – don’t press into the mesh. Never use higher concentrations or pure alcohol, and never use bleach, hydrogen peroxide, or products containing these. Always let AirPods dry completely for 5 minutes before using or storing them.
How do you remove ear wax from AirPods mesh?
The best method for removing ear wax from AirPods mesh is using Blu Tack or adhesive putty. Gently dab a small piece onto the mesh and lift straight up – the wax sticks to the putty. Repeat with fresh sections of putty until no more wax transfers. Follow with gentle brushing using a dry soft-bristled toothbrush whilst holding the AirPod mesh-side down. For stubborn wax, a cotton bud barely dampened with 70% isopropyl alcohol can help, but let them dry completely afterwards.
Why do my AirPods sound muffled?
Muffled AirPods sound is almost always caused by blocked speaker mesh. Ear wax, dust, and debris accumulate on the mesh and muffle the sound. Clean the mesh thoroughly using Blu Tack to remove wax, then gentle brushing with a soft toothbrush. For AirPods Pro, also remove and clean the silicone ear tips, then clean the mesh where the tip attaches. If cleaning doesn’t restore sound quality, check your iPhone’s audio balance settings or you may have a hardware fault.
Can you wash AirPods with water?
No, never wash AirPods with water. Whilst they’re water-resistant, this doesn’t mean waterproof – water can damage internal components, especially if it gets into the mesh or charging contacts. For AirPods Pro, you can rinse only the removable silicone ear tips under water (not the AirPods themselves). Use dry cleaning methods for the AirPods – soft brushes, cotton buds, and Blu Tack work brilliantly without any water risk. If you must use moisture, use a cloth barely dampened with water or 70% isopropyl alcohol.
How do you clean AirPods case?
Wipe the case exterior with a dry lint-free cloth. For stubborn marks, use a cloth very lightly dampened with water or 70% isopropyl alcohol, then dry immediately. Clean inside the case with a dry soft-bristled brush, holding it upside down so debris falls out. Use a dry cotton bud to clean around the metal charging contacts. For the magnetic dust that accumulates around the hinge, dab with Blu Tack to remove all the metallic particles. Never get moisture in the charging port or contacts.
How much does Apple charge to clean AirPods?
Apple offers free AirPods cleaning at the Genius Bar. Book an appointment and they’ll clean the exterior and case for you at no charge. However, they won’t deep-clean blocked mesh or remove stubborn ear wax – that’s something you’ll need to do yourself. If your AirPods need repair rather than just cleaning, costs vary depending on the issue and whether you have AppleCare+. Out-of-warranty battery replacements cost around £49 per AirPod.
Can you clean AirPods Pro ear tips?
Yes, AirPods Pro silicone ear tips can and should be cleaned regularly. Remove the tips by pulling them gently off the AirPod. Rinse them under lukewarm running water – you can use a tiny drop of washing up liquid if needed. Rub gently between your fingers, rinse thoroughly, then dry completely with a lint-free cloth. Leave them to air dry for at least 30 minutes before reattaching. Only the silicone tips can be washed – never rinse the AirPods themselves.
How do you clean AirPods Max ear cushions?
Remove the ear cushions from AirPods Max by pulling them off (they’re magnetic). Dampen a lint-free cloth with fresh water only – no soap or cleaning products. Wring it out so it’s barely damp, not wet. Wipe the cushions thoroughly, including the mesh areas and fabric surfaces. Dry with a clean cloth to remove excess moisture, then leave to air dry completely for at least 24 hours before reattaching. Never use heat to speed drying. Clean the headband and body with a dry or very slightly damp cloth.
What should you never use to clean AirPods?
Never use bleach, hydrogen peroxide, compressed air, sharp objects (pins, needles, paperclips), excessive water, toothpaste, sanitiser gel, makeup remover wipes, or any abrasive materials on AirPods. Don’t submerge them in water or cleaning solutions. Avoid products containing bleach or hydrogen peroxide. Don’t use high-concentration alcohol (stick to 70% isopropyl). Never store them whilst wet or damp. These methods can permanently damage the finish, internal components, mesh, or charging contacts.
How do you clean AirPods that fell on the floor or in the toilet?
If AirPods fell on a dirty floor, wipe them down with a cloth dampened with 70% isopropyl alcohol to disinfect, then dry thoroughly before use. If they fell in a toilet or were submerged in water, dry them immediately with a lint-free cloth, then leave them out to air dry for 24-48 hours – don’t put them in the case. Don’t use rice or heat to speed drying. After they’re completely dry, test them carefully. Water-resistant doesn’t mean waterproof – submersion often causes permanent damage.
Why is one AirPod quieter than the other?
One AirPod being quieter than the other is usually caused by uneven wax buildup blocking the mesh on the quieter side. Clean both AirPods thoroughly, paying extra attention to the mesh on the quieter one. Use Blu Tack to remove wax, then brush gently. Also check your iPhone’s audio balance (Settings > Accessibility > Audio/Visual > Balance) – if it’s shifted to one side, slide it back to centre. If cleaning and checking balance doesn’t fix it, you may have a hardware fault.
Can you use Blu Tack to clean AirPods?
Yes, Blu Tack is one of the most effective tools for cleaning AirPods mesh. Gently dab a small piece onto the speaker mesh and lift straight up – ear wax and debris stick to the putty. Use fresh sections of Blu Tack each time and repeat until no more debris transfers. It’s also brilliant for removing magnetic dust from the case hinge. This method pulls debris out rather than pushing it through the mesh like brushing alone can do. Professional cleaning services use similar adhesive methods.
How do you clean AirPods microphone?
AirPods have microphone openings on the stem or back. Clean these with a dry cotton bud, gently sweeping across the surface – don’t poke the cotton bud into the openings. You can use a soft-bristled toothbrush to very gently brush the microphone mesh. For disinfecting, use a cotton bud barely dampened with 70% isopropyl alcohol and sweep gently, then let dry completely. If you’re cleaning AirPods Pro, there are multiple microphone locations including on the stem and inside the ear cup.
What causes yellow staining on white AirPods?
Yellow staining on white AirPods and cases is caused by UV exposure from sunlight, skin oils, sweat, and natural oxidation of the white plastic over time. This yellowing is largely permanent and affects all white AirPods eventually. You can minimise it by wiping down after each use, storing away from direct sunlight, and cleaning regularly before oils set in. For existing stains, try wiping with a cloth lightly dampened with 70% isopropyl alcohol, which can lighten (but won’t eliminate) discolouration.
You May Also Like
How to Clean a Keyboard: Complete Guide for 2026
How to Clean Laptop Screen Safely: Complete UK Guide 2026