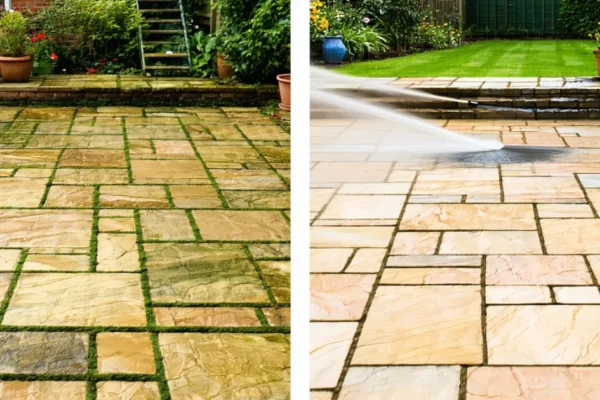
How to Clean a Block Paving Driveway: Complete UK Guide
How to clean a block paving driveway is one of those jobs that looks simple until you’re halfway through and realising you’ve made a proper mess. I’ve cleaned hundreds of driveways across the UK in my 18 years as a professional cleaner, and I’ve seen every mistake possible – from blasting sand everywhere with a pressure washer to using the wrong chemicals and damaging the blocks permanently.
In this guide, I’ll show you exactly how to clean block paving properly, whether you’re doing a quick maintenance clean or tackling years of neglected moss and algae. You’ll learn which methods actually work, which ones waste your money, and when it’s honestly worth calling in the professionals.
Here’s what you’ll learn: the safest way to pressure wash without damaging joints, how to remove stubborn moss and algae without harsh chemicals, the truth about those expensive block paving cleaners, and how to stop your driveway turning green again within months.
Quick Summary
Time needed: 3-6 hours (depending on size and condition)
Difficulty: Moderate (requires physical effort)
You’ll need: Stiff brush, washing up liquid, pressure washer (optional), weed killer, kiln-dried sand
Key takeaway: Regular sweeping and quick washes prevent major buildup; pressure washing works but must be done carefully at 45-degree angle
What You'll Need
For a basic clean:
- Stiff outdoor broom or brush
- Washing up liquid (any brand)
- Bucket and warm water
- Garden hose
- Weed killer (for between blocks)
- Old screwdriver or weeding tool
- Kiln-dried sand (for refilling joints after cleaning)
For a deep clean or heavily soiled driveways:
- Pressure washer (1500-2000 PSI is plenty)
- Block paving cleaner or diluted bleach
- Protective gloves and safety glasses
- Stiff-bristled scrubbing brush
- Spray bottle for applying cleaners
Optional extras:
- Paving sealant (£20-40 for average driveway)
- Oil stain remover for stubborn marks
- Moss killer (preventative treatment)
How to Clean Block Paving Driveway – Step-by-Step
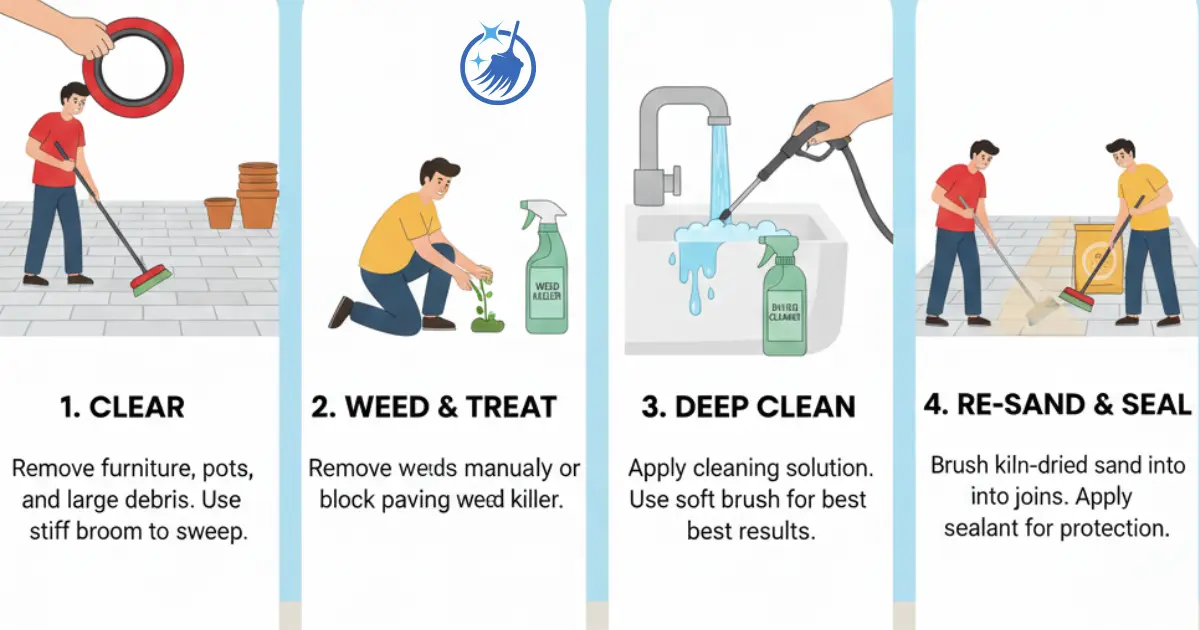
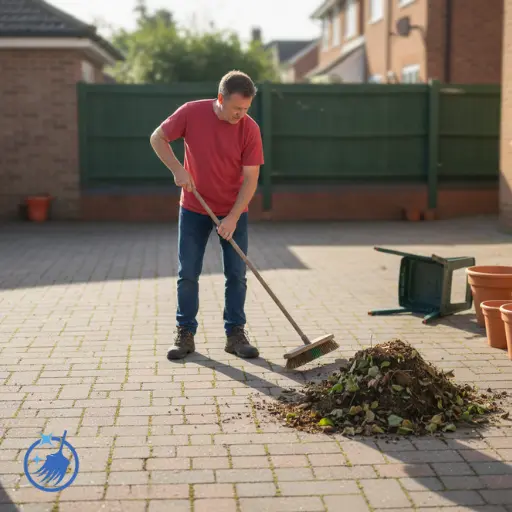
Step 1 – Clear and Prepare the Area
Move all vehicles, plant pots, garden furniture and anything else off the driveway. You need complete access to work efficiently.
Sweep the entire area thoroughly with a stiff outdoor broom. Remove all loose leaves, dirt, and debris. This prevents you from just spreading muck around when you start wet cleaning.
Check your drainage whilst you’re at it. Block paving cleaning creates a lot of dirty water that needs somewhere to go. Make sure drains are clear and working.
Step 2 – Remove All Weeds
This is the tedious bit, but it matters. Go around the entire driveway and remove weeds growing between blocks. Use an old screwdriver or proper weeding tool to get the roots out completely.
Pull the weeds when the ground is slightly damp if possible – they come out more easily. Don’t just snap them off at ground level or they’ll be back within weeks.
Once you’ve cleared all visible weeds, spray the joints with weed killer. This prevents regrowth and gives you a head start on maintenance.
Step 3 – Apply Cleaning Solution
For a basic clean, mix a squirt of washing up liquid in a bucket of warm water. For heavily soiled driveways or those with moss and algae, use a 50/50 mix of household bleach and water instead.
Pour or spray the solution over sections of the driveway, working in manageable areas (about 2-3 square metres at a time). Don’t let it dry out – work quickly.
Let the solution sit for 5-10 minutes. This dwell time is crucial. The cleaner needs time to break down dirt, moss, and algae. Don’t skip this step.
Step 4 – Scrub the Surface
Use a stiff-bristled brush to scrub the paving in a diagonal pattern across the blocks. Never scrub in the same direction as the joints – this pulls sand out unnecessarily.
Put some effort into it. Block paving needs proper scrubbing to shift ingrained dirt and moss. This is the part that takes real physical work.
Pay extra attention to shaded areas where moss and algae grow fastest, and to oil-stained areas near where vehicles park.
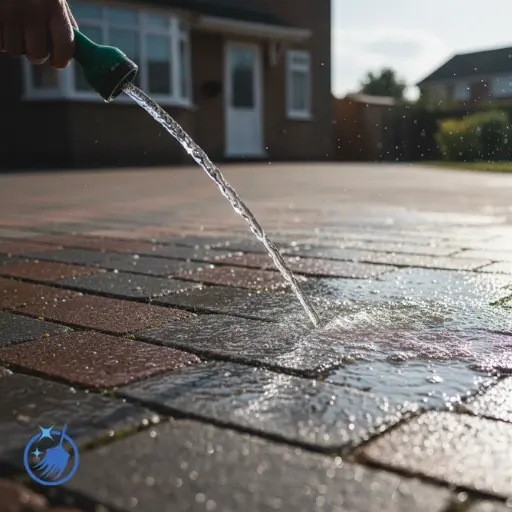
Step 5 – Rinse Thoroughly
Use a garden hose to rinse away all the dirty water and cleaning solution. Direct the water towards drains or onto grass/soil – not towards your house or your neighbour’s property.
Keep rinsing until the water runs completely clear. Any soap or bleach left behind will attract dirt and leave streaky marks.
Check the entire surface as you rinse. If any dirty patches remain, repeat the cleaning process on those areas.
Step 6 – Refill Joints with Sand
Once the driveway is completely dry (leave it 24-48 hours), you’ll need to refill the joints between blocks with kiln-dried sand. Cleaning always removes some sand, and the gaps need filling to keep blocks stable.
Spread kiln-dried sand across the driveway and sweep it into the joints with a soft brush. Keep adding and sweeping until joints are full and no more sand will go in.
Sweep away excess sand, then spray the surface lightly with water to help the sand settle. Add more sand where needed.
How to Pressure Wash Block Paving Safely
Pressure washers are brilliant for block paving but they’re also the easiest way to cause damage. I’ve seen countless driveways where someone’s blasted all the sand out of the joints and left an unstable mess.
Here’s how to do it properly:
Choose the right pressure – 1500-2000 PSI is plenty for block paving. Higher pressure risks damaging blocks and definitely removes too much sand.
Use the correct nozzle – A 25-degree nozzle is ideal. Never use a zero-degree (pencil jet) nozzle on block paving.
Hold at 45 degrees – Point the lance at a 45-degree angle to the surface, never straight down. This reduces the force on the joints and minimises sand removal.
Keep moving – Never hold the spray in one spot. Keep the wand moving in smooth, overlapping passes.
Work from top to bottom – Start at the highest point and work downwards, letting water flow naturally to drains.
Expect sand loss – You will remove some sand, even with perfect technique. Budget for 2-3 bags of kiln-dried sand to refill joints afterwards.
Don’t go too close – Keep the nozzle 15-30cm from the surface. Closer than this risks etching the blocks.
Honestly? Pressure washing is where most DIY attempts go wrong. If your driveway is in decent condition, the scrubbing method works just as well and causes far less damage. I use pressure washers on commercial jobs because speed matters, but at home I often just scrub.
Removing Specific Stains from Block Paving
How to Remove Moss and Algae
Moss and algae are the biggest complaints I hear about block paving. That green, slimy coating makes driveways slippery and looks terrible.
Method 1: Bleach solution (fastest)
- Mix 50/50 bleach and water in a spray bottle
- Spray affected areas generously
- Leave for 10-15 minutes
- Scrub with a stiff brush
- Rinse thoroughly
- Repeat if necessary
The moss should lift away easily after the bleach treatment. For heavy moss coverage, you might need 2-3 applications.
Method 2: Dedicated moss killer (longer-lasting)
- Apply proprietary moss killer following product instructions
- Leave for the recommended time (usually 24 hours)
- Brush away dead moss
- Rinse clean
Moss killers cost £10-15 but often include preventative ingredients that stop regrowth for 6-12 months.
How to Remove Oil Stains
Oil stains are notoriously stubborn on block paving. The oil soaks into the porous surface and ordinary cleaning barely touches it.
For fresh oil spills:
- Cover immediately with cat litter, sand, or sawdust
- Leave for several hours to absorb the oil
- Sweep up and dispose of properly
- Scrub the area with washing up liquid and hot water
- Rinse clean
For old, set-in oil stains:
- Apply a dedicated paving degreaser (£8-12 from B&M or Wilko)
- Leave for 20-30 minutes
- Scrub vigorously with a stiff brush
- Rinse thoroughly
- Repeat as needed – deep stains may need 3-4 treatments
I’ll be honest, really old oil stains rarely come out completely. You can fade them significantly, but getting block paving back to perfect after years of oil drips is nearly impossible. Prevention is far easier than cure.
How to Remove Tyre Marks
Black rubber marks from tyres respond well to white spirit or WD-40.
- Apply white spirit to a cloth
- Rub the tyre mark firmly
- The rubber should transfer onto the cloth
- Wash the area with soapy water
- Rinse clean
For stubborn marks, a pressure washer at close range (with caution) often shifts them.
Common Mistakes That Damage Block Paving
1. Using too high pressure on a pressure washer – Anything over 2500 PSI risks damaging the blocks themselves and will definitely blast out all your jointing sand. Stick to 1500-2000 PSI maximum.
2. Cleaning in the same direction as joints – This pulls sand out of the gaps. Always work diagonally across the pattern.
3. Using acid-based cleaners – Acid eats away at block paving, making it porous and weak. Never use patio or brick cleaners containing hydrochloric acid.
4. Not refilling joints after cleaning – Missing or low sand makes blocks unstable. They shift under vehicle weight and crack. Always top up sand after cleaning.
5. Sealing without proper cleaning first – Sealing traps dirt underneath and looks terrible. Clean thoroughly, let dry completely (48+ hours), then seal.
6. Cleaning in direct summer sun – Cleaning solution dries too quickly, leaving streaks and not working properly. Clean in spring or autumn, or on overcast days.
How often should you clean block paving?
Based on 18 years of experience across hundreds of driveways, here’s what actually works:
| Cleaning Task | Frequency | Why |
|---|---|---|
| Sweep with broom | Weekly | Prevents dirt buildup and keeps drains clear |
| Weed between blocks | Monthly | Stops weeds establishing deep roots |
| Quick scrub with soapy water | Every 3 months | Maintains appearance between deep cleans |
| Deep clean (pressure wash or thorough scrub) | Annually | Removes ingrained dirt and moss |
| Moss treatment | Spring and autumn | Prevents growth during wet seasons |
| Re-sand joints | After each deep clean | Maintains stability |
| Apply sealant | Every 3-5 years | Protects blocks and makes cleaning easier |
Your driveway’s condition affects frequency. Heavy moss growth means more frequent treatment. Shaded driveways need cleaning more often than those in full sun. High-traffic areas get dirtier faster.
Block Paving Cleaners: What Actually Works
I’ve tested every block paving cleaner available in UK shops. Here’s what’s actually worth buying:
Budget option (under £5): Household bleach diluted 50/50 with water. Brilliant for moss, algae, and general dirt. Works on 90% of cleaning jobs. Available everywhere for about £1.50.
Mid-range option (£8-15): Wet & Forget or similar dedicated moss/algae remover. Longer-lasting than bleach, includes preventative ingredients. Available from B&M, Wilko, or Amazon. Good value for money.
For oil stains (£8-12): Paving degreaser from Screwfix or Toolstation. Purpose-made for cutting through oil and grease. Nothing else works as well on oil.
Professional choice (£15-25): Sodium hypochlorite-based cleaners at higher concentrations. These are what professional driveway cleaners use. Faster and more effective but no better results than bleach if you’re willing to do more scrubbing.
What I don’t recommend:
- Expensive “miracle” cleaners costing £20+ that are just fancy bleach
- Acid-based cleaners (they damage blocks)
- Homemade vinegar solutions (too weak for block paving)
- Pressure washer detergent additives (gimmicks that add no value)
Should you seal block paving after cleaning?
Sealing is optional but has real benefits if done properly. I seal about 40% of the driveways I clean professionally, based on the client’s budget and the paving’s condition.
Benefits of sealing:
- Makes future cleaning much easier
- Reduces moss and weed growth
- Enhances colour and appearance
- Protects against oil stains
- Reduces sand loss from joints
- Can last 3-5 years with proper application
Downsides of sealing:
- Costs £20-40 for DIY on average driveway
- Professional sealing costs £200-500
- Can look unnatural if poorly applied
- Cheap sealants fail within 6-12 months
- Requires reapplication every few years
If you decide to seal, wait at least 48 hours after cleaning for the paving to dry completely. Apply on a dry, mild day with no rain forecast for 24 hours. Two thin coats beat one thick coat every time.
DIY vs Professional Block Paving Cleaning
I run a cleaning business, so you might expect me to push professional cleaning. But honestly? Most driveways don’t need professional cleaning if you’re willing to put in the effort.
When DIY makes sense:
- Driveway is small to medium (under 50 square metres)
- Condition is reasonable with light moss/dirt
- You have basic fitness and don’t mind hard work
- You already own or can borrow a pressure washer
- You’re happy spending 4-6 hours on the job
When to call professionals:
- Driveway is large (over 100 square metres)
- Heavily soiled with years of neglected buildup
- Significant oil staining that needs specialist treatment
- You have mobility issues or health conditions
- You value your weekend too much for this job
- Previous DIY attempts have failed
Professional cleaning costs £2-4 per square metre typically, so a standard 40 square metre driveway runs £80-160. That includes pressure washing, treating with chemicals, re-sanding, and sometimes sealing.
Is it worth it? Sometimes. I’ve seen clients spend £60 on equipment hire and products, work all weekend, and get mediocre results. For £100 more they could have had professional results in 3-4 hours. But I’ve also seen people save £150 by doing it themselves perfectly well.
Preventing Block Paving Getting Dirty Again
The best cleaning is the cleaning you don’t have to do. Here’s how to keep your driveway cleaner for longer:
Sweep weekly – Sounds boring but it works. A quick weekly sweep prevents dirt embedding and stops moss establishing.
Deal with oil immediately – Keep cat litter or sand handy for fresh oil spills. Cover them instantly before oil soaks in.
Trim overhanging vegetation – Trees and shrubs drop debris and create shade that encourages moss. Keep them trimmed back.
Fix oil leaks on vehicles – If your car drips oil, fix it. Otherwise you’re fighting a losing battle with stains.
Apply moss treatment annually – Preventative moss killer in early spring stops problems before they start.
Re-sand joints promptly – Missing sand lets weeds grow and allows water to wash more sand away. Keep joints filled.
Consider sealing – A good quality sealant makes everything easier and can pay for itself in reduced maintenance.
Improve drainage – Standing water accelerates moss and algae growth. Make sure driveways slope properly towards drains.
These preventative steps take minimal effort but make a massive difference. My own driveway gets a weekly sweep, quarterly scrub, and annual moss treatment. It looks great year-round and takes maybe 10 hours of maintenance total per year.
Maintaining your driveway properly also applies to other outdoor cleaning tasks – just like keeping your windows clean or maintaining window tracks, regular small efforts prevent major jobs down the line.
Pro Tips From 18 Years of Cleaning Driveways
Insider Tips
After cleaning hundreds of block paved driveways across the UK, here’s what I’ve learned:
- Weather timing is everything – Clean in spring or autumn when it’s mild and slightly damp. Summer heat dries cleaning solutions too fast. Winter cold makes chemicals less effective and you can’t re-sand frozen joints.
- Work in sections – Never try to clean an entire driveway in one go. Work in 3-4 square metre sections, completing each fully before moving on. This prevents solutions drying out and gives better results.
- The two-bucket technique – Use one bucket for cleaning solution and one for rinse water. Change rinse water frequently. This prevents spreading dirty water around.
- Invest in proper kiln-dried sand – Building sand goes hard in joints and lets weeds through. Kiln-dried sand costs £3-5 per bag and actually works. This isn’t the place to save £2.
- Test chemicals first – Different blocks react differently to cleaners. Always test bleach or chemicals on an inconspicuous area (behind the garage door, perhaps) before doing the whole driveway.
When Block Paving Needs Professional Help
Some situations genuinely need professional equipment and expertise:
Deep oil contamination – Oil that’s soaked deep into blocks over years needs industrial-strength cleaners and potentially steam cleaning. DIY methods just won’t shift it.
Extensive structural issues – If blocks are sinking, shifting, or the whole surface is uneven, cleaning won’t help. You need proper repairs first.
Severe moss infestation – If moss has grown so thick it’s lifted blocks or destroyed joints, professional treatment and possible re-laying may be needed.
Large commercial driveways – Anything over 100 square metres is a big job. Hiring a professional with proper equipment makes economic sense.
Failed previous attempts – If you’ve tried DIY cleaning and it’s made things worse (common with incorrect pressure washer use), professionals can often fix the damage whilst cleaning.
Professional driveway cleaning companies have access to better equipment, stronger chemicals, and crucially, the experience to know which methods work for which problems. Sometimes that expertise is worth paying for.
Cleaning a block paving driveway properly takes effort and time, but the results are absolutely worth it. Whether you choose the budget-friendly scrubbing method or invest in a pressure washer, regular maintenance keeps your driveway looking smart and prevents expensive repairs.
I’ve cleaned hundreds of these driveways in my 18 years as a professional cleaner. The ones that look best aren’t necessarily the newest or most expensive – they’re the ones where someone takes the time to sweep weekly, scrub quarterly, and treat moss before it takes hold. A bit of regular effort beats occasional intensive cleaning every time.
Related guides:
- Best Way to Clean Windows – Keep your home’s exterior sparkling
- How to Clean Window Tracks – Don’t forget the details
- How to Clean Stainless Steel – Maintain all surfaces properly
Frequently Asked Questions
What is the best way to clean block paving?
The best method is scrubbing with washing up liquid and water for light dirt, or a 50/50 bleach solution for moss and algae. Pressure washing works well but must be done at 45 degrees and under 2000 PSI to avoid damaging joints. Regular sweeping prevents buildup better than occasional intensive cleaning.
Can you pressure wash block paving?
Yes, but carefully. Use 1500-2000 PSI maximum pressure, hold the lance at 45 degrees, use a 25-degree nozzle, and keep moving constantly. Never use a zero-degree nozzle or get closer than 15cm to the surface. Always refill joints with kiln-dried sand after pressure washing.
How often should you clean block paving?
Sweep weekly, scrub with soapy water every 3 months, and deep clean annually. Driveways in shade or with overhanging trees need more frequent moss treatment. High-traffic areas benefit from quarterly deep cleans. Apply moss killer twice yearly in spring and autumn for best prevention.
How do you remove oil stains from block paving?
For fresh oil, cover immediately with cat litter, leave for hours, then scrub with washing up liquid. For old stains, use dedicated paving degreaser, leave for 20-30 minutes, scrub vigorously, and rinse. Deep oil stains may need 3-4 treatments and rarely come out completely.
Should you seal block paving after cleaning?
Sealing is optional but beneficial. It makes future cleaning easier, reduces moss growth, protects against stains, and enhances appearance for 3-5 years. Only seal completely dry paving (48+ hours after cleaning) and use quality sealant. Cheap sealants fail within a year.
How do you remove moss from block paving?
Spray affected areas with 50/50 bleach and water solution, leave for 10-15 minutes, scrub with stiff brush, and rinse thoroughly. For prevention, apply moss killer in spring and autumn. Improve light and air circulation by trimming overhanging plants.
What damage can pressure washing cause to block paving?
Incorrect pressure washing removes jointing sand, making blocks unstable. Excessive pressure etches or chips block surfaces. Direct downward spray forces water under blocks, causing base damage. Always use under 2000 PSI, hold at 45 degrees, and refill joints with kiln-dried sand after washing.
Can you use bleach on block paving?
Yes, diluted household bleach (50/50 with water) is excellent for removing moss, algae, and general dirt from block paving. Wear gloves, avoid getting it on plants, and rinse thoroughly after use. Never use with other cleaners and always add bleach to water, not water to bleach.
Why does block paving turn green?
Green discolouration is moss and algae growth caused by damp conditions, shade, and lack of air circulation. Spores settle on the porous surface and thrive in moisture. Prevention involves regular cleaning, improving drainage, trimming overhanging vegetation, and applying moss killer treatments.
How much does professional block paving cleaning cost UK?
Professional cleaning typically costs £2-4 per square metre in the UK. A standard 40 square metre driveway runs £80-160, including pressure washing, chemical treatment, and re-sanding. Sealing adds £60-150. Prices vary by region, with London and Southeast England generally 20-30% higher.
You May Also Like
How to Clean a Sink Drain: Complete Step-by-Step Guide
How to Deep Clean Your Kitchen: Complete Step-by-Step Guide