How to Clean Alloy Wheels with Household Products: 7 Proven Methods (2026)
You’ve just finished washing your car. The bodywork looks brilliant, but one glance at the wheels ruins everything. Those alloys are covered in stubborn brown brake dust and road grime that ordinary car shampoo won’t shift.
Commercial alloy wheel cleaners work, but they cost £8 to £20 per bottle. Use them regularly and you’ll spend over £100 a year just keeping your wheels clean. Most bottles only last a few washes, which makes the cost add up quickly.
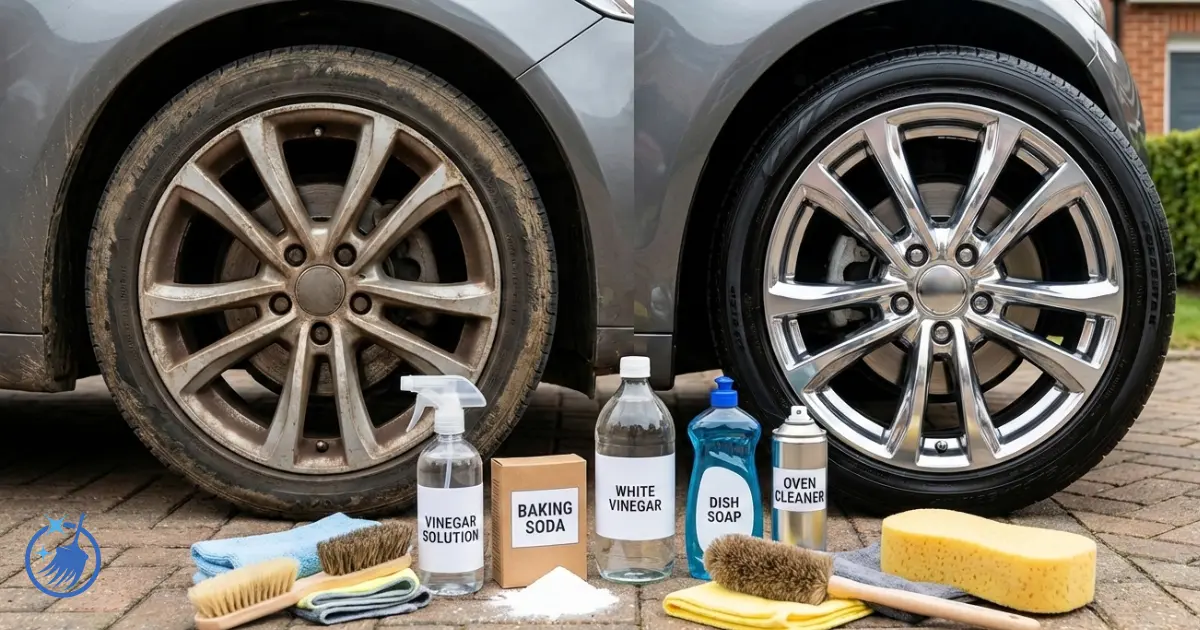
What most people don’t realise is that several household products clean alloy wheels just as effectively as expensive shop-bought formulas. White vinegar, baking soda, dish soap, and even oven cleaner can remove everything from light surface dirt to years of baked-on brake dust. The difference in cost is substantial. A homemade vinegar solution costs around 75p and does the same job as a £15 bottle of branded wheel cleaner.
The problem is knowing which household products actually work, how to use them without damaging your wheels, and what methods suit different types of dirt. Use the wrong product or technique and you could strip the protective coating from your alloys, leading to permanent corrosion.
This guide covers seven proven household methods for cleaning alloy wheels. Each method includes step-by-step instructions, safety precautions, and honest assessments of effectiveness. You’ll learn which products work best for light maintenance, which tackle stubborn brake dust, and when you might need something stronger.
Quick Summary
Time needed: 25-40 minutes
Difficulty: Easy to Moderate
You’ll need: White vinegar, baking soda, dish soap, soft brushes, microfibre cloths
Key takeaway: You can achieve professional-quality alloy wheel cleaning using common household products, saving £100+ annually whilst protecting your wheels from corrosive brake dust.
Understanding Alloy Wheels & Why They Need Special Care
Before you start cleaning, you need to understand what makes alloy wheels different from standard steel wheels. This knowledge helps you choose the right household products and avoid damaging your wheels.
What Makes Alloy Wheels Different
Alloy wheels are made from a mixture of aluminium or magnesium metals. This makes them much lighter than traditional steel wheels. The reduced weight improves fuel economy, braking performance, and steering response whilst reducing tyre wear.
The lighter weight comes with a trade-off. Alloy wheels are more delicate than steel ones. Most have a protective coating (clear lacquer, paint, powder coating, or anodising) that shields the metal from oxidation and corrosion. Damage this coating and you’ll see permanent corrosion that affects both appearance and structural integrity.
Different types of protective coatings require different cleaning approaches:
Clear coated alloys: The most common type. These have a transparent lacquer over polished or painted aluminium. They’re reasonably durable but can be damaged by harsh acids or abrasive scrubbing.
Painted alloys: Feature a colour coating similar to car bodywork. Generally robust but can chip from stone impacts.
Powder coated alloys: Have a baked-on finish that’s very durable. These handle household cleaners well but still need gentle treatment.
Polished alloys: Have exposed metal with minimal coating. These require the most careful cleaning as they oxidise quickly when the surface is damaged.
The Brake Dust Problem
Brake dust looks like harmless brown specks, but it’s one of the most corrosive substances your wheels encounter. Understanding what it contains explains why regular cleaning matters so much.
Brake dust is a mixture of three components:
Metal filings: When you brake, friction wears away the surface of brake pads. These pads contain metal compounds that create tiny metal particles.
Carbon fibres: Modern brake pads include carbon fibre materials for better performance. These fibres break down during braking and mix with the metal filings.
Adhesive residues: The compounds that bind brake pads together contain acidic chemicals. These residues are released during braking and are highly corrosive.
When you apply your brakes, this mixture is deposited onto your wheels at very high temperatures (brake discs can exceed 400°C during hard braking). The heat causes the brake dust to bond immediately with your wheel’s surface, whilst the acidic adhesive residues start eating into the protective coating.
The metal filings in brake dust oxidise over time. When they oxidise whilst stuck to your alloy rim, they cause galvanic corrosion. This is an electrochemical process where two different metals in contact cause accelerated corrosion. The result is permanent pitting and damage to your wheel surface.
Road salt during winter makes everything worse. Salt is highly corrosive on its own, and when combined with brake dust, it can cause serious etching in just two to three weeks. Once etching sets in, no amount of cleaning will remove it. You’ll need professional wheel refurbishment, which costs £50 to £100 per wheel.
When and How Often to Clean
Timing affects both cleaning effectiveness and wheel safety.
Temperature is critical: Never clean hot wheels. If you’ve just driven your car, the brake discs and wheels will be hot. Applying cold water or cleaning products to hot wheels can warp brake components and crack the wheel coating. Park in a shaded area and wait at least 30 minutes after driving before you start cleaning.
Recommended cleaning schedule:
Weekly: Quick rinse with plain water or mild soapy water. This removes road salt and prevents brake dust from bonding to the surface. Takes 5 minutes per car.
Every 2-3 weeks: Light clean using a household cleaner like diluted vinegar or dish soap solution. Removes accumulated brake dust before it becomes stubborn. Takes 15-20 minutes.
Monthly: Deep clean using the methods described in this guide. Tackles any stubborn buildup and restores shine. Takes 25-40 minutes.
Quarterly: Thorough cleaning followed by protective treatment (wax or sealant). Provides long-term protection against brake dust adhesion. Takes 45-60 minutes.
Adjust this schedule based on your driving conditions. If you drive in heavy traffic (more braking means more brake dust), live near the coast (salt air accelerates corrosion), or drive through winter with salted roads, increase your cleaning frequency to at least weekly.
Safety First: Important Precautions
Household cleaning products can be just as harsh as commercial cleaners when used incorrectly. Proper safety precautions protect both you and your wheels.
Essential Safety Equipment
Gather these items before you start any wheel cleaning:
Rubber or latex gloves: Essential for all cleaning methods. Household cleaners can irritate and dry out your skin. Thicker rubber gloves provide better protection than thin latex ones, especially when using acidic cleaners like vinegar or oven spray.
Safety goggles or glasses: Protect your eyes from splashes. This is particularly important when using spray bottles or working at ground level where cleaning solution can splash upwards. Regular prescription glasses provide some protection but safety goggles are better.
Long-sleeved shirt and old trousers: Some household cleaners can irritate skin on contact. Wear clothes you don’t mind getting dirty or stained. Oven cleaner in particular can bleach fabric.
Well-ventilated area: Always work outdoors if possible. If you must work in a garage, open all doors and windows. Oven cleaner fumes are toxic and should never be inhaled in enclosed spaces.
Bucket of clean water: Keep this nearby for emergency rinsing. If cleaning solution gets on your skin or in your eyes, immediate rinsing with clean water prevents irritation or injury.
Similar to how to clean brass at home, working with household cleaners requires respect for the chemicals involved, even when they’re common products.
What NOT to Use
Some household items will damage your alloy wheels permanently. Avoid these completely:
Steel wool or wire brushes: These scratch through the protective coating and expose bare metal. Even light scratches allow moisture in, leading to corrosion. Once scratched, your wheels will corrode in those areas regardless of how well you clean them afterwards.
Abrasive scouring pads: The rough green or brown scouring pads sold for kitchen cleaning are too harsh for alloy wheels. They’ll remove the shine and can scratch the coating. Only use soft sponges or microfibre cloths.
Undiluted acidic cleaners: Products like neat vinegar, lemon juice, or toilet cleaner are too acidic for direct application. They must be diluted. Undiluted acids will strip the protective coating, especially if left on for more than a minute or two.
Bleach or chlorine products: These can discolour alloy wheels and weaken the protective coating. Avoid any household cleaner that contains bleach.
Automatic car washes: Most automatic car washes use harsh acid-based chemicals and stiff rotating brushes. The chemicals can damage the coating, and the brushes leave swirl marks and scratches. Hand washing is always safer for alloy wheels.
Pressure washers above 100 bar: Whilst pressure washers can help rinse wheels, excessive pressure can force water past wheel seals and into bearing assemblies. If using a pressure washer, use a wide fan setting and keep the nozzle at least 30cm from the wheel surface.
Material-Specific Precautions
Different wheel finishes require different approaches:
Polished alloys: These have minimal protective coating and are the most vulnerable to damage. Avoid any acidic cleaners (including vinegar and lemon juice). Stick to pH-neutral dish soap solutions only.
Chrome-plated wheels: Despite looking like solid chrome, many wheels just have a thin chrome coating over aluminium. Acidic cleaners can damage the chrome layer. Use only mild soap solutions.
Matt or satin finish wheels: These have a special coating that creates the non-glossy appearance. Aggressive cleaning or polishing will make them shiny, ruining the finish. Use only gentle cleaners and never apply wax or polish.
Diamond-cut alloys: These have a machined face with a thin clear lacquer. The lacquer is very thin and easily damaged. Any corrosion usually means the wheel needs professional refurbishment. Use only the gentlest cleaning methods (dish soap solution).
If you’re unsure what type of finish your wheels have, check your vehicle’s handbook or contact the manufacturer. When in doubt, start with the mildest cleaning method (dish soap and water) and only move to stronger solutions if needed.
The 7 Best Household Products for Cleaning Alloy Wheels
Each of these methods uses common household items you likely already own. I’ve tested all seven approaches and included honest assessments of effectiveness, cost, and appropriate use cases.
Method 1: Dish Soap and Baking Soda (Safest Option)
This combination provides gentle but effective cleaning without risking damage to your wheel’s protective coating. It’s the best starting point for regular maintenance.
What you need:
- Washing-up liquid (any brand)
- Baking soda
- Two buckets
- Warm water
- Soft sponge
- Soft-bristled brush
- Microfibre cloth
How it works:
Dish soap is designed to cut through grease and grime on plates and pans. The same degreasing properties work on road grime and oil residue on your wheels. It’s pH-neutral, which means it won’t damage protective coatings even with regular use.
Baking soda (sodium bicarbonate) is a mild abrasive. The fine granules provide gentle scrubbing power that helps lift dirt without scratching the surface. Baking soda also has mild alkaline properties that help break down acidic brake dust residues.
Step-by-step instructions:
- Fill one bucket with warm water and add a good squirt of washing-up liquid (about 2 tablespoons per 5 litres). Fill the second bucket with clean water for rinsing your sponge.
- Rinse each wheel thoroughly with a hose to remove loose dirt and surface dust.
- Dip your sponge in the soapy water and wash each wheel, working from top to bottom. This removes most of the surface grime.
- Sprinkle baking soda directly onto a damp sponge (about a teaspoon’s worth).
- Gently scrub the wheel using circular motions. The baking soda provides extra cleaning power for stubborn spots.
- Use a soft-bristled brush dipped in the soapy water to reach between spokes and around lug nuts. An old toothbrush works perfectly for tight areas.
- Rinse your sponge frequently in the clean water bucket to avoid reapplying dirt to the wheel.
- Once you’ve scrubbed the entire wheel, rinse thoroughly with a hose until all soap and baking soda residue is gone.
- Dry immediately with a clean microfibre cloth to prevent water spots.
Best for: Light to moderate dirt, regular weekly or fortnightly maintenance, all wheel finishes including polished and chrome.
Pros:
- Safest method that won’t damage any wheel finish
- Very cheap (approximately 50p per cleaning session)
- No harsh fumes or safety concerns
- Readily available in every household
Cons:
- Less effective on heavily baked-on brake dust
- Requires more scrubbing effort than acidic cleaners
- May need multiple applications for neglected wheels
Estimated cost: £0.50 per cleaning session
This method mirrors the gentle approach used in guides like how to clean stainless steel, where mild abrasives work without causing damage.
Method 2: White Vinegar Solution (Most Popular)
White vinegar is the most commonly recommended household product for cleaning alloy wheels. Its mild acidity breaks down brake dust effectively whilst remaining safer than commercial acid-based cleaners.
What you need:
- White vinegar (distilled is best)
- Warm water
- Spray bottle
- Soft sponge or microfibre cloth
- Soft brush
- Hose
How it works:
White vinegar contains acetic acid at about 5-7% concentration. This mild acid reacts with the alkaline and metallic components in brake dust, breaking the bonds that make it stick to your wheels. The acid also cuts through grease and dissolves mineral deposits from road spray.
The key advantage over stronger acids is that diluted vinegar is gentle enough for regular use without stripping protective coatings, provided you rinse thoroughly afterwards.
Step-by-step instructions:
- Mix equal parts white vinegar and warm water in a spray bottle. For example, 250ml vinegar to 250ml water creates 500ml of cleaning solution.
- Ensure your wheels are completely cool. Rinse with a hose to remove loose surface dirt.
- Spray the vinegar solution generously over the entire wheel surface, ensuring good coverage on areas with visible brake dust.
- Allow the solution to sit for 3-5 minutes. You may see the brake dust beginning to dissolve and run off. Don’t let it sit longer than 5 minutes, especially on damaged or chipped wheels.
- Use a soft sponge or brush to agitate stubborn areas. Work in circular motions, paying extra attention to the areas between spokes and around the wheel rim.
- For hard-to-reach areas like the barrel (the inner part of the wheel), use a dedicated wheel brush or bottle brush that can reach into tight spaces.
- Rinse thoroughly with plenty of water from your hose. It’s essential to remove all vinegar residue, as any remaining acid will continue acting on the wheel surface.
- Dry completely with a microfibre cloth.
Best for: Regular maintenance cleaning, moderate brake dust buildup, most wheel finishes except polished aluminium or damaged wheels with exposed metal.
Pros:
- Very effective at dissolving brake dust
- Inexpensive (approximately 75p per cleaning session)
- Readily available and safe to store
- No harsh fumes like oven cleaner
- Works well on grease and oil residue
Cons:
- Must be thoroughly rinsed to prevent damage
- Not suitable for polished alloys without protective coating
- Can damage wheels if left on too long
- Smell can be unpleasant during application
Estimated cost: £0.75 per cleaning session
Variation for stubborn dirt:
If you have particularly stubborn brake dust, you can increase the vinegar concentration slightly to a 60/40 mix (60% vinegar, 40% water), but reduce the dwell time to just 2-3 minutes and ensure extra thorough rinsing.
Method 3: Lemon Juice and Baking Soda (Natural Alternative)
This combination uses natural acids and mild abrasives for effective cleaning with a more pleasant scent than vinegar. It’s particularly good for removing stubborn stains whilst adding shine.
What you need:
- Fresh lemon juice or bottled lemon juice
- Baking soda
- Warm water
- Spray bottle
- Microfibre cloth or soft sponge
- Soft brush
- Hose
How it works:
Lemon juice contains citric acid at approximately 5-6% concentration, making it similarly acidic to white vinegar. The citric acid breaks down brake dust and cuts through grease. Lemon juice also contains natural oils that can add shine to your wheels.
Adding baking soda creates a chemical reaction (fizzing) that helps lift dirt. The baking soda also raises the pH level slightly, making the solution less acidic and therefore safer for your wheels. Additionally, the fine granules of baking soda provide gentle mechanical cleaning action.
Step-by-step instructions:
- In a spray bottle, mix equal parts lemon juice and warm water. For example, 200ml lemon juice to 200ml water.
- Rinse your wheels with a hose to remove loose dirt.
- Spray the lemon juice solution over the wheel surface, covering all areas with brake dust or grime.
- Immediately sprinkle baking soda over the wet surface (about 2-3 tablespoons per wheel). You’ll see it fizz and foam. This reaction helps lift dirt from the surface.
- Let the mixture sit for 3-5 minutes while it works. The combination of acid and alkaline creates a cleaning action that breaks down stubborn residues.
- Use a damp microfibre cloth or soft sponge to scrub the wheel in circular motions. For areas with heavy buildup, use a soft-bristled brush.
- Pay special attention to the crevices between spokes and around lug nuts, using an old toothbrush if necessary.
- Rinse extremely thoroughly with a hose. Make sure all traces of lemon juice and baking soda are removed.
- Dry with a clean microfibre cloth.
- Optional: For extra shine, you can apply a second light mist of diluted lemon juice (10% lemon, 90% water), let it sit for 2 minutes, then rinse and dry.
Best for: Stubborn stains, wheels that need both cleaning and shine restoration, users who prefer natural products, moderate to heavy brake dust.
Pros:
- Very effective on stubborn deposits
- Pleasant citrus scent (much nicer than vinegar)
- Natural ingredients
- Adds shine to wheels
- The fizzing action helps lift embedded dirt
Cons:
- More expensive than vinegar (fresh lemons cost £1-2, bottled juice around £1.50)
- Can damage wheels if not rinsed thoroughly
- Not suitable for polished alloys without coating
- Sticky if not rinsed completely
Estimated cost: £1.50-£2.00 per cleaning session (using bottled lemon juice)
This method shares similarities with how to clean brass at home, where the combination of citric acid and baking soda effectively removes tarnish and grime from metal surfaces.
Method 4: Oven Cleaner (Heavy-Duty Option)
Oven cleaner is surprisingly effective at removing baked-on brake dust, but it requires careful use. This is the strongest household option and should be reserved for heavily soiled wheels.
What you need:
- Oven cleaner spray (standard household type, around £3-4)
- Rubber gloves (thick ones)
- Safety goggles
- Old clothes
- Nylon brush (never use metal)
- Hose or pressure washer
How it works:
Oven cleaner contains strong alkaline compounds (usually sodium hydroxide or potassium hydroxide) at concentrations high enough to dissolve baked-on grease and carbonised food residue. These same compounds are excellent at breaking down the mixture of metal filings, carbon fibres, and adhesive residues that make up brake dust.
The alkaline formula is particularly effective because it doesn’t rely on acid to work, making it less likely to damage metal surfaces when used correctly. However, the high pH means it can still damage protective coatings if left on too long.
Step-by-step instructions:
- Work outdoors or in a very well-ventilated area. Oven cleaner fumes are toxic and should not be inhaled.
- Put on thick rubber gloves and safety goggles before handling the oven cleaner. Wear old clothes that you don’t mind damaging.
- Ensure wheels are completely cool and rinse them thoroughly with a hose.
- Shake the oven cleaner can well. Spray a generous, even coating over the wheel surface, avoiding contact with tyres, painted bodywork, and brake components where possible.
- Leave for 2-5 minutes only. Check the product instructions, but never exceed 5 minutes. For wheels with intact protective coatings, 2-3 minutes is usually sufficient.
- You’ll see the brake dust beginning to dissolve and run off the wheel. The cleaner may change colour (often turning brown or purple) as it reacts with the brake dust.
- Use a soft nylon brush to gently agitate any stubborn areas. Don’t scrub hard, the chemical action does most of the work.
- Rinse extremely thoroughly with a hose or pressure washer. Use plenty of water to ensure all oven cleaner residue is completely removed.
- If brake dust remains, you can apply a second coat, but reduce the dwell time to 2 minutes maximum.
- Dry thoroughly with microfibre cloths.
Best for: Heavily soiled wheels with years of baked-on brake dust, wheels that haven’t been cleaned properly in months or years, clear-coated alloys (not polished or damaged wheels).
Pros:
- Extremely effective on stubborn, baked-on brake dust
- Requires minimal scrubbing effort
- Readily available in supermarkets
- Works quickly
- One can does multiple wheels
Cons:
- Harsh chemical with toxic fumes
- Can damage wheels if left on too long or used on damaged coatings
- Can irritate or burn skin
- May damage tyres if overspray occurs
- Unpleasant smell
- Environmental concerns
Estimated cost: £3-4 per can (sufficient for 5-6 cleaning sessions)
Real-world effectiveness:
The Instructables guide “Cleaning Alloy Wheels With Oven Cleaner” demonstrates this method on a 1985 Toyota with nearly 30 years of accumulated brake dust. The results showed that oven cleaner removed all the brake dust “straight off without a problem” where soap, water, and even pressure washers had failed.
However, the same guide emphasises checking for wheel damage first. Areas where the clear coat had been damaged by wheel weights, stone chips, or kerb contact still showed marks after cleaning because the oven cleaner couldn’t reverse permanent corrosion in those spots.
Safety reminder:
Oven cleaner is caustic and can cause chemical burns. If any gets on your skin, rinse immediately with plenty of water. If it gets in your eyes, rinse for at least 15 minutes and seek medical attention. Keep pets and children away from the area whilst working.
Method 5: Coca-Cola (Rust and Lug Nut Cleaner)
Coca-Cola isn’t just for drinking. Its phosphoric acid content makes it effective for specific wheel cleaning tasks, particularly rust removal on lug nuts and bolts.
What you need:
- Coca-Cola (regular, not diet)
- Spray bottle
- Old toothbrush or small brush
- Washing-up liquid
- White vinegar
- Warm water
- Microfibre cloth
How it works:
Coca-Cola contains phosphoric acid (about 0.05% concentration), which, combined with carbonation, can dissolve rust and tarnish on metal surfaces. The acid reacts with iron oxide (rust) to create a soluble compound that washes away easily.
Whilst too weak for heavy-duty wheel cleaning, Coke is perfect for cleaning rusty lug nuts, removing light surface rust, and tackling small corroded areas.
Step-by-step instructions:
- Pour Coca-Cola into a spray bottle for easy application.
- For rusty lug nuts and bolts, spray Coke directly onto the affected areas, ensuring good coverage.
- Let it sit for 5-10 minutes. The phosphoric acid needs time to react with the rust.
- Use an old toothbrush or small wire brush to scrub the lug nuts. The rust should come away easily with light scrubbing.
- For wheels with light surface dirt, you can spray Coke over the entire wheel and let it sit for 3-5 minutes before scrubbing with a soft brush.
- Mix washing-up liquid and white vinegar with water in your rinse bucket (1 tablespoon soap, 100ml vinegar, to 2 litres water).
- Use this solution to rinse away the Coke. This removes the sticky sugar residue that Coke leaves behind.
- Rinse thoroughly with clean water from a hose.
- Dry completely with microfibre cloths.
Best for: Removing rust from lug nuts and bolts, light cleaning when you don’t have other products available, novelty cleaning for those curious to try it.
Pros:
- Safe for all wheel types
- Non-toxic and readily available
- Effective on rust removal
- Interesting conversation starter
Cons:
- Less effective than other methods for brake dust
- Leaves sticky residue if not rinsed properly
- More expensive per cleaning than vinegar or soap
- Wastes a perfectly good drink
- Not practical for regular use
Estimated cost: £1-2 per cleaning session
Practical limitations:
Whilst Coca-Cola does work for rust removal, it’s not practical for regular alloy wheel cleaning. The sugar content makes wheels sticky if not rinsed thoroughly, and the cleaning power is too mild for typical brake dust buildup. Think of it as a specialist tool for rust rather than an everyday cleaner.
Method 6: WD-40 (Quick Maintenance)
WD-40 is primarily a lubricant and water displacement product, but it has useful applications for light wheel maintenance between deep cleans.
What you need:
- WD-40 spray
- Soft cloths or microfibre towels
- Warm water
- Washing-up liquid
- Soft brush
How it works:
WD-40 (Water Displacement, 40th formula) contains petroleum-based hydrocarbons and mineral oil. These ingredients can dissolve grease, displace moisture, and help remove light surface grime. The product penetrates into small crevices and helps loosen dirt.
However, WD-40 is not formulated as a cleaner and shouldn’t be considered a replacement for proper wheel cleaning. Its main benefit is as a quick maintenance spray between thorough cleans.
Step-by-step instructions:
- Rinse wheels with warm water to remove loose dirt.
- Spray WD-40 onto a microfibre cloth (not directly onto the wheel). This gives you better control and prevents overspray onto brake components.
- Wipe the cloth over the wheel surface, working in sections. The WD-40 will help dissolve light grease and road film.
- Use a clean section of cloth to buff the surface.
- For any stubborn spots, spray WD-40 directly onto those areas, let sit for 1-2 minutes, then wipe clean.
- After using WD-40, wash the wheels with soapy water to remove the oily residue. This is important because WD-40 attracts dust and dirt if left on the surface.
- Rinse thoroughly and dry with clean cloths.
Best for: Quick touch-ups between proper cleans, water displacement after washing, loosening stubborn tar spots, protecting against moisture.
Pros:
- Multi-purpose product (useful for many car maintenance tasks)
- Helps prevent rust by displacing moisture
- Good for removing tar and adhesive residues
- Quick and convenient
Cons:
- Not a true wheel cleaner
- Oily residue attracts dust if not washed off
- Ineffective against brake dust
- Can damage brakes if overspray reaches brake pads
- More expensive than dedicated cleaning solutions
- Can degrade rubber over time if it contacts tyres
Estimated cost: £4-6 per can (multi-use product)
Appropriate use cases:
WD-40 works well for:
- Removing tar spots that soap and water won’t shift
- Quick wipe-down before a car show when you don’t have time for proper cleaning
- Displacing water from wheels after washing in winter
- Protecting lug nuts from rust
It doesn’t work well for:
- Removing brake dust (you need acids or strong alkalines)
- Deep cleaning
- Regular maintenance (too expensive and not effective enough)
Similar to how how to clean silver requires specific products for tarnish removal, alloy wheels need proper cleaners for brake dust. WD-40 is a supplement, not a substitute.
Method 7: Toilet Bowl Cleaner (For Experienced Users Only)
This method uses toilet bowl cleaner containing hydrochloric acid. It’s extremely effective but also extremely risky. Only attempt this if you’re experienced with wheel cleaning and understand the dangers.
What you need:
- Toilet bowl cleaner containing hydrochloric acid (check the label)
- Baking soda
- Water
- Spray bottle
- Glass or ceramic bowl (never metal)
- Thick rubber gloves
- Safety goggles
- Face mask
- Old toothbrush or small brush
- Hose or pressure washer
How it works:
Hydrochloric acid (HCl) is one of the strongest acids available in household products. At concentrations around 9-10% (typical in toilet cleaners), it aggressively dissolves metal oxides, mineral deposits, and brake dust. Commercial acid-based wheel cleaners use similar chemistry but at safer concentrations.
The danger is that HCl will also attack the protective coating on your wheels and the aluminium itself if given the chance. This method requires precise timing and immediate neutralisation.
Step-by-step instructions:
- Prepare your acid neutraliser first. Fill a spray bottle with water and add 3-4 tablespoons of baking soda. Shake well until dissolved. Keep this within arm’s reach throughout the process.
- Put on thick rubber gloves, safety goggles, and a face mask. Ensure you’re working outdoors with good ventilation.
- Rinse wheels thoroughly with water.
- Pour a small amount of toilet bowl cleaner into a glass or ceramic bowl. Never use a metal container as the acid will react with it.
- Dip your brush into the cleaner and quickly scrub a small section of the wheel (about 10cm x 10cm area). Work fast.
- Do not let the cleaner sit on the wheel for more than 10-15 seconds.
- Immediately spray your baking soda solution over the area you just cleaned. The solution will fizz as it neutralises the acid.
- Rinse thoroughly with plenty of water.
- Repeat for the next small section, working around the wheel in small areas. Never apply cleaner to the entire wheel at once.
- After completing the wheel, rinse the entire surface multiple times to ensure all acid is removed.
- Wash with soapy water for a final rinse.
- Dry thoroughly.
Best for: Extremely stubborn brake dust on clear-coated wheels that hasn’t responded to any other method. This is a last resort before professional refurbishment.
Pros:
- Extremely effective on the most stubborn deposits
- Removes stains that nothing else will touch
- Cheap (toilet cleaner costs £1-2)
Cons:
- Dangerous to use (can cause chemical burns)
- Will damage wheels if timing is wrong
- Can permanently etch aluminium
- Toxic fumes
- Requires experience and confidence
- Easy to make mistakes that ruin wheels
- Can damage surrounding paintwork, concrete driveways, and vegetation
Estimated cost: £1-2
When to absolutely avoid this method:
- If you’ve never cleaned alloy wheels before
- If your wheels have any chips, cracks, or damage to the coating
- If your wheels are polished aluminium without clear coat
- If you’re working near painted surfaces, plants, or pets
- If you’re uncomfortable handling dangerous chemicals
- If you can’t work outdoors
- If the wheels are not badly enough soiled to justify the risk
Safer alternatives:
Before attempting this method, try:
- Multiple applications of vinegar solution with longer dwell times
- Oven cleaner (Method 4)
- Commercial acid-based wheel cleaners at proper concentrations
- Professional mobile wheel cleaning services (often £20-30 per car)
Much like how to clean heavily corroded brass sometimes requires professional intervention, severely damaged alloy wheels may need specialist treatment rather than DIY solutions.
Complete Step-by-Step Cleaning Process
Now that you know which household products work and how they function, let’s walk through the complete wheel cleaning process. This universal method works with any of the cleaning solutions above.
Gather Your Supplies
Before you begin, collect everything you’ll need. Having all items ready prevents interruptions once you start cleaning.
Essential items:
- Two buckets (one for cleaning solution, one for rinse water)
- Garden hose with adjustable nozzle (or pressure washer)
- Your chosen household cleaner
- Washing-up liquid
- Warm water
- Soft sponges (at least 2-3)
- Soft-bristled wheel brush
- Old toothbrush for tight spaces
- Microfibre cloths (at least 4-6 for drying)
- Rubber gloves
- Safety goggles (for acidic or alkaline cleaners)
Optional but helpful:
- Wheel woolies or spoke brushes for hard-to-reach areas
- Spray bottles for applying diluted cleaners
- Plastic sheeting to protect driveway from acid drips
- Small step ladder for better access to wheel tops
- Second person to help (makes the job quicker)
Pre-Cleaning Preparation
Proper preparation makes cleaning faster and more effective whilst preventing damage.
Step 1: Check wheel temperature
Touch the wheel centre and brake disc area. If they feel warm at all, wait longer. Hot wheels will cause cleaning products to evaporate before they work properly, and thermal shock from cold water can crack protective coatings.
On a warm day, wait at least 30-40 minutes after driving. On cold days, 20-30 minutes is usually sufficient. If you’ve been doing motorway driving or heavy braking, allow up to an hour.
Step 2: Position your car correctly
Park in a shaded area if possible. Direct sunlight causes cleaning products to dry too quickly, leaving streaks and reducing effectiveness. A shaded driveway or garage entrance is ideal.
Ensure you have easy access to all four wheels. You’ll be kneeling or crouching frequently, so a flat, comfortable surface helps. If your driveway slopes, park so you’re working on the uphill side where possible.
Step 3: Protect surrounding areas
If using acidic or alkaline cleaners (vinegar, oven cleaner, toilet cleaner), protect your driveway. Some acids can etch concrete or stain paving. Lay down plastic sheeting or old towels to catch drips.
Make sure pets and children are indoors. Many household cleaners are toxic if ingested, and the cleaning process involves water, which children might want to play in.
Step 4: Initial rinse
Thoroughly rinse all four wheels with your hose to remove loose dirt, dust, and surface grime. This step is more important than most people realise.
Rinsing first prevents you from scrubbing abrasive dirt particles across the wheel surface, which causes fine scratches. It also removes the top layer of grime, allowing your cleaning solution to work more effectively on the stubborn brake dust underneath.
Use a strong spray setting and ensure you rinse:
- The wheel face and spokes
- Around and behind the spokes
- The wheel barrel (inner rim area)
- Around lug nuts and the centre cap
- The junction between wheel and tyre
The Cleaning Process
This section describes the universal cleaning method. Adjust timing and techniques based on which household product you’re using from Methods 1-7 above.
Step 1: Apply your chosen cleaner
Working on one wheel at a time gives better results than trying to clean all four simultaneously. The cleaner stays wet longer and you can focus attention on stubborn areas.
For spray applications (vinegar solution, lemon juice solution):
- Spray the entire wheel surface generously
- Ensure good coverage in recessed areas and between spokes
- Don’t forget the wheel barrel and the inner rim edge
For paste applications (baking soda and soap):
- Apply with a damp sponge, spreading evenly
- Work in sections for better control
For foam applications (oven cleaner):
- Apply a consistent coating across the wheel
- Avoid getting product on tyres or bodywork
- Step back regularly to breathe fresh air
Step 2: Observe the dwell time
Dwell time (how long the cleaner sits on the surface) is crucial for effectiveness. Different products require different times:
- Dish soap and baking soda: Can sit indefinitely whilst you work on other wheels
- Vinegar solution: 3-5 minutes maximum
- Lemon juice and baking soda: 3-5 minutes
- Oven cleaner: 2-5 minutes maximum (follow product instructions)
- WD-40: 1-2 minutes for stubborn spots
- Toilet cleaner: 10-15 seconds only (immediate section-by-section work)
Watch for visual changes. Many cleaners cause brake dust to dissolve and run off the wheel. Vinegar and oven cleaner often cause discolouration as they react with brake dust. This is normal and indicates the product is working.
Step 3: Scrubbing technique
After the dwell time, it’s time to scrub. The cleaner has broken down most of the grime, so you shouldn’t need excessive force.
Use circular motions with your sponge or brush. Small, overlapping circles work better than long strokes. Apply firm but gentle pressure. If you’re having to scrub really hard, the cleaner needs more dwell time or you need a stronger solution.
Work systematically:
- Start with the wheel face (the visible flat part)
- Clean each spoke individually, both sides
- Work around the outside rim edge
- Clean the centre cap and lug nut areas
- Finally, tackle the wheel barrel (the inner part)
For the barrel, use a dedicated wheel brush or a bottle brush. The barrel accumulates the most brake dust because it’s closest to the brake caliper. Insert the brush and work around the entire circumference.
Use an old toothbrush for:
- Crevices between spokes
- Around lug nuts (clean each nut individually)
- Textured areas on spoke designs
- The junction between wheel and tyre
- Valve stem area
- Any embossed lettering or badges
Step 4: Two-bucket method for rinsing tools
Keep two buckets beside you whilst working:
Bucket 1: Contains your cleaning solution (soapy water or diluted cleaner) Bucket 2: Contains clean rinse water
After scrubbing a section, dip your brush or sponge in the rinse bucket first to remove dirt and grime. Then dip into the cleaning solution bucket for fresh cleaner. This prevents you from constantly reintroducing dirt to the wheel surface.
Replace the rinse water if it becomes very dirty (usually after 2-3 wheels).
Step 5: Tackle stubborn areas
If some brake dust or stains remain after your first scrubbing pass:
- Apply more cleaning solution directly to those spots
- Allow extra dwell time (another 2-3 minutes)
- Scrub again with a brush
- For really stubborn spots, you may need a stronger cleaning method
Don’t be tempted to scrub harder with abrasive materials. Patience and repeated applications of the right cleaner work better than aggressive scrubbing.
Step 6: Thorough rinsing
Rinsing is arguably the most important step. Inadequate rinsing leaves chemical residues that will damage your wheels over time.
Use your hose with a strong spray setting. Rinse for at least 30-60 seconds per wheel, ensuring you:
- Rinse the entire wheel face
- Flush between all spokes
- Rinse the wheel barrel thoroughly
- Spray around lug nuts and caps
- Rinse the junction with the tyre
The water should run completely clear. If you still see soap suds, foam, or discoloured water, keep rinsing.
For acidic or alkaline cleaners (vinegar, oven cleaner, toilet cleaner), double your rinsing time. These products must be completely removed. Consider doing a final rinse with soapy water followed by another clear water rinse for extra assurance.
If using a pressure washer:
- Use a wide fan setting (25-40 degrees)
- Keep the nozzle at least 30cm from the wheel
- Never use a pinpoint jet directly on wheels
- Don’t spray directly at wheel bearings or the centre hub seal
Step 7: Immediate drying
Don’t let wheels air-dry. Water spots form quickly, especially in hard water areas, and they’re difficult to remove once they dry.
Use clean, dry microfibre cloths. Microfibre is essential because:
- It’s highly absorbent (holds 7 times its weight in water)
- It won’t scratch the wheel surface
- It buffs to a shine as you dry
Dry in sections, working from top to bottom:
- Dry the wheel face completely
- Dry each spoke individually
- Get between spokes and in crevices
- Dry around lug nuts
- Dry the outer rim edge
- Wipe the exposed part of the wheel barrel
Use a separate cloth for each wheel if possible. If using the same cloths, shake them out between wheels to remove absorbed dirt and moisture.
For hard-to-reach areas, twist the corner of a microfibre cloth and push it into crevices to absorb water.
Step 8: Final inspection
Before moving to the next wheel, do a quick inspection:
- Check for missed spots or remaining brake dust
- Look for water drops in crevices
- Ensure no cleaner residue remains
- Check that lug nuts and centre cap are clean
- Verify the wheel looks uniform with no streaks
If you spot any problems, address them now before the wheel fully dries.
Step 9: Repeat for remaining wheels
Work through each wheel using the same process. Don’t rush. Taking an extra 5 minutes per wheel to do the job properly saves hours of corrective work later.
You’ll often find that wheels get progressively faster to clean as you develop a rhythm and technique.
Special Technique: Working Smarter
Clean one wheel completely before starting the next rather than applying cleaner to all four wheels at once. This approach:
- Prevents cleaners from drying on wheels whilst you work on others
- Lets you adjust technique based on what you learn from the first wheel
- Reduces the risk of forgetting how long cleaner has been sitting
- Makes the job less overwhelming
Time-saving approach for regular maintenance:
If you clean weekly using mild methods (dish soap), you can work more efficiently:
- Spray all four wheels with soapy water
- Go back and scrub the first wheel
- Rinse the first wheel whilst the soap continues working on wheels 2-4
- Proceed to wheel 2, and so on
This only works with non-acidic, non-alkaline cleaners that can safely sit on wheels for 10-15 minutes.
Post-Cleaning Protection
Clean wheels won’t stay clean for long without protection. A protective layer makes your next cleaning session much easier and faster.
Why Protection Matters
Bare alloy wheels attract brake dust like a magnet. The rough, porous surface of the protective coating provides plenty of areas for brake dust particles to lodge. Once lodged, the acidic adhesives in brake dust bond to the surface.
A protective sealant or wax fills these microscopic pores, creating a smooth, non-stick surface. Brake dust sits on top of this barrier rather than bonding to the wheel itself. This means:
- Brake dust washes off more easily during cleaning
- Less aggressive cleaning products are needed
- Your wheels stay cleaner for longer between washes
- The protective coating on your wheels lasts longer
DIY Protection Methods
Unfortunately, there aren’t really effective household alternatives to proper wheel sealants. However, you can use car wax as a reasonable substitute.
Using car wax on wheels:
If you have car wax (paste or liquid), you can apply it to your wheels for basic protection.
- Ensure wheels are completely clean and dry
- Apply a small amount of wax to an applicator pad
- Work the wax over the wheel surface in small circular motions
- Cover the entire wheel face and spokes
- Let the wax haze (usually 5-10 minutes)
- Buff with a clean microfibre cloth until the wheel shines
- Repeat every 4-6 weeks
Limitations of car wax on wheels:
Car wax isn’t formulated for the high temperatures that wheels experience. It may:
- Break down faster than proper wheel sealant
- Provide less protection against brake dust
- Require more frequent reapplication
However, some protection is better than none, and car wax is something many people already own.
Natural protection:
Some claim that a thin coating of baby oil or olive oil can provide protection. Whilst these will create a temporary barrier, they:
- Attract dirt and dust
- Break down quickly when exposed to heat
- Can sling onto bodywork when driving
- Provide minimal actual protection
I don’t recommend oil-based DIY protectants. If you’re going the household route, stick with car wax.
When to Consider Commercial Products
For wheel protection specifically, commercial products are worth the investment. A bottle of dedicated wheel sealant costs £10-15 but lasts for 10-15 applications and provides:
Better protection: Formulated to withstand brake heat and harsh conditions Longer lasting: Typically lasts 2-3 months vs. 3-4 weeks for car wax Easier cleaning: Makes brake dust removal significantly easier Better value: When you factor in time savings, commercial sealants pay for themselves
Types of commercial wheel protectants:
Spray sealants: Quick and easy to apply. Spray on, wipe in, buff off. Last 2-3 months.
Wax sealants: Paste or liquid applied with a pad. Take longer to apply but last 3-4 months.
Ceramic coatings: Professional-grade protection lasting 6-12 months. More expensive (£20-40) but offer the best protection.
Application Tips for Any Protectant
Regardless of which product you use:
- Only apply to completely clean, dry wheels
- Work in shade or indoors (heat causes products to dry too quickly)
- Apply thin, even coats (more isn’t better)
- Follow cure times (typically 20-30 minutes)
- Buff thoroughly for best shine
- Reapply according to product schedule
Similar to how how to clean a stainless steel sink benefits from protective treatments after cleaning, alloy wheels perform best when cleaned and protected regularly.
Troubleshooting Common Problems
Even with the right products and techniques, you’ll occasionally encounter stubborn problems. Here’s how to address them.
Stubborn Brake Dust That Won't Budge
Problem: You’ve applied cleaner, scrubbed thoroughly, and rinsed, but brake dust remains stuck to the wheel.
Solutions:
Multiple application technique:
- Apply your cleaner a second time
- Let it sit for the maximum safe dwell time
- Cover the wheel with a damp cloth to prevent drying
- After dwell time, scrub again before rinsing
- Repeat up to three times if necessary
Progressive strength approach:
If a mild cleaner isn’t working, move up the strength ladder:
- Start with dish soap and baking soda (Method 1)
- If ineffective, try vinegar solution (Method 2)
- If still stubborn, use lemon juice and baking soda (Method 3)
- As a last resort, use oven cleaner (Method 4)
Don’t jump straight to the strongest method. Give milder approaches a fair chance with proper dwell time and technique.
Check your technique:
Sometimes the problem isn’t the cleaner, it’s the application:
- Are you letting the cleaner sit long enough?
- Is the cleaner drying before you scrub?
- Are you using a brush in tight areas or just a sponge?
- Is your water too cold? (Warm water helps cleaners work better)
Baked-On Brake Dust Removal
Problem: Brake dust has been on the wheels for months or years and has etched into the protective coating.
This is the most challenging situation because the brake dust has chemically bonded with or actually damaged the coating.
Soaking technique:
- Apply your strongest safe cleaner (usually vinegar or oven spray)
- Cover the wheel with plastic wrap to prevent evaporation
- Let it sit for 10-15 minutes (monitor carefully)
- Remove plastic and scrub immediately
- Rinse thoroughly
- Assess results and repeat if necessary
Clay bar treatment:
If household cleaners won’t remove embedded brake dust, try an automotive clay bar:
- Clean the wheel normally first
- Use clay bar lubricant (or soapy water)
- Glide the clay bar over the surface
- The clay pulls embedded contaminants from the coating
- Wipe clean and inspect
Clay bars cost £10-15 but are reusable and highly effective.
When it’s not brake dust:
Sometimes what looks like stubborn brake dust is actually corrosion under the coating. If you see:
- Bubbling or flaking of the clear coat
- White or grey discolouration that won’t scrub off
- Rough, pitted texture
These indicate coating failure and corrosion. No amount of cleaning will fix this. You’ll need professional wheel refurbishment.
Water Spots and Streaks
Problem: After cleaning and drying, you see white spots or streaks on the wheels.
Causes and solutions:
Hard water deposits:
If your tap water is hard (high mineral content), minerals get left behind when water evaporates.
Solution:
- Dry wheels immediately after rinsing (don’t let them air-dry)
- Use distilled water for final rinse if hard water is severe
- Apply a vinegar solution (50/50) to dissolve deposits, then rinse and dry
Cleaner residue:
Incomplete rinsing leaves soap or cleaner residue that dries to white streaks.
Solution:
- Rinse for longer (minimum 30 seconds per wheel)
- Use stronger water pressure
- Follow cleaner rinse with plain water rinse
- Wipe with a damp microfibre cloth if streaks appear
Wax or sealant hazing:
If you’ve applied protection incorrectly, it can haze or streak.
Solution:
- Use a clean microfibre cloth to buff the area
- If that doesn’t work, apply more product and buff immediately
- For severe hazing, wash the wheel again and reapply protection
When Household Products Aren't Enough
Signs you need professional help:
- The protective coating is bubbling, flaking, or peeling
- You see deep pitting or corrosion
- The wheels have significant kerb damage
- Cleaning makes no visible difference
- The metal underneath shows through
Options for severe cases:
Mobile wheel cleaning services: £20-40 for all four wheels. They use professional-grade equipment and chemicals.
Wheel refurbishment: £50-100 per wheel. Strips the old coating, repairs damage, and applies fresh coating.
Replacement: For severely damaged wheels, sometimes replacement is more cost-effective than refurbishment.
Cost Comparison: Household vs Commercial
Let’s look at the real costs of cleaning your alloy wheels over a year.
Annual Cost Breakdown
Using household products:
Assuming you deep clean monthly and do light cleaning weekly:
| Product | Cost per clean | Annual cost (12 deep cleans) |
|---|---|---|
| Dish soap & baking soda | £0.50 | £6.00 |
| White vinegar solution | £0.75 | £9.00 |
| Lemon juice & baking soda | £1.50 | £18.00 |
| Oven cleaner | £0.60 | £7.20 |
Average household cost: £10-15 per year for regular maintenance
Using commercial wheel cleaners:
A typical commercial wheel cleaner costs £12-15 per bottle and provides approximately 8-10 applications.
For monthly deep cleaning: 12 cleans ÷ 9 per bottle = 1.3 bottles Annual cost: 1.3 × £13.50 = £17.55 per year
For bi-weekly cleaning: 26 cleans ÷ 9 per bottle = 2.9 bottles Annual cost: 2.9 × £13.50 = £39.15 per year
Total Savings
Conservative estimate (monthly cleaning): Commercial products: £17.55 Household products: £10.00 Annual saving: £7.55
Regular maintenance (bi-weekly cleaning): Commercial products: £39.15 Household products: £15.00 Annual saving: £24.15
Enthusiast level (weekly cleaning): Commercial products: £78.30 Household products: £25.00 Annual saving: £53.30
Value Beyond Money
Cost savings aren’t the only benefit:
Convenience: You always have cleaning products available. No last-minute trips to the shop when you want to clean your wheels.
Versatility: The same household products clean multiple things. White vinegar also cleans windows, baking soda cleans ovens, dish soap washes dishes. Commercial wheel cleaner only cleans wheels.
Environmental impact: Fewer harsh chemicals going down drains. Many household products are biodegradable.
Learning: Understanding how cleaning chemistry works gives you knowledge applicable to other cleaning tasks.
When Commercial Products Make Sense
Despite the cost savings, commercial products have some advantages:
Convenience: Pre-mixed and ready to use. No measuring or mixing required.
Optimised formulas: Specifically engineered for wheel cleaning with the right pH balance and surfactants.
Better protection products: Wheel sealants and ceramic coatings don’t have household equivalents worth using.
Time savings: Some commercial cleaners work faster, reducing your cleaning time by 10-15 minutes per session.
Show-quality results: For car enthusiasts or before selling a car, commercial products may produce slightly better results.
Recommendation:
Use household products for regular maintenance (90% of your cleaning). Keep one bottle of quality commercial cleaner for special occasions or extremely stubborn cases (10% of your cleaning). This hybrid approach maximises savings whilst ensuring you have the right tool for any situation.
Expert Tips and Pro Tricks
These advanced techniques will help you achieve better results in less time.
Timing and Temperature
Best time to clean: Early morning or late afternoon/evening in spring and autumn. The ambient temperature should be 10-20°C. Avoid:
- Midday in summer (too hot, products dry too quickly)
- Freezing conditions (water freezes, making rinsing difficult)
- Immediately after rain (wheels are already wet and dirty water makes assessment difficult)
Seasonal considerations:
Winter: Clean more frequently (weekly if roads are salted). Use slightly warmer water. Work faster as products become less effective in cold temperatures.
Summer: Clean in shade. Use cooler water for initial rinse to help cool wheels. Be more careful about dwell times as products dry faster.
Spring/Autumn: Ideal conditions for thorough cleaning and protection application.
Preventing Brake Dust Buildup
You can’t eliminate brake dust (it’s a natural byproduct of braking), but you can reduce it:
Choose the right brake pads: Low-dust brake pads produce significantly less brake dust. They cost slightly more but save cleaning time. When your brake pads need replacing, ask your mechanic about low-dust options.
Driving habits: Anticipate stops earlier and brake gently when possible. Aggressive braking generates more dust. This also extends brake pad life.
Apply wheel protectant religiously: A good sealant can reduce brake dust adhesion by 60-70%. The small investment in protection products saves hours of scrubbing.
Weekly rinse routine: A 2-minute rinse with plain water once a week prevents brake dust from bonding. This simple habit dramatically reduces deep cleaning requirements.
Using Pressure Washers Safely
Pressure washers speed up rinsing, but misuse can cause damage:
Safe pressure range: 1000-2000 PSI (70-140 bar) maximum for alloy wheels
Nozzle selection: Use a 25-40 degree fan nozzle. Never use a 0-degree pinpoint jet.
Distance: Maintain 30-45cm distance from the wheel surface.
Technique:
- Start with the water stream aimed away from the wheel
- Gradually move the stream onto the wheel whilst maintaining distance
- Keep the stream moving (never hold it in one spot)
- Work from top to bottom
- Be especially careful around centre caps and wheel seals
What not to do:
- Don’t aim directly at wheel bearing seals
- Don’t use maximum pressure
- Don’t get closer than 30cm
- Don’t spray directly into valve stems
Advanced Tools Worth Considering
Wheel woolies: Long-handled brushes with soft wool bristles. Perfect for cleaning wheel barrels without removing wheels. Cost £10-20 for a set.
Detailing brushes: Small, soft brushes in various sizes for intricate spoke designs. Cost £5-15 for a set.
Brake dust erasers: Non-abrasive foam pads that mechanically remove brake dust without chemicals. Reusable and cost £8-12.
Dry-vapour steamer: Expensive (£150-500) but extremely effective. Uses low-moisture steam to lift dirt. Worth considering if you detail cars regularly or professionally.
Spray bottles with foam settings: Create clinging foam from liquid cleaners. Foam dwells longer than liquid sprays. Cost £3-5.
Time-Saving Techniques
Clean wheels first, always: Don’t wait until you’ve washed the entire car. Clean wheels when you start, allowing protection products to cure whilst you wash the bodywork.
Keep a wheel cleaning kit ready: Store all your wheel cleaning supplies in one bucket or caddy. Grab and go saves 5-10 minutes of gathering supplies.
Use the right brush for each area:
- Large soft brush for wheel faces
- Medium brush for spokes
- Small detail brush for lug nuts
- Bottle brush or wheel woolie for barrels
Having the right tool for each area reduces cleaning time by 30-40%.
The one-wheel test: When trying a new product or method, test on your dirtiest wheel first. If it works well, you know the other wheels will be easier. If it doesn’t work well, you haven’t wasted time treating all four wheels.
Common Mistakes to Avoid
Learning from these common errors saves you time, money, and potentially your wheels.
Cleaning Hot Wheels
The mistake: Washing wheels immediately after driving or when they’re hot from sunshine.
Why it’s harmful:
- Thermal shock can crack protective coatings
- Products evaporate before they can work
- Can cause warping of brake rotors (in extreme cases)
- Water spots form instantly
The fix: Always wait 30-60 minutes after driving. Touch the wheel centre and brake disc. They should feel cool to the touch, not warm.
Using Abrasive Materials
The mistake: Scrubbing with steel wool, wire brushes, or rough scouring pads because brake dust won’t budge.
Why it’s harmful:
- Scratches through the protective coating
- Exposes bare aluminium to corrosion
- Creates rough surface that attracts more dirt
- Damage is permanent and worsens over time
The fix: If gentle methods aren’t working, use stronger chemicals with longer dwell times. Let chemistry do the work instead of mechanical force.
Inadequate Rinsing
The mistake: Quick rinse that doesn’t fully remove cleaning products.
Why it’s harmful:
- Residual acids continue etching the coating
- Dried cleaner leaves white streaks
- Residue attracts dirt faster
- Gradual buildup damages the wheel finish
The fix: Rinse for minimum 30 seconds per wheel. Water should run completely clear. For acidic/alkaline cleaners, rinse even longer.
Mixing Incompatible Chemicals
The mistake: Combining different household cleaners to make a “super cleaner.”
Why it’s harmful:
- Can create toxic fumes (e.g., vinegar + bleach = chlorine gas)
- Unpredictable reactions may damage wheels
- Some combinations neutralise each other, providing no cleaning benefit
- Serious health risks from fume inhalation
The fix: Use one cleaning method at a time. If one doesn’t work, rinse completely before trying a different product.
Skipping Protection
The mistake: Cleaning wheels thoroughly but not applying any protective treatment.
Why it’s harmful:
- Brake dust bonds directly to the coating
- Next cleaning requires more effort
- Wheels stay dirty longer
- Protective coating degrades faster
The fix: Apply car wax or wheel sealant after every deep clean. It adds 10 minutes to your session but saves 15-20 minutes on the next clean.
Using Automatic Car Washes
The mistake: Taking your car through automatic car washes to save time.
Why it’s harmful:
- Brushes create swirl marks and scratches
- Harsh chemicals damage protective coatings
- Some car washes use acidic wheel cleaners at improper concentrations
- Can’t clean tight areas properly
The fix: Hand wash your wheels. The 30-40 minutes invested provides better results and protects your wheels from damage. If you must use a car wash, choose touchless versions that use only water and pH-neutral soap.
Neglecting Regular Maintenance
The mistake: Only cleaning wheels when they look terrible (every few months).
Why it’s harmful:
- Brake dust chemically bonds, making removal difficult
- Allows corrosion to start under the coating
- Requires harsh chemicals for removal
- Eventually leads to permanent damage
The fix: Quick 5-minute rinse weekly, proper clean monthly. Prevention is easier than correction.
Similar to how to clean a washing machine, regular light maintenance of alloy wheels prevents the need for intensive deep cleaning and extends lifespan.
Forgetting the Wheel Barrels
The mistake: Only cleaning the visible wheel face whilst ignoring the inner barrel.
Why it’s harmful:
- Barrel accumulates the most brake dust (closest to brake caliper)
- Hidden corrosion develops
- Imbalanced cleaning makes visible areas dirty faster
- Eventually affects brake performance
The fix: Use a wheel woolie or bottle brush to clean inside the barrel during every cleaning session. You can’t see this area easily, but it matters most.
Wrong Product for Wheel Type
The mistake: Using acidic cleaners on polished aluminium wheels without protective coating.
Why it’s harmful:
- Acids directly attack bare aluminium
- Causes white oxidation that’s difficult to remove
- Can pit and etch the metal permanently
- Ruins the polished finish
The fix: Know your wheel type. Polished wheels need only pH-neutral soap. Clear-coated wheels can handle mild acids. When in doubt, start with the gentlest method.
Conclusion
Cleaning alloy wheels with household products isn’t just possible, it’s practical, effective, and economical. With the seven methods covered in this guide, you have options ranging from the safest (dish soap and baking soda) to the most powerful (oven cleaner for heavy-duty jobs).
The key principles to remember:
Start gentle and escalate only if needed. Begin with mild methods like soapy water before moving to acidic cleaners. Most regular maintenance needs nothing stronger than vinegar solution.
Technique matters as much as product. Proper dwell time, thorough rinsing, and using the right tools for different areas produce better results than simply using stronger chemicals.
Protection is essential. The 10 minutes spent applying wax or sealant after cleaning saves you 20 minutes of scrubbing on the next clean. Protected wheels stay cleaner longer and require gentler products.
Regular maintenance beats intensive cleaning. A 5-minute weekly rinse prevents the buildup that requires 45 minutes of aggressive cleaning later. Prevention is easier and safer for your wheels than correction.
Safety first, always. No wheel cleaning job is worth injuring yourself or damaging your wheels. Use proper protective equipment, work in ventilated areas, and never take shortcuts with safety.
By using household products intelligently, you’ll save £50-100 annually whilst maintaining alloy wheels that look professionally detailed. The methods in this guide work, they’re safe when used correctly, and they give you the knowledge to tackle any wheel cleaning challenge.
Start with Method 1 (dish soap and baking soda) for your next cleaning session. Once you experience how well it works, you’ll wonder why you ever spent money on commercial wheel cleaners.
Your alloy wheels are an investment in your vehicle’s appearance and performance. With these household cleaning methods, protecting that investment costs pennies rather than pounds.
What household method will you try first? Have you had success with other products not mentioned here? Share your experiences with wheel cleaning to help other readers achieve the same brilliant results.
Frequently Asked Questions
Can I use vinegar to clean alloy wheels?
Yes, you can use white vinegar to clean alloy wheels, but you must dilute it first. Mix equal parts white vinegar and water (50/50 ratio) in a spray bottle. Apply the solution to your wheels, let it sit for 3-5 minutes, then scrub and rinse thoroughly. Never use undiluted vinegar as it’s too acidic and can damage the protective coating on your alloys. Vinegar is particularly effective at dissolving brake dust and cutting through grease. Always rinse completely with plenty of water to remove all vinegar residue, as any remaining acid will continue etching your wheel’s surface.
Will baking soda scratch my alloy wheels?
Baking soda won’t scratch alloy wheels when used correctly. It’s a mild abrasive that’s softer than the protective coating on your wheels. However, you must use it with a soft sponge or cloth, never with rough scouring pads or steel wool. Apply baking soda to a damp sponge and use gentle circular motions. The fine granules provide cleaning action without causing damage. If you scrub aggressively with a rough pad, you could scratch the coating, but the damage comes from the pad material, not the baking soda itself. For best results, make a paste with three parts baking soda to one part water and apply with soft materials only.
How often should I clean alloy wheels with household products?
For optimal wheel maintenance, rinse your alloy wheels with plain water weekly to prevent brake dust from bonding to the surface. Perform a proper clean using household products (vinegar solution or dish soap) every 2-3 weeks for regular maintenance. Deep clean with stronger methods (like oven cleaner if needed) monthly or when you notice significant brake dust buildup. During winter months when roads are salted, increase frequency to weekly proper cleaning to prevent corrosion from the combination of salt and brake dust. This schedule prevents damage whilst minimising the time you spend cleaning.
Can oven cleaner damage alloy wheels?
Oven cleaner can damage alloy wheels if used incorrectly, but it’s safe when used properly. Never leave oven cleaner on wheels for longer than 5 minutes, and 2-3 minutes is usually sufficient. Never use it on wheels with chipped or damaged protective coatings, as it will attack the exposed aluminium directly. Always rinse extremely thoroughly after use. The alkaline compounds in oven cleaner are very effective at dissolving brake dust, but they can strip protective coatings if left on too long. Only use oven cleaner on clear-coated alloys in good condition, and always work in a well-ventilated area whilst wearing gloves and eye protection.
What's the best homemade alloy wheel cleaner?
For most situations, a 50/50 mixture of white vinegar and warm water is the best homemade alloy wheel cleaner. It effectively dissolves brake dust, costs approximately 75p per cleaning session, and is safe for most wheel types when used correctly. For lighter maintenance, dish soap mixed with baking soda provides the safest option that won’t damage any wheel finish. For extremely stubborn brake dust, oven cleaner is the most powerful household option, though it requires careful use. Choose your cleaner based on how dirty your wheels are: dish soap for light dirt, vinegar for moderate brake dust, and oven cleaner only for heavily soiled wheels that haven’t responded to gentler methods.
Is it safe to use WD-40 on alloy wheels?
WD-40 is safe for light cleaning and maintenance of alloy wheels, but it’s not an effective primary cleaner. Use it for removing tar spots, displacing water after washing, or protecting lug nuts from rust. Always spray WD-40 onto a cloth first, then wipe the wheels, never spray directly onto wheels whilst they’re on the car. Overspray can contaminate brake pads and discs, reducing braking performance. After using WD-40, wash the wheels with soapy water to remove the oily residue, as WD-40 attracts dust if left on the surface. It’s better suited as a supplement to proper cleaning rather than a replacement for dedicated wheel cleaners.
Can I use Coca-Cola to clean alloy wheels?
Coca-Cola can clean alloy wheels due to its phosphoric acid content, but it’s not very effective for regular wheel cleaning. It works best for removing rust from lug nuts and bolts rather than cleaning entire wheels. Pour Coke into a spray bottle, apply to rusty areas, let sit for 5-10 minutes, then scrub with a brush. The main drawback is that Coke leaves a sticky sugar residue that attracts dirt, so you must rinse thoroughly with soapy water afterwards. For the cost of a bottle of Coke (£1-2), you’re better off using vinegar solution which is cheaper, more effective, and doesn’t leave sticky residue.
How do I remove baked-on brake dust from alloy wheels?
To remove baked-on brake dust, use a progressive approach starting with longer dwell times. Apply white vinegar solution or lemon juice mixture and let it sit for the maximum safe time (5 minutes), then scrub and rinse. If this doesn’t work, apply oven cleaner for 2-3 minutes, scrub gently, and rinse thoroughly. For extremely stubborn deposits, try the soaking technique: apply your strongest safe cleaner, cover the wheel with plastic wrap to prevent evaporation, let sit for 10-15 minutes whilst monitoring carefully, then scrub and rinse. Repeat applications work better than single aggressive scrubbing. If household methods fail, the brake dust may have permanently etched the coating, requiring professional wheel refurbishment.
Can lemon juice damage alloy wheels?
Lemon juice can damage alloy wheels if used incorrectly, as it contains citric acid at 5-6% concentration. Always dilute lemon juice with equal parts water before applying to wheels. Never let it sit longer than 5 minutes, and always rinse thoroughly with plenty of water. Undiluted lemon juice or extended contact time can strip protective coatings, especially on older wheels or wheels with damaged finishes. Never use lemon juice on polished aluminium wheels without protective coating. When diluted properly and rinsed thoroughly, lemon juice is safe and effective for cleaning most alloy wheels. The addition of baking soda helps neutralise the acidity and makes it safer to use.
What removes brake dust from rims using home remedies?
White vinegar solution is the most effective home remedy for removing brake dust from rims. Mix equal parts white vinegar and warm water, spray onto wheels, let sit for 3-5 minutes, then scrub with a soft brush and rinse thoroughly. For stubborn brake dust, combine lemon juice, water, and baking soda for a stronger cleaning action. The citric acid breaks down brake dust whilst baking soda provides mild abrasive cleaning. For heavy buildups, oven cleaner removes even baked-on brake dust, but requires careful use with proper safety equipment. Regular dish soap and baking soda works for lighter brake dust and regular maintenance. Choose the strength based on how much brake dust has accumulated.
Do I need to remove wheels to clean them properly?
You don’t need to remove wheels to clean them properly. All the household cleaning methods in this guide work with wheels still on the car. Keeping wheels on is actually easier for most people and prevents the need for a jack and axle stands. Use a wheel brush or bottle brush to reach the inner barrel (the part facing the brake caliper), which accumulates the most brake dust. The only advantage of removing wheels is easier access to photograph all areas and clean very intricate spoke designs. For regular maintenance, cleaning wheels on the car is perfectly adequate and much more convenient.
Can I clean alloy wheels with washing-up liquid?
Yes, washing-up liquid (dish soap) is excellent for cleaning alloy wheels, especially for regular maintenance. It’s pH-neutral, safe for all wheel finishes, and won’t damage protective coatings. Mix 2 tablespoons of washing-up liquid in 5 litres of warm water, apply with a sponge, scrub gently, and rinse thoroughly. For extra cleaning power, sprinkle baking soda on your sponge after washing with the soapy water. Washing-up liquid works well for light to moderate dirt but may not remove heavily baked-on brake dust. It’s the safest household product for alloy wheels and the best starting point before trying stronger cleaners.
How long does it take to clean alloy wheels at home?
Cleaning alloy wheels at home takes 25-40 minutes for all four wheels when doing a thorough job. This breaks down to approximately 6-10 minutes per wheel. If you’re doing quick maintenance cleaning with just soap and water, you can complete all four wheels in 15-20 minutes. First-time cleaning of neglected wheels might take 45-60 minutes due to stubborn brake dust requiring multiple applications. Once you establish a regular cleaning routine, your time decreases because brake dust doesn’t build up as much. Using the right products with proper dwell time is more important than rushing, as patient cleaning prevents the need for aggressive scrubbing that risks damaging your wheels.
Are household products as effective as commercial wheel cleaners?
Household products can be just as effective as commercial wheel cleaners for most situations. White vinegar solution dissolves brake dust similarly to pH-balanced commercial cleaners. Oven cleaner works as well as or better than some commercial alkaline cleaners for heavy-duty jobs. The main advantages of commercial products are convenience (pre-mixed and ready to use), optimised formulations for specific wheel types, and slightly faster working times. However, for regular maintenance and even stubborn brake dust, household products deliver excellent results at a fraction of the cost. The key difference is that you need to mix household solutions correctly and use proper techniques, whilst commercial products are ready to use straight from the bottle.
Can I use toilet cleaner on alloy wheels?
Toilet cleaner containing hydrochloric acid can clean alloy wheels, but it’s extremely risky and should only be attempted by experienced users. The acid is very powerful and will permanently damage wheels if left on for more than 10-15 seconds or used on wheels with any coating damage. You must work in tiny sections, applying cleaner for no more than 15 seconds before immediately neutralising with baking soda solution and rinsing thoroughly. Never use toilet cleaner on polished wheels, damaged wheels, or if you’re inexperienced with wheel cleaning. Safer household alternatives like vinegar, lemon juice, or oven cleaner are strongly recommended instead. Professional wheel refurbishment costs less than replacing wheels damaged by improper acid use.
Will vinegar and baking soda clean alloy wheels?
Yes, vinegar and baking soda together clean alloy wheels effectively. Mix equal parts white vinegar and water, spray onto wheels, then sprinkle baking soda over the wet surface. The combination creates a fizzing reaction that helps lift brake dust and grime. Let it sit for 3-5 minutes, scrub with a soft brush, and rinse thoroughly. The vinegar’s acidity breaks down brake dust whilst baking soda provides mild abrasive cleaning and neutralises some of the acidity, making it safer for your wheels. This combination is particularly effective on stubborn stains and costs less than £1 per cleaning session. Always rinse completely to remove all residue.
Should I clean alloy wheels before or after washing the car?
Always clean alloy wheels before washing the rest of your car. Wheels are the dirtiest part of your vehicle and require harsher cleaning products than your paintwork. If you wash the car first, then clean the wheels, dirty water and harsh wheel cleaning products can splash onto your freshly cleaned bodywork. Cleaning wheels first also allows any protective sealant you apply to cure whilst you wash the rest of the car, saving time overall. This approach prevents you from having to re-clean areas of your car that get contaminated during wheel cleaning. Professional detailers always follow this sequence for the best results.
Can I use a pressure washer to clean alloy wheels?
Yes, you can use a pressure washer to clean alloy wheels, but you must use proper technique. Keep pressure below 2000 PSI (140 bar), use a 25-40 degree fan nozzle (never a pinpoint jet), and maintain at least 30cm distance from the wheel surface. Never spray directly at wheel bearing seals, centre caps, or valve stems, as excessive pressure can force water past seals into bearing assemblies. Pressure washers are excellent for rinsing away cleaning products and loosening surface dirt, but they cannot replace proper scrubbing for brake dust removal. Use the pressure washer for pre-rinse and final rinse stages, but still apply cleaning products and use brushes for the actual cleaning.
What's the cheapest way to clean alloy wheels?
The cheapest way to clean alloy wheels is using dish soap and baking soda, which costs approximately 50p per cleaning session. Mix washing-up liquid with warm water, wash the wheels with a sponge, then sprinkle baking soda on the sponge for extra cleaning power on stubborn areas. This method uses products you already have at home and requires no special purchases. For an annual cleaning cost, expect to spend £6-10 if you clean monthly. This compares to £40-80 annually using commercial wheel cleaners. The dish soap method is safest for all wheel types and effective for regular maintenance, though you may occasionally need stronger methods like vinegar solution (75p per clean) for heavy brake dust.
How do I know if my alloy wheels are damaged beyond cleaning?
Signs your alloy wheels need professional refurbishment rather than just cleaning include: bubbling or flaking protective coating that peels away when scrubbed, white or grey discolouration that won’t wash off (indicates corrosion under the coating), rough pitted texture even after cleaning, visible bare aluminium showing through the coating, and deep kerb damage with exposed metal. If cleaning makes no visible difference to heavily stained areas, the stains may actually be corrosion rather than dirt. Wheels with these issues require professional attention. Mobile wheel refurbishment typically costs £50-100 per wheel but restores wheels to like-new condition. Attempting to clean severely damaged wheels with harsh household products will worsen the damage.
You May Also Like
How to Clean Tombstones with Shaving Cream: Safe Guide

Is It Legal to Clean Gravestones in the UK? Laws & Permissions