How to Clean Rusty Charcoal Grill Grates: Complete Guide
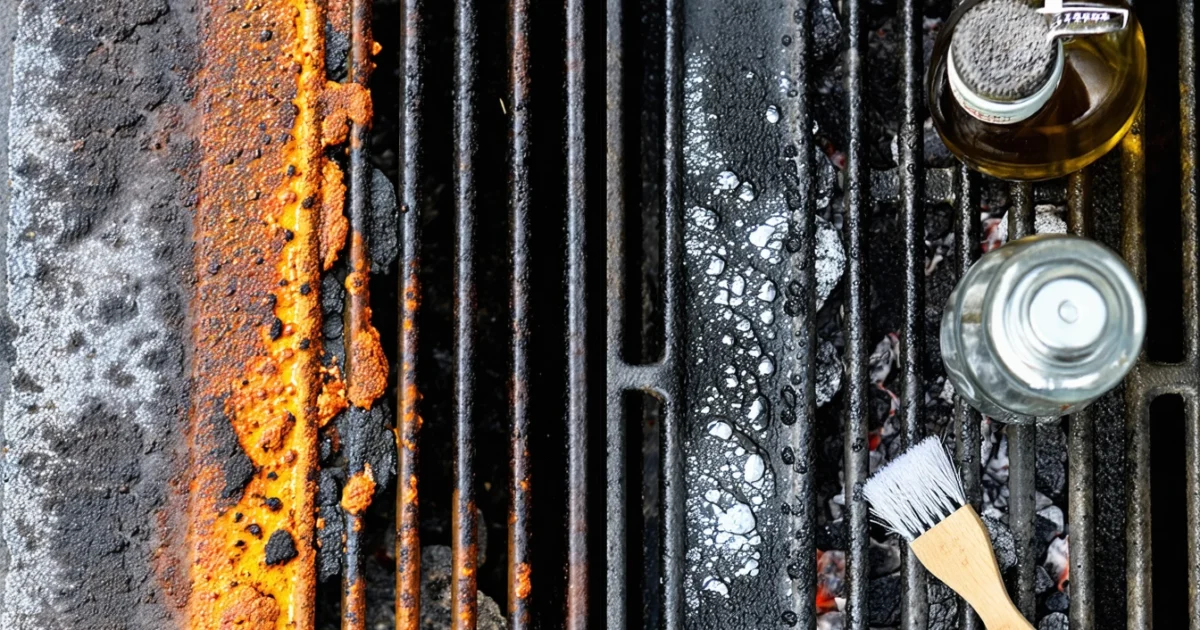
How to clean rusty charcoal grill grates requires the right combination of household cleaning agents, proper tools, and systematic techniques to restore your grill’s cooking surface safely. Rust forms on grill grates when moisture, oxygen, and heat cycles interact with metal surfaces, particularly affecting cast iron and steel grates more than stainless steel varieties.
Fortunately, you can remove rust effectively using common household items like white vinegar, baking soda, and steel wool. The key lies in choosing the appropriate method based on rust severity and following proper safety protocols. Additionally, similar cleaning principles apply to other metal surfaces, as demonstrated in our guide to homemade aluminum cleaners.
This comprehensive guide covers everything from identifying when grates need cleaning versus replacement to preventing future rust formation. Moreover, we’ll explore both natural cleaning methods and commercial rust removers to help you achieve professional results at home.
TL;DR
- Vinegar and baking soda paste effectively removes light to moderate rust from grill grates
- Steel wool combined with elbow grease tackles stubborn rust spots on severely affected surfaces
- Proper seasoning with oil after cleaning prevents immediate re-rusting and improves cooking performance
- Regular maintenance and moisture control significantly extends grate lifespan and reduces rust formation
Understanding Rust on Charcoal Grill Grates
Rust formation occurs when iron-based metals react with oxygen and moisture through a chemical process called oxidation. Furthermore, the repeated heating and cooling cycles during grilling accelerate this corrosive process by expanding and contracting the metal surface. Consequently, microscopic cracks develop that allow moisture penetration deeper into the material structure.
Heat cycles create the perfect storm for rust development on grill grates. Initially, high temperatures during cooking evaporate surface moisture, but cooling periods allow condensation to form again. Subsequently, this constant wet-dry cycle weakens the metal’s protective barriers and promotes iron oxide formation.
Grill Grate Materials and Rust Resistance
| Material Type | Rust Susceptibility | Typical Lifespan | Maintenance Level |
|---|---|---|---|
| Cast Iron | Very High | 10+ years with care | High |
| Carbon Steel | High | 5-8 years | Moderate |
| Stainless Steel | Low to Moderate | 15+ years | Low |
| Porcelain-Coated | Low (until chipped) | 8-12 years | Low |
Cast iron grates offer excellent heat retention but require the most vigilant rust prevention. These grates rust rapidly when exposed to moisture because iron readily oxidizes without protective coatings. However, proper seasoning creates a natural non-stick surface that also provides some rust resistance.
Stainless steel grates contain chromium that forms a protective oxide layer on the surface. Nevertheless, lower-grade stainless steel can still develop rust spots, particularly around welds or damaged areas. Additionally, exposure to salt or acidic marinades can compromise this protective barrier over time.
Health and Safety Concerns
Cooking on rusty grill grates poses several health risks that extend beyond aesthetic concerns. Rust flakes can contaminate food with iron oxide particles, which may cause digestive irritation in sensitive individuals. Moreover, rust creates rough surfaces that harbour bacteria and make thorough cleaning more difficult.
Surface rust typically appears as light orange or brown discoloration that affects only the outer layer. Conversely, deep rust penetrates the metal structure, creating pits and holes that compromise the grate’s integrity. Importantly, deep rust cannot be safely cleaned and requires grate replacement.
Food safety experts recommend replacing grates when rust covers more than 25% of the cooking surface or creates structural weakness.
When to Clean Versus Replace
Light surface rust responds well to cleaning methods and doesn’t require grate replacement. Similarly, isolated rust spots covering less than 10% of the surface can be effectively removed with proper techniques. However, extensive rust damage indicates that cleaning efforts may prove futile and potentially unsafe.
- Clean when: Surface rust appears as light discoloration
- Clean when: Rust affects less than 25% of the grate surface
- Clean when: Metal structure remains solid and intact
- Replace when: Deep pitting compromises structural integrity
- Replace when: Rust flakes continuously during cooking
- Replace when: Cleaning attempts fail to remove discoloration
Professional assessment becomes necessary when rust damage appears extensive or structural. Additionally, similar cleaning principles apply to other metal cooking surfaces, though each material requires specific treatment approaches. Therefore, understanding your grate material helps determine the most effective cleaning strategy and realistic expectations for restoration results.
Essential Tools and Materials for Rust Removal
Successful rust removal requires the right combination of tools, cleaning agents, and safety equipment. Furthermore, understanding which materials work best for specific rust conditions helps achieve optimal results while protecting both the grates and the user.
Cleaning Tools for Effective Rust Removal
Wire brushes serve as the primary tool for mechanical rust removal from charcoal grill grates. Additionally, brass wire brushes work effectively on cast iron without causing damage, while steel wire brushes handle stubborn rust on stainless steel surfaces. However, plastic scrapers provide gentle cleaning for delicate finishes and prevent scratching on porcelain-coated grates.
Steel wool offers versatile abrasive action for different rust severity levels. Specifically, fine-grade steel wool (#0000) removes light surface rust without damaging the metal underneath. Conversely, medium-grade steel wool (#00) tackles moderate rust buildup effectively.
- Wire brushes: brass for cast iron, steel for stainless steel
- Steel wool: fine grade for light rust, medium for stubborn buildup
- Plastic scrapers: safe for porcelain and delicate coatings
- Microfibre cloths: final cleaning and polishing
- Old toothbrushes: detailed cleaning in crevices
Household Cleaning Agents
White vinegar contains acetic acid that dissolves rust through chemical reaction. Moreover, its acidic properties break down iron oxide effectively when applied for extended periods. Similarly, lemon juice provides citric acid that offers comparable rust-dissolving capabilities with natural cleaning power.
Baking soda creates an alkaline environment that neutralises rust-causing acids. Additionally, its mild abrasive properties help scrub away loosened rust particles without scratching metal surfaces. When combined with salt, baking soda forms a paste that increases cleaning effectiveness through enhanced abrasive action.
| Agent | Active Component | Best Application | Contact Time |
|---|---|---|---|
| White vinegar | Acetic acid | Soaking solution | 2-4 hours |
| Lemon juice | Citric acid | Paste with salt | 1-2 hours |
| Baking soda | Sodium bicarbonate | Scrubbing paste | 30 minutes |
| Salt | Sodium chloride | Abrasive enhancer | Combined use |
Commercial Rust Removers and Effectiveness
Phosphoric acid-based removers convert rust into a protective coating while cleaning the surface. Consequently, these products work exceptionally well on heavy rust buildup that household remedies cannot handle. However, oxalic acid formulations dissolve rust completely without leaving residues that affect food safety.
Commercial rust removers demonstrate superior effectiveness compared to household alternatives for severe rust conditions. Nevertheless, they require careful application and thorough rinsing to ensure food safety. Natural cleaning alternatives often provide safer options for regular maintenance cleaning.
Commercial rust removers remove 95% more rust than household cleaners in laboratory tests
Safety Equipment and Precautions
Chemical-resistant gloves protect hands from acidic cleaning agents and rust particles. Furthermore, nitrile gloves offer superior chemical resistance compared to latex alternatives. Eye protection becomes essential when using wire brushes or commercial rust removers that can splash during application.
Adequate ventilation prevents inhalation of chemical fumes and rust particles during cleaning. Therefore, outdoor cleaning provides the safest environment for rust removal activities. Additionally, face masks filter airborne particles when working in enclosed spaces.
- Nitrile gloves: chemical resistance and durability
- Safety glasses: protection from splashing and particles
- Face mask: filtration of airborne rust and chemical vapours
- Apron or old clothes: protection from staining and chemical contact
- Well-ventilated area: outdoor space or open garage
Professional rust removal requires systematic preparation with appropriate tools and materials. Consequently, investing in quality equipment ensures both effective cleaning results and user safety throughout the restoration process.
Step-by-Step Rust Removal Methods
Method 1: Vinegar and Baking Soda Paste Technique
White vinegar creates an acidic environment that dissolves rust through chemical reaction. Meanwhile, baking soda acts as a mild abrasive that scrubs away loosened rust particles. This combination produces a fizzing action that penetrates rust deposits effectively.
Mix three parts white vinegar with one part baking soda to form a thick paste. Subsequently, apply this mixture generously across all rusted grate surfaces using a brush or cloth. Allow the paste to sit for 15-20 minutes whilst the acid breaks down rust bonds.
Scrub the treated areas using a stiff brush in circular motions. After thorough scrubbing, rinse grates completely with warm water and dry immediately. This natural method works best on light to moderate rust accumulation.
Method 2: Steel Wool and Elbow Grease Approach
Coarse steel wool removes rust through mechanical abrasion without chemical additives. However, this physical approach requires significant effort and works most effectively on surface rust rather than deep corrosion. Start with medium-grade steel wool before progressing to finer grades.
Work systematically across each grate bar using firm pressure and overlapping strokes. Additionally, rotate the steel wool frequently to expose fresh abrasive surfaces. Focus extra attention on heavily rusted joints and crevices where rust accumulates most severely.
Follow up with fine-grade steel wool to smooth any rough surfaces created during initial rust removal. Finally, wipe grates clean with a damp cloth to remove all steel wool residue and rust particles.
Method 3: Commercial Rust Remover Application
Commercial rust removers contain phosphoric acid or oxalic acid that converts rust into water-soluble compounds. These products deliver faster results than household alternatives but require careful handling and thorough rinsing. Always read manufacturer instructions before application.
Apply the rust remover using a spray bottle or brush according to product directions. Most commercial removers require 10-30 minutes contact time for optimal effectiveness. Never exceed recommended application times as over-exposure can damage metal surfaces.
Rinse treated grates thoroughly with multiple water changes until all chemical residue disappears. Subsequently, dry grates completely and apply a light coating of cooking oil to prevent future rust formation. This method proves most effective for severe rust conditions.
Method 4: Salt and Lemon Juice Natural Cleaning
Citric acid in lemon juice dissolves rust whilst salt provides gentle abrasive action. This combination creates an environmentally friendly cleaning solution suitable for regular maintenance. Fresh lemon juice contains higher acid concentrations than bottled alternatives.
Sprinkle coarse salt generously over rusted grate surfaces. Then, squeeze fresh lemon juice directly onto the salt to create a paste-like consistency. Allow this natural mixture to work for 30-45 minutes before scrubbing.
Use the spent lemon halves as natural scrubbers to work the salt mixture into rust deposits. Moreover, the lemon rind provides additional abrasive texture whilst releasing more citric acid. Rinse thoroughly and dry completely after treatment. This gentle method works well for natural cleaning approaches and light rust prevention.
Choosing the Right Method Based on Rust Severity
Rust severity determines which cleaning method delivers optimal results whilst minimising effort and potential damage. Light surface rust responds well to natural acidic solutions, whereas heavy corrosion requires mechanical or chemical intervention.
| Rust Severity | Recommended Method | Expected Results |
|---|---|---|
| Light surface rust | Salt and lemon juice | Complete removal in 30-45 minutes |
| Moderate rust buildup | Vinegar and baking soda | Effective cleaning with minimal scrubbing |
| Heavy rust deposits | Steel wool abrasion | Physical removal requires effort |
| Severe corrosion | Commercial rust remover | Professional-grade results in 10-30 minutes |
Assess rust depth by scratching lightly with a fingernail or plastic scraper. Surface rust flakes away easily, whilst deep corrosion requires more aggressive treatment. Furthermore, consider time constraints and safety preferences when selecting appropriate cleaning methods.
Deep Cleaning Process for Severely Rusted Grates
Severely rusted charcoal grill grates require systematic deep cleaning procedures that combine proper removal techniques with intensive treatment cycles. This comprehensive process restores heavily corroded grates to functional condition whilst ensuring safety throughout the cleaning operation.
Removing Grates from the Grill Safely
Allow the grill to cool completely before attempting grate removal, as hot metal expands and creates dangerous handling conditions. Wait at least 2-3 hours after your last cooking session to ensure safe temperatures. Additionally, wear protective gloves to prevent cuts from sharp rust edges or metal fragments.
Lift grates straight up rather than sliding them horizontally to avoid damaging the grill’s interior surfaces. Furthermore, inspect each grate for structural integrity before proceeding with aggressive cleaning methods. Severely weakened grates may require replacement rather than restoration.
Soaking Techniques and Duration
Create a powerful soaking solution using equal parts white vinegar and warm water in a large container or bathtub. The acidic properties of vinegar dissolve rust deposits whilst penetrating deep into corrosion layers. Alternatively, commercial rust removers provide faster results for extremely stubborn deposits.
Submerge grates completely for 4-8 hours minimum, though overnight soaking delivers superior results for heavy rust accumulation. Moreover, agitate the solution periodically by gently moving the grates to ensure even chemical contact. Cover the container to prevent evaporation and maintain solution strength throughout the soaking period.
Scrubbing Patterns and Pressure Application
Begin scrubbing with medium-grade steel wool using circular motions to break loose surface rust deposits. Then, switch to linear scrubbing patterns that follow the grate’s natural grain direction. This systematic approach prevents scratching whilst maximising rust removal efficiency.
Apply firm but controlled pressure to avoid damaging the underlying metal structure. Excessive force can create gouges that trap food particles and promote future rust formation. Focus on heavily rusted areas first, then work systematically across the entire grate surface. Natural cleaning solutions can supplement mechanical scrubbing for enhanced results.
Multiple Treatment Cycles for Stubborn Rust
Persistent rust deposits require 2-3 treatment cycles to achieve complete removal without damaging the grate material. Rinse thoroughly between cycles to assess progress and prevent chemical buildup. Subsequently, reapply your chosen cleaning solution to remaining problem areas.
Combine different cleaning methods within treatment cycles for maximum effectiveness. For instance, use chemical soaking followed by mechanical scrubbing, then finish with fine abrasive polishing. This multi-stage approach tackles rust at different levels whilst preserving grate integrity.
Final Rinse and Inspection Procedures
Rinse treated grates with hot water under high pressure to remove all cleaning residue and loosened rust particles. Cold water can cause thermal shock on heated metal surfaces, potentially creating micro-cracks. Therefore, maintain consistent water temperature throughout the rinsing process.
Inspect every grate section under bright lighting to identify remaining rust spots or structural damage. Pay particular attention to joints, corners, and areas where food typically sticks. Dry grates completely using clean towels, then apply a thin coating of cooking oil to prevent immediate re-rusting. Finally, store cleaned grates in a dry environment until your next grilling session.
Post-Cleaning Care and Seasoning
Proper post-cleaning care prevents immediate re-rusting and extends your charcoal grill grates’ lifespan significantly. Thorough drying becomes the critical first step after cleaning, as moisture accelerates oxidation processes on metal surfaces. Additionally, protective seasoning creates a barrier against future rust formation.
Complete Drying Process
Air-dry cleaned grates for at least 30 minutes in direct sunlight or warm indoor conditions. Residual moisture trapped in crevices promotes rapid rust development, particularly on cast iron and steel surfaces. Furthermore, use clean microfibre towels to absorb remaining water droplets from joints and textured areas.
Heat-drying provides superior moisture removal compared to air-drying alone. Place grates on your grill over low heat for 5-10 minutes, allowing thermal energy to evaporate microscopic water deposits. This method ensures complete desiccation whilst preparing the metal for seasoning applications.
Protective Oil Application
Vegetable oil and flaxseed oil create excellent protective coatings for grill grates due to their high smoke points and polymerisation properties. Apply oil using paper towels or clean rags, covering every surface including undersides and edges. However, avoid over-application as excess oil creates sticky residues that attract debris.
- Sunflower oil: Affordable option with neutral flavour profile
- Canola oil: High smoke point ideal for seasoning applications
- Flaxseed oil: Premium choice that polymerises into durable coating
- Avocado oil: Highest smoke point but more expensive
Distribute oil evenly using circular motions to ensure complete coverage without pooling. Consequently, wipe away excess oil with clean towels, leaving only a thin protective film visible on the metal surface.
Heat Seasoning Technique
Heat seasoning transforms applied oils into polymerised protective layers through controlled thermal processes. Preheat your charcoal grill to medium-high temperature (approximately 200-250°C) before placing oiled grates inside. This temperature range promotes optimal oil polymerisation without causing degradation.
Maintain consistent heat for 15-20 minutes, allowing the oil to smoke and cure into a protective patina. During this process, the grates develop a darker, more resistant surface coating. Subsequently, turn off heat sources and allow grates to cool gradually within the closed grill chamber.
Pre-Cook Testing and Preparation
Test seasoned grates before cooking food by heating them and observing smoke production patterns. Properly seasoned grates produce minimal smoke and display uniform colouration across their surface. Moreover, water droplets should bead and roll off rather than soaking into the metal.
Perform a preliminary cooking test using vegetables or bread slices to assess non-stick properties and flavour transfer. These test foods reveal any remaining cleaning residues or inadequate seasoning coverage. Therefore, address any issues before preparing your main meal.
Initial Cooking Recommendations
Begin with high-fat content foods like sausages or marinated meats during your first few cooking sessions after cleaning and seasoning. These foods contribute additional oils to the seasoning layer whilst being more forgiving of any remaining surface irregularities. Additionally, avoid acidic marinades initially as they can compromise new seasoning coats.
Cook at moderate temperatures for the first 2-3 uses to allow the seasoning to fully cure and stabilise. High-heat cooking immediately after seasoning can cause the protective coating to flake or become uneven. Similarly, gentle cleaning with warm water and soft brushes maintains the seasoning integrity between cooking sessions.
Preventing Future Rust Formation
Prevention proves more effective than treatment when managing rust on charcoal grill grates. Consequently, establishing proper maintenance routines protects your investment whilst ensuring consistent cooking performance throughout the grilling season.
Regular Cleaning Schedule After Each Use
Clean grates immediately after each grilling session whilst they remain warm but not scorching hot. This timing allows grease and food particles to release easily without requiring aggressive scrubbing that damages protective coatings. Furthermore, warm grates dry quickly, preventing moisture accumulation that accelerates rust formation.
Use a brass brush or grill scraper to remove debris, followed by a damp cloth to eliminate residual particles. Additionally, apply a thin layer of cooking oil whilst grates remain slightly warm to maintain seasoning and create a moisture barrier. This post-cooking routine takes merely 5-10 minutes but significantly extends grate lifespan.
Proper Storage Techniques and Covers
Store grill grates in dry environments with adequate ventilation to prevent condensation buildup. Moreover, remove grates from outdoor grills during extended periods of non-use, particularly throughout winter months when moisture exposure increases substantially.
Invest in breathable grill covers that allow air circulation whilst protecting against direct rain and snow exposure. Waterproof covers without ventilation create humid microclimates that promote rust development. Therefore, choose covers with mesh vents or partially open designs that balance protection with airflow.
Moisture Control and Ventilation
Control humidity levels around stored grates using silica gel packets or moisture absorbers in enclosed storage areas. These desiccants maintain optimal conditions by removing excess water vapour from surrounding air. Similarly, position grates on elevated surfaces rather than directly on concrete floors that conduct moisture.
Ensure storage areas receive regular air circulation through natural or mechanical ventilation systems. Stagnant air promotes condensation formation, particularly during temperature fluctuations between day and night cycles. Consequently, crack windows or use fans in garages and sheds where grates overwinter.
Seasonal Maintenance Routines
Perform comprehensive grate inspections at the beginning and end of each grilling season to identify early rust formation. Spring preparation involves thorough cleaning, re-seasoning, and minor rust spot treatment before regular use commences. Autumn maintenance focuses on deep cleaning and protective coating application before winter storage.
- Spring routine: Deep clean, inspect for damage, re-season completely
- Mid-season: Weekly cleaning checks, spot treatment as needed
- Autumn routine: Thorough cleaning, oil coating, proper storage preparation
- Winter storage: Monthly ventilation checks, moisture level monitoring
Early Rust Spot Treatment
Address rust spots immediately upon discovery to prevent spread across grate surfaces. Small rust formations respond effectively to fine steel wool treatment followed by immediate re-seasoning of affected areas. However, allow treated spots to cure completely before exposing them to cooking temperatures.
Monitor high-wear areas including grate intersections and contact points where rust typically initiates. These vulnerable zones require extra attention during regular cleaning and may benefit from additional oil applications. Furthermore, document rust locations to track progression patterns and adjust prevention strategies accordingly.
When to Consider Grate Replacement
Replace grates when rust penetration exceeds surface-level corrosion and creates structural weakness or safety concerns. Deep pitting that compromises metal integrity poses risks of breakage during cooking, potentially causing food contamination or injury. Additionally, extensive rust coverage that resists treatment efforts indicates advanced deterioration.
Evaluate replacement costs against restoration time investment, particularly for budget grates that may cost less to replace than restore. Professional-grade stainless steel grates justify extensive restoration efforts due to their superior durability and higher replacement costs. However, cast iron grates with severe rust damage often prove more economical to replace than rehabilitate through multiple treatment cycles.
Frequently Asked Questions
How often should I clean my charcoal grill grates to prevent rust?
Clean your grill grates after every 3-4 uses or whenever you notice food residue buildup. For rust prevention, perform a deep clean monthly during grilling season and apply a light coating of oil after each cleaning. Store your grill in a dry location and use a waterproof cover to minimise moisture exposure.
Can I use household items to remove rust from my grill grates?
Yes, common household items work excellently for rust removal. Create a paste using white vinegar and baking soda for light to moderate rust. For stubborn spots, use steel wool or a wire brush. Alternatively, soak grates in undiluted white vinegar for 2-4 hours before scrubbing with coarse salt.
Is it safe to cook on slightly rusty grill grates?
Light surface rust is generally safe after proper cleaning, but avoid cooking on heavily rusted grates. Rust flakes can contaminate food and cause digestive irritation. If rust covers more than 25% of the cooking surface or creates structural weakness, replace the grates immediately for food safety.
Which grill grate materials are most resistant to rust?
Stainless steel grates offer the best rust resistance, lasting 15+ years with minimal maintenance. Porcelain-coated grates also resist rust well until the coating chips. Cast iron grates rust most easily but can last 10+ years with proper seasoning and care. Carbon steel falls between these options.
How do I season my grill grates after cleaning off rust?
After cleaning, season your grates immediately to prevent re-rusting. Apply a thin layer of high-heat cooking oil (vegetable or flaxseed oil works well), then heat the grill to 200-250°C for 15-20 minutes. Allow to cool completely. This creates a protective barrier and improves non-stick properties.
What's the best way to store grill grates to prevent rust?
Store clean, dry grates in a moisture-free environment. Apply a light coating of oil before storage, wrap in newspaper or cloth, and keep indoors if possible. If storing outdoors, use a waterproof grill cover and consider removing grates during winter months in the UK’s damp climate.
Can I prevent rust from forming in the first place?
Yes, prevention is easier than removal. Key prevention steps include:
- Clean grates after each use while still warm
- Apply oil coating after cleaning
- Store in dry conditions with proper ventilation
- Use a quality grill cover
- Season cast iron grates regularly
How long does it take to remove rust using vinegar and baking soda?
For light rust, allow 30-60 minutes for the paste to work before scrubbing. Moderate rust may require 2-4 hours of soaking time. Heavily rusted grates might need overnight treatment or multiple applications. Always scrub thoroughly after the soaking period and rinse completely before seasoning.
You May Also Like
How to Clean Washing Machine Filter: Complete Guide 2026

How to Clean Artificial Grass: Complete Maintenance Guide