How to Clean a Grill: Complete Guide for Gas & Charcoal
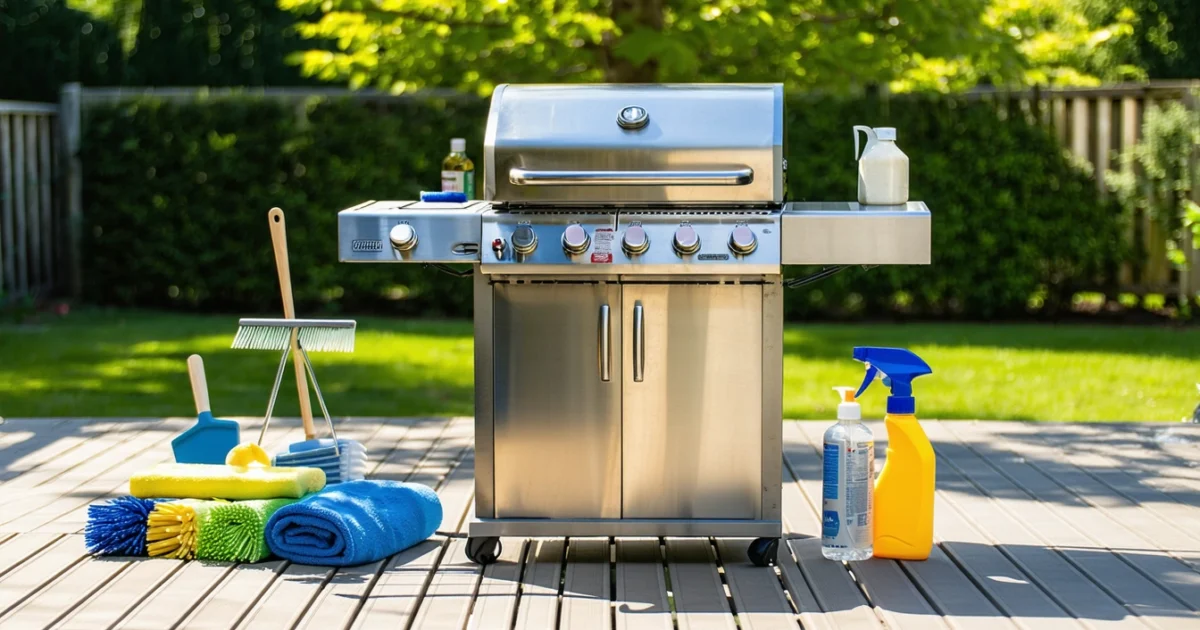
How to clean a grill properly involves removing grease buildup, scrubbing cooking grates, and maintaining all components to ensure safe cooking and extend your grill’s lifespan. Regular cleaning prevents rust formation, eliminates harmful bacteria, and maintains optimal heat distribution for better-tasting food.
Whether you own a gas grill or charcoal grill, effective cleaning requires the right tools and techniques. Most importantly, always ensure your grill is completely cool before starting any cleaning process to prevent burns and damage.
This comprehensive guide covers everything from essential grill cleaning supplies to deep cleaning methods using both commercial degreasers and natural alternatives like vinegar and baking soda. Additionally, you’ll learn proper maintenance schedules and common mistakes to avoid when cleaning different grill materials.
TL;DR
- Safety first: Always clean a completely cool grill and disconnect gas or remove charcoal before starting
- Essential tools: Use appropriate grill brushes, scrapers, degreasers, and protective gear for effective cleaning
- Regular maintenance: Clean grates after each use, perform weekly deep cleaning for frequent users, and schedule comprehensive monthly inspections
- Natural alternatives: Vinegar, baking soda, and onion halves provide chemical-free cleaning options for health-conscious grillers
- Component-specific care: Different materials (cast iron, stainless steel, porcelain) require specific cleaning approaches and rust prevention methods
Essential Grill Cleaning Supplies and Tools
Effective grill cleaning requires specific tools and supplies designed to handle grease, carbon buildup, and high-temperature residues. Furthermore, having the right equipment ensures safe cleaning while protecting your grill’s surfaces from damage.
Grill Brush Selection Guide
Wire brushes provide aggressive scrubbing power for heavy carbon deposits on cast iron and steel grates. However, wire bristles can break off and potentially contaminate food, so inspect brushes regularly for loose bristles.
Brass brushes offer excellent cleaning performance without the safety concerns of steel wire. Additionally, brass bristles resist corrosion and work effectively on porcelain-coated grates without causing scratches.
Nylon bristle brushes provide the safest option for delicate surfaces like porcelain enamel and non-stick coatings. Moreover, these brushes eliminate the risk of metal contamination while still removing stubborn grease buildup.
Scrapers and Removal Tools
Putty knives excel at removing thick grease layers from firebox walls and drip pans. Similarly, plastic scrapers protect delicate surfaces while effectively loosening baked-on residues.
Grill stones and pumice blocks tackle extremely stubborn buildup on grates and cooking surfaces. These abrasive tools work particularly well on rusty grill grates that need restoration.
Cleaning Solutions: Commercial vs Natural
| Solution Type | Best For | Advantages | Considerations |
|---|---|---|---|
| Commercial Degreasers | Heavy grease buildup | Fast-acting, powerful | Chemical residues, ventilation needed |
| Vinegar Solution | General cleaning, rust prevention | Natural, safe, affordable | Slower action on tough buildup |
| Baking Soda Paste | Scrubbing action needed | Abrasive, non-toxic | Requires elbow grease |
| Dish Soap | Regular maintenance | Gentle, readily available | Limited degreasing power |
Commercial grill cleaners contain powerful degreasers that dissolve carbonized food and grease quickly. Nevertheless, these products require careful handling and thorough rinsing to prevent chemical contamination of food surfaces.
Natural cleaning alternatives include white vinegar, baking soda, and lemon juice, which provide effective cleaning without harsh chemicals. Consequently, these options appeal to health-conscious grillers who prefer chemical-free maintenance methods.
Essential Protective Equipment
- Heat-resistant gloves protect hands from sharp edges and cleaning chemicals
- Safety glasses shield eyes from splashing degreasers and debris
- Aprons or old clothes prevent staining from grease and cleaning solutions
- Dust masks protect against inhaling cleaning fumes and particles
Cleaning Accessories and Containers
Microfiber cloths excel at final polishing and removing cleaning residues without scratching surfaces. Meanwhile, disposable paper towels handle initial grease removal and messy cleanup tasks.
Non-abrasive sponges work effectively for general scrubbing without damaging grill finishes. Additionally, steel wool pads tackle extreme buildup on cast iron surfaces that can withstand aggressive cleaning.
A large bucket holds soapy water for soaking removable parts like grates and drip pans. Furthermore, a disposal container collects scraped grease and debris for proper waste management.
Pro Tip
Pre-Cleaning Safety and Preparation
Proper preparation ensures safe and effective grill cleaning while preventing accidents and damage. Additionally, thorough preparation saves time during the actual cleaning process by organizing tools and creating an optimal workspace.
Temperature Safety and Cooling Requirements
Complete cooling represents the most critical safety requirement before beginning any grill cleaning. Hot surfaces cause severe burns, while heated grease creates dangerous splashing hazards when mixed with cleaning solutions.
Gas grills require 2-4 hours of cooling time after use, depending on cooking duration and ambient temperature. Conversely, charcoal grills need 4-6 hours because coals retain heat longer than gas burners.
Safety Warning
Fuel Disconnection and Removal
Gas grill owners must disconnect propane tanks completely before cleaning begins. Turn the tank valve clockwise until tight, then disconnect the regulator coupling by turning counterclockwise.
Charcoal grill preparation involves removing all ash and unburned charcoal from the firebox. Furthermore, dispose of ashes in a metal container, as they can remain hot for up to 48 hours after cooking.
- Store propane tanks upright in well-ventilated outdoor areas
- Check tank connections for leaks using soapy water
- Remove charcoal briquettes to prevent moisture absorption
- Clean ash catchers thoroughly before reassembly
Component Removal and Disassembly
Systematic component removal allows thorough cleaning of individual parts while preventing damage during the process. Moreover, removing components provides better access to hidden grease buildup and hard-to-reach areas.
Cooking grates lift out easily once cool, though some models require sliding or rotating to release locking mechanisms. Similarly, warming racks typically unhook from support brackets or slide out of mounting slots.
Drip pans and grease trays slide out from underneath the firebox in most grill designs. However, some models require removing screws or clips that secure these components in place.
| Component | Removal Method | Special Considerations |
|---|---|---|
| Cooking Grates | Lift straight up | May require sliding motion |
| Warming Racks | Unhook from brackets | Note bracket orientation |
| Drip Pans | Slide out forward | Empty grease first |
| Heat Plates | Lift after grates removed | Heavy – use both hands |
Workspace Setup and Ventilation
Outdoor cleaning provides optimal ventilation for chemical fumes while containing mess and splashing. Additionally, garden hoses and outdoor water sources make rinsing components more convenient than indoor alternatives.
Cover nearby surfaces with plastic sheeting or tarps to protect decking, patio furniture, and landscaping from cleaning overspray. Furthermore, position cleaning supplies within easy reach to maintain workflow efficiency.
Indoor cleaning requires opening windows and using exhaust fans to prevent fume accumulation. Nevertheless, outdoor cleaning remains preferable for safety and convenience reasons.
Manufacturer Guidelines and Warranty Considerations
Manufacturer cleaning recommendations specify approved cleaning products and methods that maintain warranty coverage. Consequently, using prohibited chemicals or abrasive techniques can void warranty protection for expensive grill components.
Weber grills prohibit oven cleaners on porcelain surfaces, while Traeger specifically recommends avoiding water on electrical components. Similarly, Big Green Egg warns against using soap on ceramic surfaces that can absorb cleaning residues.
Documentation typically includes specific guidance for different surface materials, from stainless steel maintenance to cast iron seasoning preservation. Therefore, consulting your owner’s manual prevents costly cleaning mistakes and component damage.
Pro Tip
Cleaning Gas Grill Components
Gas grill components require systematic cleaning to maintain performance and prevent dangerous blockages. Moreover, each component demands specific techniques that protect materials while removing grease, debris, and carbon buildup effectively.
Cleaning Burner Tubes and Checking for Clogs
Burner tube maintenance prevents dangerous gas flow restrictions that cause uneven heating and potential flare-ups. First, disconnect the gas supply and allow the grill to cool completely before beginning burner inspection.
Remove burner tubes by unscrewing mounting brackets or lifting them from support clips. Subsequently, inspect each tube for spider webs, grease deposits, and food debris that commonly block gas ports during storage periods.
Clean burner tubes using a bottle brush or pipe cleaner to dislodge interior blockages without damaging delicate gas ports. Additionally, use compressed air to blow debris from gas holes, working from inside the tube outward to prevent pushing material deeper.
Safety Warning
Degreasing the Firebox Interior Walls and Bottom
The firebox interior accumulates grease and carbon deposits that create fire hazards and affect heat distribution. Therefore, thorough degreasing removes combustible buildup while preserving protective coatings on interior surfaces.
Apply commercial grill degreaser to interior walls and bottom surfaces, allowing the solution to penetrate stubborn grease for 10-15 minutes. However, avoid harsh chemicals on porcelain-coated surfaces that can damage protective finishes permanently.
Scrub walls with a non-abrasive sponge or plastic scraper to remove loosened grease without scratching surfaces. Furthermore, work from top to bottom to prevent dripping cleaned grease onto already-cleaned areas below.
Rinse thoroughly with water to remove all cleaning residue that could create unpleasant flavors during future cooking sessions. Similarly, dry completely before reassembling components to prevent rust formation on metal surfaces.
Cleaning Grease Management System and Drip Pans
Grease management systems channel cooking fats away from heat sources to prevent dangerous flare-ups and fires. Consequently, regular cleaning maintains proper drainage flow and prevents overflow situations during heavy cooking sessions.
Remove drip pans and grease cups from their mounting positions, noting their orientation for proper reassembly. Additionally, empty accumulated grease into appropriate disposal containers rather than pouring down drains that can cause plumbing blockages.
Wash drip pans in hot soapy water using dish soap that cuts through grease effectively without requiring harsh chemicals. Meanwhile, clean grease channels and slides with degreasing solution to remove sticky residue that impedes proper drainage.
Inspect grease management components for cracks, warping, or damage that could allow grease to leak onto heating elements. Therefore, replace damaged components immediately to maintain safe grilling conditions and prevent potential fire hazards.
Maintaining Gas Connections and Control Knobs
Gas connections require careful cleaning to maintain proper sealing while avoiding damage to critical safety components. Moreover, control knobs and valves need regular maintenance to ensure smooth operation and accurate temperature control.
Clean gas connection fittings with a dry brush or cloth to remove debris without introducing moisture that could cause corrosion. However, never apply liquid cleaners directly to gas fittings or valve assemblies that could compromise sealing integrity.
Remove control knobs by pulling them straight off their valve stems, then wash in warm soapy water to remove grease and food residue. Subsequently, clean valve stems with a damp cloth while avoiding excessive moisture that could penetrate internal mechanisms.
Apply a small amount of food-grade lubricant to valve stems if knobs turn stiffly or resist smooth rotation. Nevertheless, consult manufacturer guidelines before applying any lubricants to gas control components that affect safety systems.
Cleaning Exterior Surfaces and Handles
Exterior cleaning protects your grill’s appearance while preventing corrosion that reduces lifespan and resale value. Furthermore, proper exterior maintenance creates a hygienic cooking environment that prevents contamination from dirty surfaces.
Clean stainless steel surfaces using specialized stainless steel cleaner applied with microfiber cloths that prevent scratching. Additionally, wipe in the direction of the grain to maintain the brushed finish appearance that manufacturers design into premium grills.
For painted surfaces, use mild dish soap and warm water rather than abrasive cleaners that can damage protective coatings. Similarly, grease removal techniques used for kitchen cabinets work effectively on grill exteriors without causing damage.
Clean handles and control panel areas with antibacterial wipes to remove germs and food residue from frequently-touched surfaces. Therefore, regular sanitizing prevents cross-contamination between raw food handling and cooked food preparation areas.
Apply protective coatings like car wax to painted surfaces or specialized stainless steel protectant to maintain appearance and resist future staining. Consequently, protective treatments reduce cleaning frequency while preserving your grill’s original finish quality.
Cleaning Charcoal Grill Components
Charcoal grills require systematic component cleaning to maintain performance and extend lifespan. Moreover, thorough cleaning prevents grease buildup that creates fire hazards and affects food flavor quality.
Removing Ash and Charcoal Debris from Fire Bowl
Empty the fire bowl completely before cleaning to prevent ash from mixing with cleaning solutions and creating abrasive paste. Additionally, cold ash disposal requires metal containers rather than plastic bags that can melt from residual heat.
Use a shop vacuum or ash vacuum to remove fine ash particles that regular brushes cannot capture effectively. Furthermore, vacuum cleaning prevents ash clouds that coat surrounding surfaces and create respiratory irritation during cleaning sessions.
Scrape stubborn charcoal residue using a putty knife or grill scraper designed for metal surfaces without scratching. Similarly, soaking dried debris with warm water loosens carbonized material that resists mechanical removal techniques.
Cleaning Air Vents and Dampers for Proper Airflow
Clean air vents regularly to maintain precise temperature control that charcoal grilling demands for consistent results. Therefore, blocked vents create uneven heat distribution that affects cooking performance and fuel efficiency.
Remove vent covers and soak them in warm soapy water to dissolve grease buildup that restricts airflow. Additionally, use bottle brushes or pipe cleaners to reach narrow vent passages where standard cleaning tools cannot access effectively.
Test damper movement after cleaning to ensure smooth operation that allows precise airflow adjustment during cooking. Consequently, properly functioning dampers enable temperature control techniques that separate skilled grillers from beginners.
Scrubbing the Interior Bowl and Ash Catcher
Clean the interior bowl using dish soap and warm water rather than harsh chemicals that can leave residues affecting food safety. Moreover, gentle cleaning preserves protective coatings that prevent rust formation in high-moisture environments.
Scrub with non-abrasive brushes or plastic scrapers that remove buildup without damaging metal surfaces that protect against corrosion. Similarly, avoid steel wool that creates scratches where bacteria and grease accumulate between cleaning sessions.
Empty and clean the ash catcher after every few uses to prevent overflow that creates mess and potential fire hazards. Additionally, regular ash catcher maintenance prevents rust damage that compromises structural integrity over time.
Maintaining Hinges and Moving Parts
Lubricate hinges and moving parts with high-temperature grease designed for grill applications rather than general-purpose lubricants that break down under heat. Furthermore, proper lubrication prevents binding that makes lid operation difficult and unsafe.
Clean hinge pins and pivot points to remove ash and grease accumulation that causes sticking and premature wear. Therefore, regular maintenance extends component lifespan while ensuring smooth operation during cooking sessions.
Inspect spring mechanisms and adjustment screws for proper tension that supports lid weight without excessive force requirements. Consequently, well-maintained hardware enhances user safety and cooking convenience throughout the grill’s service life.
Cleaning Exterior Surfaces and Legs
Clean exterior surfaces using appropriate cleaners for your grill’s finish material to prevent damage while maintaining appearance. Additionally, regular exterior cleaning prevents corrosion that reduces structural integrity and resale value over time.
For painted surfaces, use mild dish soap solutions rather than abrasive cleaners that scratch protective coatings. Similarly, grease removal techniques used for kitchen surfaces work effectively on grill exteriors without causing finish damage.
Clean grill legs and wheels to remove grease drips and debris that attract insects and create unsanitary conditions. Moreover, clean wheels ensure smooth mobility when moving your grill for cleaning or storage purposes.
Apply protective treatments like automotive wax to painted surfaces or specialized metal protectants to resist future staining and corrosion. Therefore, protective coatings reduce cleaning frequency while preserving your grill’s original appearance and functionality.
Deep Cleaning Grill Grates and Cooking Surfaces
Grill grates require intensive cleaning methods that remove stubborn grease buildup and food residue effectively. Furthermore, deep cleaning techniques restore cooking performance while preventing food contamination from accumulated debris.
Heat Cleaning Method for Maximum Residue Removal
The heat cleaning method burns off grease residue at high temperatures, creating an effective self-cleaning process. Additionally, this technique works particularly well for cast iron and stainless steel grates that withstand extreme heat exposure.
Preheat your grill to 500-550°F and maintain this temperature for 15-20 minutes to carbonize stuck-on food particles. Subsequently, the high heat transforms grease into ash that brushes away easily with a grill brush or scraper.
Allow grates to cool completely before handling, then scrub with a wire brush to remove loosened debris. Therefore, this method provides thorough cleaning without chemical cleaners while preparing surfaces for seasoning treatments.
Soaking Techniques for Stubborn Buildup
Warm soapy water soaking softens hardened grease and food particles for easier removal from cooking surfaces. Moreover, extended soaking reduces scrubbing effort while protecting grate finishes from aggressive cleaning damage.
Fill a large container or bathtub with warm water and add 2-3 tablespoons of dish soap per gallon of water. Then, submerge grates completely and allow them to soak for 2-4 hours depending on buildup severity.
Scrub soaked grates with a non-abrasive brush or sponge to remove loosened debris without scratching surfaces. Consequently, this gentle approach preserves protective coatings while achieving thorough cleanliness.
Natural Cleaning with Vinegar and Baking Soda
Vinegar and baking soda combinations create powerful natural cleaning reactions that dissolve grease without harsh chemicals. Additionally, this eco-friendly approach safely cleans all grate materials while eliminating chemical residue concerns.
Sprinkle baking soda generously over grate surfaces, then spray with white vinegar to activate the cleaning reaction. Furthermore, the fizzing action lifts embedded grease while neutralizing odors that accumulate during cooking sessions.
Allow the mixture to work for 15-30 minutes before scrubbing with a brush to remove loosened debris. Therefore, this natural method provides effective cleaning power while remaining safe for food contact surfaces.
Material-Specific Scrubbing Techniques
Different grate materials require specific cleaning approaches to prevent damage while achieving optimal cleanliness. Moreover, understanding material properties ensures you select appropriate tools and techniques for each surface type.
- Cast iron grates: Use stiff wire brushes and avoid soaking to prevent rust formation
- Stainless steel surfaces: Clean with non-abrasive brushes following grain direction to prevent scratching
- Porcelain-coated grates: Use soft brushes and gentle pressure to avoid chipping protective coatings
- Chrome-plated surfaces: Apply mild cleaners with soft cloths to maintain reflective finish quality
Select cleaning tools that match your grate material hardness to prevent surface damage during maintenance. Consequently, proper tool selection preserves grate functionality while extending service life through appropriate care methods.
Overnight Cleaning for Heavy Soiling
Overnight cleaning methods tackle heavily soiled grates that resist standard cleaning approaches effectively. Additionally, extended treatment time allows cleaning agents to penetrate deep into grease layers for comprehensive removal.
Create a cleaning paste using baking soda and water, then apply it generously to grate surfaces before covering with plastic wrap. Subsequently, the extended contact time breaks down stubborn residue while preventing paste from drying out.
Alternatively, place grates in garbage bags with ammonia-soaked rags for overnight treatment in well-ventilated areas. Therefore, ammonia vapors dissolve grease buildup without requiring direct contact or scrubbing effort.
Rinse treated grates thoroughly with water and scrub lightly to remove loosened debris the following day. Moreover, this intensive approach restores heavily neglected grates to like-new condition with minimal physical effort.
Quick Maintenance with Natural Alternatives
Onion halves provide a natural cleaning solution for light maintenance between deep cleaning sessions. Furthermore, this traditional method uses natural acids and enzymes to break down fresh grease while adding subtle flavor enhancement.
Cut a large onion in half and rub the cut surface across warm grate surfaces to remove light buildup. Additionally, onion juices contain natural cleaning compounds that dissolve grease while leaving a protective coating that prevents sticking.
This technique works best on grates that are still warm from cooking, allowing onion moisture to steam-clean surfaces effectively. Therefore, regular onion cleaning maintains grate condition while reducing the frequency of intensive cleaning requirements.
For specialized cleaning challenges like rust removal, consider consulting our detailed guide on cleaning rusty charcoal grill grates for comprehensive restoration techniques.
Removing Rust and Restoring Grill Grates
Rust formation on grill grates creates safety concerns and affects food quality, requiring immediate attention to prevent further deterioration. However, distinguishing between rust and natural seasoning on cast iron grates determines the appropriate restoration approach.
Identifying Rust vs Seasoning on Cast Iron Grates
Seasoning appears as a dark, smooth coating that protects cast iron surfaces from moisture and corrosion. Furthermore, properly seasoned grates display uniform black or dark brown coloration with a slightly glossy finish that feels smooth to touch.
Rust manifests as reddish-brown patches with rough, flaky textures that easily transfer to fingers when touched. Additionally, rust spots often appear raised above the surface level, creating uneven cooking surfaces that stick to food.
Light surface oxidation may appear orange or brown without flaking, indicating early-stage rust formation that responds well to gentle cleaning methods. Therefore, early intervention prevents extensive damage requiring aggressive restoration techniques.
Using Steel Wool and Rust Removal Products Safely
Fine steel wool (grade 0000) removes light rust without damaging underlying metal surfaces when used with gentle circular motions. Moreover, coarser steel wool grades create scratches that promote future rust formation and should be avoided on cooking surfaces.
Commercial rust removal products containing phosphoric acid convert rust into protective coatings while dissolving stubborn oxidation. However, these products require thorough rinsing and neutralization before food contact to prevent chemical residue contamination.
Safety Precaution
Natural alternatives like white vinegar and baking soda paste provide gentler rust removal for food-safe restoration. Furthermore, these household products dissolve rust through acidic action without introducing harmful chemicals to cooking surfaces.
Soak heavily rusted grates in white vinegar for 2-4 hours before scrubbing with steel wool to loosen stubborn oxidation. Additionally, this soaking process softens rust deposits, reducing scrubbing effort and preventing surface damage.
Re-seasoning Cast Iron Grates After Rust Removal
Clean grates must be completely dry before seasoning to prevent moisture from causing new rust formation under protective coatings. Therefore, thorough drying using heat or compressed air ensures optimal seasoning adhesion and longevity.
Apply thin layers of high-temperature cooking oil such as flaxseed, grapeseed, or canola oil using paper towels or lint-free cloths. Moreover, excessive oil application creates sticky surfaces that attract debris rather than providing smooth protective coatings.
- Heat grill to 350-400°F (175-200°C) with grates in place
- Remove grates and apply oil evenly across all surfaces
- Wipe excess oil to prevent pooling and sticky residue
- Return grates to grill and heat for 15-20 minutes
- Repeat oil application and heating process 2-3 times
Multiple thin seasoning layers create durable protection that improves with each cooking session. Furthermore, properly seasoned grates develop natural non-stick properties that enhance cooking performance while preventing rust formation.
Preventing Future Rust with Proper Storage and Maintenance
Moisture control represents the primary factor in preventing rust formation on grill grates and metal components. Additionally, proper storage techniques eliminate humidity exposure that accelerates oxidation processes.
Store grills in covered areas or use waterproof covers that allow air circulation while blocking rain and snow. However, plastic covers without ventilation trap moisture, creating ideal conditions for rust development.
Apply light oil coatings to clean, dry grates before extended storage periods to create moisture barriers. Furthermore, this protective layer prevents air contact with metal surfaces while maintaining seasoning integrity.
Regular cleaning after each use removes food residue and grease that retain moisture against metal surfaces. Therefore, consistent maintenance prevents corrosive buildup that leads to extensive rust damage requiring professional restoration.
When to Replace vs Restore Heavily Rusted Components
Grates with structural damage such as holes, cracks, or significant metal loss require replacement rather than restoration attempts. Moreover, compromised grates pose safety risks and cannot maintain proper cooking temperatures or food support.
Surface rust covering less than 25% of grate area typically responds well to restoration techniques and re-seasoning processes. However, extensive rust penetration that affects metal thickness indicates irreversible damage requiring component replacement.
| Condition | Action | Success Rate |
|---|---|---|
| Light surface rust | Clean and re-season | 95%+ |
| Moderate rust patches | Steel wool treatment | 80-90% |
| Heavy rust with pitting | Professional restoration | 60-70% |
| Structural damage | Replace immediately | N/A |
Cost analysis often favors replacement when restoration materials and labor exceed 50% of new grate prices. Furthermore, new grates provide warranty protection and guaranteed performance that restored components cannot match.
Professional restoration services offer specialized techniques for valuable or antique grill components that justify higher restoration costs. Additionally, expert restoration preserves original specifications and appearance that DIY methods cannot achieve consistently.
Natural and Chemical-Free Cleaning Methods
Natural cleaning methods provide safe alternatives to harsh chemicals while delivering effective grease removal and grill maintenance. Furthermore, these eco-friendly solutions protect your health and preserve food safety without compromising cleaning performance.
Vinegar and Baking Soda Paste for Degreasing
Combining white vinegar with baking soda creates a powerful degreasing paste that breaks down stubborn grease buildup naturally. Additionally, this alkaline-acid reaction produces fizzing action that loosens burnt-on food particles from grate surfaces.
Mix three parts baking soda with one part vinegar to form a thick paste consistency. Then, apply the mixture generously to cooled grill grates and allow the chemical reaction to work for 15-20 minutes before scrubbing.
This natural degreasing method effectively removes grease without toxic fumes or chemical residues that could contaminate food. Moreover, the paste formula adheres to vertical surfaces better than liquid cleaners, ensuring thorough coverage of all grate areas.
Lemon Juice for Cutting Grease and Adding Shine
Fresh lemon juice contains natural citric acid that cuts through grease while leaving grill grates with a brilliant shine. Similarly, the acidic properties help dissolve mineral deposits and water spots that dull metal surfaces.
Apply lemon juice directly to warm grates using a halved lemon as a natural scrubber. Consequently, the fruit’s texture provides gentle abrasion while the juice penetrates grease layers for easier removal.
Lemon cleaning also imparts a fresh citrus scent that eliminates lingering food odors from previous cooking sessions. Therefore, this method serves dual purposes of cleaning and deodorizing your grill naturally.
Steam Cleaning with Aluminum Foil and Water
Steam cleaning harnesses heat and moisture to soften grease buildup for effortless removal using common household materials. Additionally, this method requires no chemical products while achieving professional-grade cleaning results.
- Place aluminum foil over dirty grates with edges sealed
- Pour hot water onto the foil to create steam
- Allow steam to work for 10-15 minutes
- Remove foil and scrub loosened debris with a grill brush
Steam penetrates into crevices and corners that traditional scrubbing cannot reach effectively. Moreover, the moist heat softens carbonized food particles that would otherwise require aggressive scraping.
Coffee Grounds as Natural Abrasive
Used coffee grounds provide gentle abrasive action that removes stuck-on food without scratching delicate grill surfaces. Furthermore, coffee grounds contain natural oils that condition metal while cleaning, preventing rust formation.
Apply damp coffee grounds to grates using a cloth or paper towel for controlled scrubbing action. Subsequently, the grounds’ texture removes debris while their acidity helps break down grease deposits naturally.
This recycling approach transforms kitchen waste into effective cleaning material while avoiding commercial abrasives that may damage grill finishes. Deep kitchen cleaning often benefits from similar natural abrasive techniques that protect surfaces while delivering thorough results.
Salt Scrubbing for Immediate Post-Cooking Cleaning
Coarse salt creates an effective abrasive that removes fresh grease and food particles while grates remain warm from cooking. Therefore, immediate post-cooking cleaning prevents debris from hardening and becoming difficult to remove.
Sprinkle coarse salt generously over warm grates and scrub with a halved onion or potato for natural cleaning action. Consequently, the vegetable’s moisture activates the salt while providing gentle scrubbing texture that won’t damage grate surfaces.
Safety Tip
Salt scrubbing works most effectively on stainless steel and cast iron grates that can withstand abrasive action without coating damage. However, avoid this method on non-stick or porcelain-coated surfaces that require gentler cleaning approaches.
Post-Cleaning Maintenance and Seasoning
Proper post-cleaning maintenance transforms a freshly cleaned grill into a protected, ready-to-use cooking appliance. Moreover, thorough drying and seasoning prevent rust formation while ensuring optimal performance for your next grilling session.
Thorough Drying Prevents Rust Formation
Complete moisture removal represents the most critical step in preventing rust on grill components. Therefore, air-dry all cleaned parts for at least 30 minutes before reassembly, ensuring water doesn’t remain in crevices or joints.
Use clean towels to manually dry surfaces that retain moisture, particularly around burner tubes and gas connections. Subsequently, position grates and other removable components in direct sunlight or near a heat source for accelerated drying.
Check hidden areas where water commonly pools, including drip pans, grease channels, and underneath control knobs. Furthermore, these overlooked spots often develop rust problems when moisture remains trapped after cleaning.
Re-Seasoning Cast Iron Grates
Cast iron grates require oil seasoning to maintain their non-stick properties and prevent rust formation. Additionally, proper seasoning creates a protective barrier that improves with each use, developing better cooking performance over time.
- Apply a thin layer of high-heat cooking oil (vegetable, canola, or grapeseed)
- Heat grill to medium temperature for 15-20 minutes
- Allow grates to cool completely before wiping excess oil
- Repeat process monthly or after deep cleaning sessions
Avoid using olive oil or butter for seasoning, as these oils have low smoke points that create sticky residues instead of protective coatings. Consequently, high-heat oils polymerize properly, forming durable non-stick surfaces that enhance food release.
Proper Component Reassembly
Systematic reassembly ensures all components fit correctly and function safely after cleaning. Therefore, follow your grill’s manual or take reference photos before disassembly to guide proper reconstruction.
Install flavorizer bars or heat tents in their correct positions before replacing cooking grates, ensuring proper heat distribution and grease management. Subsequently, check that all clips, brackets, and supports engage securely without forcing connections.
Replace any damaged gaskets or seals discovered during cleaning, as compromised seals affect temperature control and safety. However, ensure replacement parts match your grill’s specifications for proper fit and performance.
Testing Gas Connections and Burner Function
Safety testing confirms all gas connections remain secure and leak-free after cleaning and reassembly. Moreover, proper testing prevents dangerous gas leaks that could cause fires or explosions during operation.
Apply soapy water to all gas fittings and connections while the gas supply is turned on but burners remain off. Therefore, bubbling indicates gas leaks that require immediate attention from qualified technicians.
Test each burner individually to ensure proper ignition and flame patterns after reassembly. Furthermore, uneven flames or difficulty lighting may indicate blocked burner ports that need additional cleaning attention.
Gas Safety Warning
Applying Protective Coatings
Protective treatments extend grill life by preventing corrosion and maintaining appearance between cleaning sessions. Additionally, appropriate coatings create barriers against moisture, grease, and environmental contaminants that cause deterioration.
Apply stainless steel polish to exterior surfaces using microfiber cloths for streak-free results that resist fingerprints and water spots. Subsequently, these treatments also make future cleaning easier by preventing buildup adhesion.
Consider applying food-safe protective sprays to interior surfaces that don’t contact food directly, such as firebox walls and heat shields. However, avoid coating cooking grates or areas where food preparation occurs to prevent contamination.
Similar protective maintenance applies to other kitchen appliances, as demonstrated in comprehensive deep kitchen cleaning approaches that preserve equipment longevity through proper care.
Proper post-cleaning maintenance extends grill life by up to 40% while ensuring safe, optimal cooking performance
Cleaning Schedule and Maintenance Tips
Establishing a consistent cleaning schedule prevents grease buildup and extends your grill’s lifespan significantly. Moreover, regular maintenance ensures optimal cooking performance while reducing the risk of flare-ups and food contamination.
After Each Use: Essential Quick Clean
Basic grate cleaning immediately after cooking prevents food residue from hardening and becoming difficult to remove. Additionally, warm grates clean more easily than cold ones, making this the most efficient cleaning approach.
Remove excess grease from drip pans and grease traps while still warm but not hot. Furthermore, this prevents grease from solidifying and creating stubborn blockages that require intensive cleaning later.
- Scrape cooking grates with a grill brush while warm
- Empty and rinse drip pans
- Wipe exterior surfaces with damp cloth
- Check gas connections for any visible issues
Weekly Deep Cleaning for Frequent Users
Frequent grillers benefit from weekly deep cleaning that addresses areas missed during daily maintenance. Consequently, this schedule prevents heavy buildup while maintaining food safety standards.
Focus on interior surfaces including heat shields, flavorizer bars, and firebox walls during weekly sessions. Therefore, these components accumulate grease and debris that affects heat distribution and cooking quality.
- Remove and soak cooking grates in warm soapy water
- Clean heat shields and flavorizer bars thoroughly
- Scrub firebox interior with appropriate cleaners
- Inspect and clean burner tubes
- Polish stainless steel exterior surfaces
Monthly Comprehensive Cleaning and Inspection
Monthly maintenance involves complete disassembly and thorough inspection of all grill components. Additionally, this schedule allows early detection of wear, corrosion, or damage that could affect safety or performance.
Comprehensive cleaning includes areas typically inaccessible during routine maintenance, such as grease management systems and internal gas lines. Subsequently, this thorough approach prevents major problems and extends equipment life.
| Component | Cleaning Method | Inspection Points |
|---|---|---|
| Burner Assembly | Remove and deep clean | Check for clogs, corrosion |
| Grease System | Complete emptying and washing | Verify proper drainage |
| Gas Connections | Visual inspection only | Look for wear, damage |
| Temperature Gauges | Calibration check | Accuracy verification |
Seasonal Deep Cleaning and Storage Preparation
Seasonal cleaning prepares grills for extended storage periods or intensive cooking seasons. Furthermore, this comprehensive maintenance prevents deterioration during inactive periods and ensures optimal performance when grilling resumes.
Winter storage preparation involves complete cleaning, drying, and protective treatments that prevent corrosion and pest infiltration. Similarly, spring preparation includes thorough inspection and testing before the first cooking session.
- Perform complete disassembly and deep cleaning
- Apply protective coatings to prevent corrosion
- Ensure all components are completely dry
- Cover or store in protected environment
- Disconnect and store gas tanks safely
Warning Signs Requiring Immediate Cleaning
Certain conditions indicate immediate cleaning needs regardless of your regular schedule. Additionally, recognizing these warning signs prevents safety hazards and maintains food quality standards.
Excessive flare-ups during cooking typically indicate grease buildup that requires immediate attention. Moreover, uneven heating patterns or difficulty maintaining temperatures suggest blocked burners or dirty heat distribution components.
Immediate Cleaning Required
- Visible grease accumulation on cooking surfaces
- Persistent smoke production even with clean grates
- Uneven flame patterns or burner ignition issues
- Strong odors that don’t dissipate during preheating
- Pest activity or nesting in grill components
Consistent maintenance schedules reduce cleaning time by up to 60% compared to sporadic deep cleaning sessions. Therefore, establishing regular routines saves time while ensuring optimal grill performance and safety.
Common Cleaning Mistakes to Avoid
Avoiding common cleaning mistakes protects your grill investment while ensuring safe cooking experiences. Furthermore, understanding what not to do prevents costly damage and maintains optimal performance throughout your grill’s lifespan.
Temperature-Related Mistakes
Never clean a hot grill or apply water to heated surfaces, as this creates dangerous steam and can cause severe burns. Additionally, thermal shock from cold water on hot metal can warp grates and damage internal components permanently.
Allow your grill to cool completely for at least 30 minutes after cooking before beginning any cleaning process. Moreover, touching hot surfaces with cleaning tools can melt bristles or damage equipment while creating safety hazards.
Safety Warning
Chemical and Product Mistakes
Harsh chemicals damage grill surfaces and leave toxic residues that contaminate food during subsequent cooking sessions. Specifically, avoid bleach, ammonia-based cleaners, and industrial degreasers on cooking surfaces.
Oven cleaners contain caustic chemicals that corrode aluminum components and strip protective coatings from steel surfaces. Instead, use food-safe degreasers specifically formulated for grilling equipment to maintain safety standards.
- Never use bleach or chlorine-based cleaners
- Avoid ammonia products on any grill components
- Skip industrial degreasers not designed for food equipment
- Don’t use abrasive compounds on coated surfaces
Tool and Technique Mistakes
Wire brushes damage porcelain-coated grates by chipping the protective coating and creating rust-prone areas. Consequently, use nylon brushes or specialized grill stones on coated surfaces to preserve their integrity.
Steel wool and abrasive pads scratch stainless steel surfaces, creating microscopic grooves where bacteria can harbor. Therefore, stick to soft cloths and appropriate cleaning tools for each surface type.
Pressure washers force water into electrical components and gas connections, potentially causing dangerous malfunctions. Similarly, excessive water pressure can damage seals and gaskets throughout the system.
Maintenance System Oversights
Forgetting grease management systems creates fire hazards and attracts pests while compromising food safety standards. Additionally, neglected grease traps overflow and damage surrounding components through corrosive buildup.
Clean grease traps after every 3-5 cooking sessions to prevent dangerous accumulation. Moreover, inspect drain tubes and collection pans regularly for blockages that could cause system failure.
Gas line connections require periodic inspection and cleaning to ensure safe operation and prevent dangerous leaks. However, many grill owners overlook these critical safety components during routine maintenance.
Material-Specific Mistakes
Using incorrect cleaning products for specific grill materials causes irreversible damage and voids manufacturer warranties. For instance, acidic cleaners dissolve aluminum components while alkaline products damage cast iron seasoning.
| Material Type | Avoid These Products | Safe Alternatives |
|---|---|---|
| Porcelain-coated grates | Wire brushes, abrasive cleaners | Nylon brushes, mild detergent |
| Stainless steel | Chlorine bleach, steel wool | Specialized steel cleaners |
| Cast iron | Soap, acidic cleaners | Salt scrubs, oil treatments |
| Aluminum | Acidic or alkaline cleaners | Neutral pH products |
Chrome surfaces require gentle cleaning agents to prevent pitting and corrosion that diminishes appearance and functionality. Furthermore, stainless steel cleaning techniques differ significantly from other metal maintenance approaches.
Proper cleaning technique prevents 85% of premature grill component failures
Understanding these common mistakes helps maintain your grill’s performance while ensuring safe cooking experiences. Consequently, following proper cleaning protocols extends equipment life and preserves food quality standards throughout years of outdoor cooking enjoyment.
Frequently Asked Questions
What's the best way to clean a grill?
The best way to clean a grill involves a systematic approach: ensure the grill is completely cool, disconnect gas or remove charcoal, then clean grates with appropriate brushes, scrape grease from firebox walls, and clean drip pans. Use commercial degreasers for heavy buildup or natural alternatives like vinegar and baking soda for regular maintenance.
What not to clean a grill with?
Avoid using harsh abrasives on porcelain surfaces, steel wool on non-stick coatings, or cleaning products containing ammonia or chlorine bleach. Never use water on a hot grill, and avoid wire brushes with loose bristles that could contaminate food. Also, don’t use oven cleaner on grill grates as it can leave harmful residues.
How often should I clean my grill?
Clean grill grates after each use while they’re still warm for easy maintenance. Perform a deep cleaning weekly for frequent users, and schedule comprehensive monthly inspections including drip pans, firebox, and exterior surfaces. This prevents grease buildup and maintains optimal performance.
How to clean BBQ grill with vinegar and baking soda?
Create a paste with baking soda and water for scrubbing action, then spray with white vinegar for natural degreasing. Let the mixture foam and work for 15-20 minutes before scrubbing with a brush. This combination effectively removes grease and carbon buildup without harsh chemicals.
How to clean grill with onion?
Cut an onion in half and use it as a natural grill brush on warm (not hot) grates. The onion’s natural enzymes help break down grease while the texture provides gentle scrubbing action. This method works best for light cleaning and adds a subtle flavor enhancement to the grates.
How to clean grill grates overnight?
Remove grates and soak them overnight in warm soapy water or a vinegar solution. For stubborn buildup, wrap grates in wet newspaper or paper towels soaked in ammonia (in a well-ventilated area). This extended soaking time loosens carbonized food and grease for easier scrubbing the next day.
How to restore grill grates?
For rusty or heavily damaged grates, use grill stones or pumice blocks to remove rust and buildup. Sand lightly with fine-grit sandpaper if needed, then clean thoroughly and season cast iron grates with cooking oil. For severe damage, consider professional restoration or replacement.
How to clean a flat top grill with brick?
Use a grill brick or pumice stone on a warm (not hot) flat top surface. Apply light pressure and scrub in circular motions to remove carbonized food and grease. The brick’s abrasive texture effectively cleans without scratching the surface when used properly on appropriate grill types.
How to clean a grill with rust?
Remove rust using steel wool or wire brushes on affected areas, then apply white vinegar or lemon juice to neutralize remaining rust. For severe rust, use commercial rust removers following manufacturer instructions. After cleaning, dry thoroughly and apply cooking oil to prevent future rust formation.
How to clean a charcoal grill?
Remove all ash and charcoal debris from the firebox, then clean grates and interior surfaces with appropriate brushes and cleaners. Empty the ash catcher regularly and check air vents for blockages. Clean the exterior with mild soap and protect metal surfaces from rust.
How to clean a grill before first use?
Remove all packaging materials and wash grates with warm soapy water. Wipe down interior surfaces to remove manufacturing oils and debris. Season cast iron grates with cooking oil, then run the grill at high heat for 15-20 minutes to burn off any residues before cooking food.
What type of brush is safest for cleaning grill grates?
Brass brushes offer the best balance of cleaning power and safety, effectively removing buildup without the risk of wire bristles breaking off. Nylon brushes provide the safest option for delicate surfaces, while wire brushes should be inspected regularly for loose bristles that could contaminate food.
Can I use oven cleaner on my grill?
Avoid using oven cleaner on grill grates or cooking surfaces as it can leave harmful chemical residues that transfer to food. Oven cleaners are designed for enclosed ovens, not open grills. Use grill-specific cleaners or natural alternatives for safe and effective cleaning.
How do I prevent grease buildup on my grill?
Clean grates after each use while warm, empty drip pans regularly, and trim excess fat from meats before grilling. Use drip pans under fatty foods and maintain proper grill temperature to prevent excessive grease accumulation. Regular maintenance prevents heavy buildup that requires intensive cleaning.
Is it safe to use a pressure washer on my grill?
Use pressure washers only on removable grates and drip pans, never on the main grill body or gas components. High-pressure water can damage seals, force water into gas lines, or harm electrical components. Hand washing with appropriate cleaners is safer for most grill components.
You May Also Like
How to Clean Washing Machine Filter: Complete Guide 2026
How to Clean Artificial Grass: Complete Maintenance Guide