Beauty & Personal Care

How to Clean a Hairbrush: Complete Guide for All Brush Types

· · 28 min read
How to Clean a Hairbrush: Complete Guide for All Brush Types

How to clean a hairbrush involves removing hair and debris, washing with soap and water, and allowing proper drying to maintain hygiene and brush performance. Regular cleaning prevents bacterial growth, removes product buildup, and extends your brush’s lifespan while keeping your hair healthier.

Dirty hairbrushes accumulate oils, dead skin cells, and styling products that can transfer back to clean hair. Moreover, neglected brushes become breeding grounds for bacteria and fungi, potentially causing scalp irritation and hair problems.

This comprehensive guide covers everything from basic weekly maintenance to deep cleaning with vinegar and baking soda. Furthermore, you’ll learn specific techniques for different brush types, including plastic bristle brushes, wooden brushes, and natural boar bristles. Additionally, we’ll explore alternative cleaning methods when you don’t have traditional cleaning tools available.

TL;DR

  • Remove hair weekly and wash with soap and water for basic maintenance
  • Deep clean monthly using vinegar and baking soda solution for stubborn buildup
  • Different brush types require specific care – wooden brushes need gentle cleaning, while plastic bristles can handle scrubbing
  • Proper drying prevents mold growth – air dry bristles down and store in clean, dry areas

Why Regular Hairbrush Cleaning Matters

Clean hairbrushes protect your hair and scalp from harmful bacteria while maintaining optimal styling performance. Regular cleaning removes accumulated oils, dead skin cells, and styling products that can transfer back to freshly washed hair. Additionally, proper brush maintenance prevents bacterial and fungal growth that thrives in warm, moist environments.

Health and Hygiene Benefits

Bacterial contamination occurs when hairbrushes remain uncleaned for extended periods. These microorganisms multiply rapidly in the presence of natural oils, dead skin cells, and moisture from styling products. Consequently, dirty brushes can cause scalp irritation, dandruff, and even folliculitis in severe cases.

Furthermore, fungal growth develops in brushes exposed to humid bathroom conditions without proper cleaning. Malassezia, a common scalp fungus, feeds on the sebum and dead skin trapped in brush bristles. This creates an ideal breeding ground that can worsen existing scalp conditions or trigger new infections.

Impact on Hair and Scalp Health

Dirty brushes redistribute old oils and product residue throughout clean hair, making it appear greasy and lifeless. This buildup weighs down hair strands and reduces volume, particularly affecting fine or thin hair types. Moreover, accumulated debris clogs hair follicles and can lead to reduced hair growth over time.

Scalp irritation frequently results from using contaminated brushes that harbor bacteria and allergens. The constant reintroduction of these irritants during brushing creates a cycle of inflammation that can manifest as redness, itching, or flaking. Therefore, maintaining brush cleanliness becomes essential for overall scalp health.

Warning Signs

Replace your hairbrush if you notice persistent odors, visible mold growth, or if bristles have become permanently discolored despite cleaning efforts.

Common Buildup Problems

Styling product accumulation creates the most visible form of brush contamination. Hair sprays, gels, mousses, and leave-in conditioners gradually coat bristles with sticky residues that attract dust and lint. This buildup becomes increasingly difficult to remove as it hardens over time, requiring more intensive cleaning methods.

Natural oil deposits from sebum production coat brush bristles during regular use. These oils oxidize when exposed to air, creating a rancid smell and yellowish discoloration. Additionally, the combination of oils and dead skin cells forms a paste-like substance that clogs bristle spaces and reduces brush effectiveness.

Environmental contaminants such as dust, pollen, and pollution particles also accumulate in hairbrushes over time. These microscopic particles embed themselves in the oil and product buildup, creating a complex mixture that requires thorough cleaning to remove completely. Consequently, deep cleaning techniques become necessary for heavily soiled brushes.

Dermatologists recommend cleaning hairbrushes weekly to prevent bacterial growth and maintain scalp health

Prevention strategies prove more effective than reactive cleaning approaches. Regular removal of hair strands after each use prevents the formation of dense mats that trap oils and debris. Similarly, storing brushes in clean, dry locations reduces exposure to humidity and airborne contaminants that accelerate bacterial growth.

How Often to Clean Your Hairbrush

Establishing a consistent cleaning schedule prevents bacterial buildup and extends your brush’s lifespan significantly. Most hair care professionals recommend weekly deep cleaning for regular users, though frequency adjustments depend on individual hair characteristics and styling habits.

Daily Hair Removal for Optimal Maintenance

Daily hair removal forms the foundation of proper brush hygiene. After each brushing session, pull out loose strands trapped between bristles using your fingers or a wide-tooth comb. This simple practice prevents hair from matting and creating dense clumps that trap oils and debris.

Regular hair removal also reduces the workload during weekly deep cleaning sessions. Furthermore, removing hair daily allows you to monitor your brush’s condition and identify when immediate cleaning becomes necessary.

Weekly Cleaning Schedule for Regular Users

Standard weekly cleaning suits most people with normal hair types and minimal product usage. However, certain factors require more frequent cleaning intervals to maintain optimal brush performance and scalp health.

Hair TypeCleaning FrequencyKey Factors
Oily hairEvery 3-4 daysExcess sebum production
Normal hairWeeklyStandard maintenance
Dry hairBi-weeklyLess oil accumulation
Curly/textured hairWeeklyProduct buildup concerns

Deep Cleaning Frequency Based on Hair Type and Product Use

Heavy styling product users require more intensive cleaning schedules than those who use minimal products. Hair sprays, gels, and leave-in treatments create sticky residues that accumulate rapidly on bristles and require thorough removal.

People with oily scalps should clean their brushes every three to four days because excess sebum production accelerates bacterial growth. Conversely, individuals with dry hair can extend cleaning intervals to bi-weekly since their scalps produce less natural oil.

Professional hairstylists often clean their brushes after each client to prevent cross-contamination. Similarly, people who share brushes should implement daily cleaning protocols to maintain hygiene standards.

Signs Your Brush Needs Immediate Cleaning

Visual and olfactory indicators signal when your brush requires immediate attention regardless of your regular cleaning schedule. White or grey buildup around bristle bases indicates accumulated oils, dead skin cells, and product residue that demands prompt removal.

  • Unpleasant odors emanating from the brush
  • Visible lint or dust particles trapped in bristles
  • Sticky or tacky feeling when touching bristles
  • Reduced brushing effectiveness or hair tangling
  • Discoloration of bristles or brush base

Additionally, brushes that feel sticky or leave residue in your hair require immediate cleaning. These symptoms indicate bacterial overgrowth that can transfer to your scalp and potentially cause irritation or breakouts.

i

Quick Check Method

Run your finger along the bristle base weekly. If you feel any buildup or notice your finger comes away dirty, it’s time for a thorough cleaning session.

Maintaining a consistent cleaning routine becomes easier when you integrate it with other grooming habits. Many people find success cleaning their brushes while washing their hair, creating a natural weekly rhythm that ensures both hair and tools remain hygienic.

Removing Hair and Debris from Your Brush

Effective hair removal forms the foundation of proper brush maintenance and requires systematic techniques to eliminate tangled strands without damaging bristles. Manual hair removal serves as the primary method for extracting accumulated hair from brush bristles and involves careful finger manipulation to preserve brush integrity.

Manual Hair Removal Techniques

Begin hair removal by gently pulling visible strands from the brush surface using your fingers. Start from the outer edges and work systematically toward the center to prevent hair from becoming more entangled. This methodical approach ensures complete removal while minimizing stress on bristles.

For stubborn hair wrapped around bristle bases, carefully lift strands upward rather than pulling sideways. Subsequently, twist the hair gently to loosen it from bristle clusters before extracting completely. This technique prevents bristle breakage that commonly occurs with aggressive pulling motions.

Using Tools for Stubborn Hair Removal

Wide-tooth combs excel at removing deeply embedded hair that resists manual extraction. Insert the comb teeth between bristle rows and gently lift upward to catch tangled strands. This method proves particularly effective for paddle brushes and round brushes where hair commonly wraps around the base.

Alternatively, rat-tail combs with pointed ends can precisely target individual hair strands wound tightly around bristles. The pointed tip allows for careful manipulation without disturbing surrounding bristles or damaging the brush structure.

  • Scissors for cutting severely tangled hair (use sparingly)
  • Tweezers for extracting individual stubborn strands
  • Old toothbrush for loosening hair from bristle clusters
  • Seam ripper for carefully cutting wrapped hair

Eliminating Lint, Dust, and Grey Fuzz Buildup

Grey fuzz buildup consists of dead skin cells, fabric fibers, and environmental dust that accumulates between bristles over time. This debris creates an unsanitary environment that can transfer back to clean hair during brushing. Regular removal prevents bacterial growth and maintains brush effectiveness.

Use a clean, dry toothbrush to gently scrub between bristles and dislodge accumulated debris. Work in small circular motions to lift particles without pushing them deeper into the brush base. Focus particularly on areas where bristles meet the brush pad, as debris commonly collects in these crevices.

For persistent lint removal, compressed air effectively blasts debris from hard-to-reach areas between bristles. Hold the brush at a 45-degree angle and direct short bursts of air across the bristle surface. This technique proves especially useful for cleaning intricate brush designs with multiple bristle layers.

i

Pro Tip

Tap the brush face-down on a towel after debris removal to shake loose any remaining particles that compressed air or brushing may have loosened but not completely removed.

Specialized Tools for Efficient Hair Removal

Brush cleaning tools designed specifically for hair removal streamline the maintenance process and reduce time spent on manual extraction. These specialized implements feature curved edges and pointed tips that navigate bristle patterns more effectively than household items.

Tool TypeBest ForEffectiveness
Brush cleaning rakePaddle brushes, wide bristle spacingExcellent
Pointed pick toolRound brushes, tight spacesVery good
Multi-prong cleanerAll brush typesGood
Magnetic pin lifterMetal bristle brushesExcellent

Professional-grade brush cleaning combs feature multiple prong sizes to accommodate different bristle densities. These tools reduce cleaning time by up to 60% compared to manual methods while ensuring thorough debris removal. Investment in quality cleaning tools pays dividends through extended brush lifespan and improved hygiene.

Finally, establish a systematic approach by removing hair and debris before each wet cleaning session. This preparation ensures cleaning solutions can penetrate bristles effectively rather than being blocked by accumulated matter. Consistent debris removal also prevents the formation of stubborn buildup that requires aggressive cleaning methods potentially harmful to brush materials.

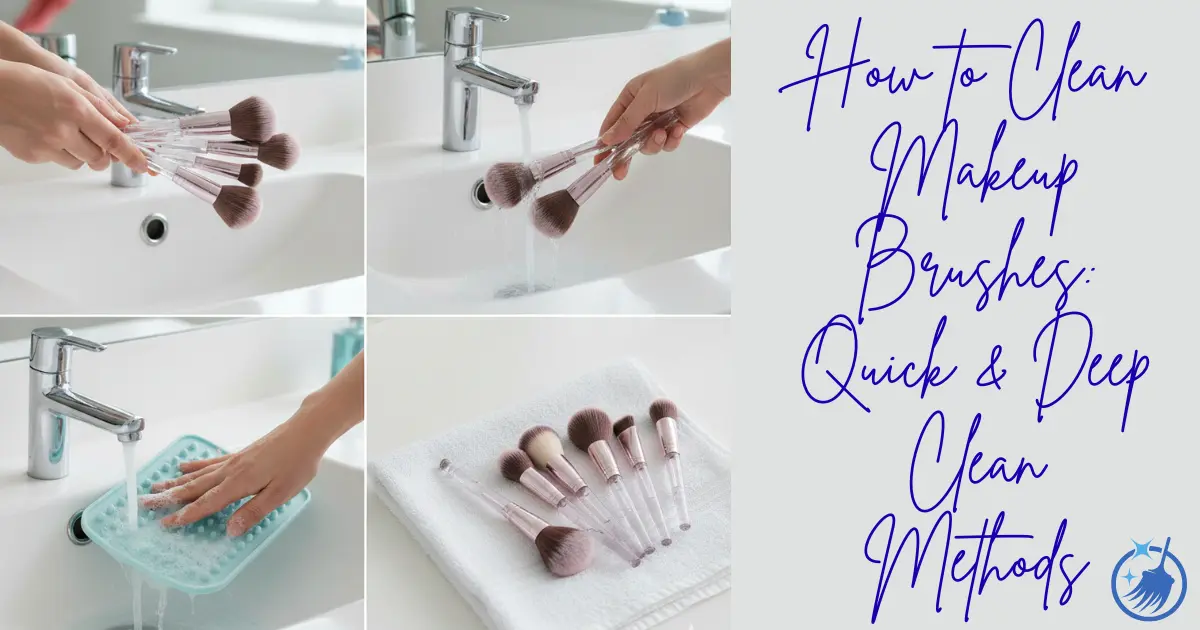
Basic Hairbrush Cleaning Method

The soap and water method provides the most effective foundation for cleaning hairbrushes of all types. This gentle approach removes accumulated oils, product residue, and bacteria without damaging natural or synthetic bristles. Moreover, this technique works equally well for paddle brushes, round brushes, and specialty styling tools.

Simple Soap and Water Cleaning Process

Begin by selecting a mild shampoo or gentle dish soap that won’t strip protective coatings from brush materials. Harsh detergents can weaken bristle bonds and cause premature brush deterioration. Additionally, avoid antibacterial soaps containing triclosan, which may leave residue that transfers to hair during use.

Fill a clean basin with lukewarm water reaching approximately 2-3 inches deep. Water temperature should feel comfortable to touch—excessive heat damages natural bristles and softens plastic components. Furthermore, lukewarm water activates cleaning agents more effectively than cold water while preventing thermal damage.

Step-by-Step Washing Instructions

  1. Add one teaspoon of shampoo to the prepared water basin
  2. Swirl gently to create light suds without excessive foam
  3. Hold the brush handle firmly and dip only the bristles into the solution
  4. Gently agitate the brush in circular motions for 30-45 seconds
  5. Use a clean toothbrush to scrub between bristles if needed
  6. Focus on areas where product buildup appears heaviest

Never submerge the entire brush head underwater, especially with wooden handles or natural bristle brushes. Water penetration into the ferrule (metal band) can loosen bristles and cause permanent damage. Instead, maintain the brush at a slight angle to prevent water from reaching sensitive connection points.

For stubborn buildup, allow the bristles to soak in the cleaning solution for 2-3 minutes maximum. Extended soaking weakens adhesives and may cause bristle shedding during subsequent uses.

Proper Rinsing Techniques

Thorough rinsing removes all soap residue that could otherwise transfer to clean hair or cause scalp irritation. Run the brush under cool running water while gently massaging bristles with your fingers. Continue rinsing until water runs completely clear without any soap bubbles or foam.

Shake the brush vigorously to remove excess water trapped between bristles. This step prevents water accumulation that leads to mold growth or bacterial development. Additionally, gentle tapping against a clean towel helps dislodge stubborn water droplets from dense bristle areas.

Drying Methods to Prevent Damage

Proper drying techniques prevent warping, cracking, and bacterial growth while maintaining brush integrity. Place the freshly cleaned brush bristles-down on a clean towel to allow gravity-assisted drainage. This positioning prevents water from pooling around the ferrule or handle connection points.

Air drying typically requires 4-6 hours for complete moisture removal, depending on bristle density and ambient humidity. Avoid placing wet brushes in direct sunlight or near heat sources, which can cause uneven drying and material stress. Instead, choose a well-ventilated area with consistent room temperature.

Drying Warning

Never use hair dryers or heating devices to speed brush drying. Excessive heat warps plastic components and damages natural bristles permanently.

Check brush dryness by gently pressing a clean tissue against the bristle base. Any moisture transfer indicates incomplete drying that requires additional time. Completely dry brushes feel light and show no water spots on bristles or handle surfaces.

This basic cleaning method should be performed weekly for daily-use brushes and monthly for occasional styling tools. Regular maintenance using soap and water prevents the need for harsh chemical treatments while extending overall brush lifespan significantly.

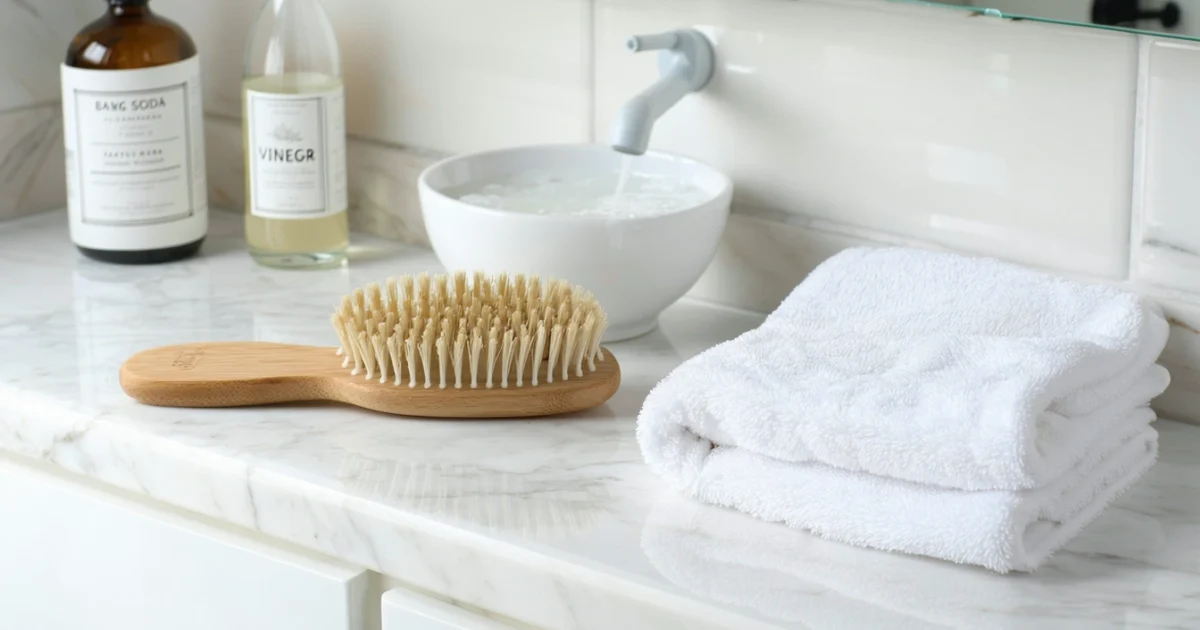
Deep Cleaning with Vinegar and Baking Soda

When basic soap cleaning fails to remove stubborn buildup, vinegar and baking soda create a powerful cleaning combination that dissolves product residue and eliminates bacteria. This natural deep-cleaning method works effectively on all brush types while avoiding harsh chemicals that damage bristles or handles.

Creating an Effective Cleaning Solution

Mix two tablespoons of baking soda with one cup of warm water in a wide bowl to create the initial cleaning base. The alkaline properties of baking soda break down oily residue and product buildup that accumulates on bristles over time. Subsequently, prepare a separate solution using one part white vinegar to three parts water for the acidic cleaning phase.

Alternatively, create a paste using three tablespoons of baking soda mixed with just enough water to form a thick consistency. This concentrated paste works particularly well for brushes with heavy product accumulation or those that haven’t been cleaned regularly. The paste adheres better to bristles and provides more intensive cleaning action.

Soaking Time and Technique

Submerge the brush bristles-down in the baking soda solution, ensuring complete coverage while keeping the handle above water level. Soaking time ranges from 15 to 30 minutes depending on the severity of buildup and brush material. Natural bristle brushes require shorter soaking periods to prevent damage, while synthetic bristles can withstand longer exposure.

During the soaking process, gently agitate the brush every five minutes to help the solution penetrate between bristles. This movement helps dissolve stubborn residue and allows the cleaning solution to reach areas where product buildup typically accumulates. Watch for bubbling action, which indicates the baking soda is actively breaking down oils and debris.

Scrubbing Stubborn Buildup

After soaking, use an old toothbrush or small cleaning brush to gently scrub between bristles where residue persists. Work systematically from the base of bristles toward the tips, following the natural bristle direction to avoid damage. Focus particularly on areas near the ferrule where hair products and oils tend to accumulate most heavily.

For plastic bristle brushes with severe buildup, apply the baking soda paste directly to problem areas and scrub with circular motions. The abrasive action of baking soda combined with mechanical scrubbing removes even the most stubborn product residue. However, use lighter pressure on natural bristle brushes to prevent bristle breakage or loosening.

i

💡 Pro Tip

Grey fuzz in hairbrushes often consists of dead skin cells, dust, and product residue. The vinegar solution effectively dissolves this buildup while the baking soda provides gentle abrasion to lift stubborn particles.

Neutralizing and Rinsing Process

Following the baking soda treatment, rinse the brush thoroughly with the vinegar solution to neutralize alkaline residue and provide additional cleaning action. The acidic properties of vinegar dissolve mineral deposits from hard water and eliminate any remaining soap scum or product buildup. This neutralization step prevents white residue from forming on bristles as they dry.

Complete the process with a final rinse using cool, clean water to remove all traces of both cleaning solutions. Gently squeeze bristles to expel trapped water and cleaning solution from dense bristle areas. The brush should feel completely clean with no slippery or gritty texture remaining on bristles or handle surfaces.

This deep cleaning method should be performed monthly for regular users or whenever basic cleaning fails to remove visible buildup. The combination of baking soda and vinegar provides thorough sanitization while maintaining brush integrity, similar to how natural cleaning methods work for deep cleaning kitchen surfaces.

Cleaning Different Types of Hairbrushes

Different hairbrush materials require specific cleaning approaches to maintain their effectiveness and longevity. Plastic bristle brushes tolerate aggressive cleaning methods, while wooden handles and natural boar bristles demand gentler care. Understanding these material-specific requirements ensures proper brush maintenance without causing damage.

Plastic Bristle Brush Cleaning Methods

Plastic bristle brushes withstand the most thorough cleaning techniques due to their synthetic construction. These brushes handle hot water temperatures up to 60°C without bristle deformation or handle warping. The non-porous surface of plastic bristles resists bacterial growth and allows for complete sanitization using standard household cleaners.

Submerge plastic brushes completely in the baking soda solution for extended periods without concern for material damage. Vigorous scrubbing with an old toothbrush effectively removes product buildup from bristle bases and ventilation holes. Additionally, plastic brushes benefit from occasional disinfection using 70% isopropyl alcohol applied with a cotton pad to eliminate bacteria and fungi.

For heavily soiled plastic brushes, create a paste using three tablespoons of baking soda mixed with minimal water. Apply this concentrated paste directly to problem areas and allow it to sit for 15 minutes before scrubbing. The abrasive action safely removes even dried styling gel and hairspray without scratching the plastic surface.

Wooden Hairbrush Care and Precautions

Wooden hairbrush handles require careful moisture management to prevent cracking, swelling, or finish deterioration. Never submerge wooden brushes completely in water, as prolonged exposure causes wood expansion and potential bristle loosening. Instead, focus cleaning efforts on bristles while protecting the wooden components from excessive moisture.

Clean wooden brushes using a damp cloth to wipe the handle surface, followed immediately by thorough drying with a clean towel. For bristle cleaning, apply the vinegar solution using a spray bottle rather than submersion methods. This targeted approach prevents water from seeping into the wood grain or bristle attachment points.

Natural wood finishes benefit from occasional conditioning using food-grade mineral oil applied sparingly with a soft cloth. This treatment maintains wood flexibility and prevents drying that leads to handle splitting. However, avoid using oils on the bristle area, as residue transfers to hair during brushing.

Natural Boar Bristle Brush Maintenance

Natural boar bristle brushes demand the gentlest cleaning approach due to their organic composition and delicate structure. These premium brushes distribute natural hair oils effectively but require specialized care to maintain bristle integrity. Harsh chemicals or excessive heat damage the protein structure of boar bristles, reducing their effectiveness.

Use only lukewarm water below 40°C when cleaning boar bristle brushes, as higher temperatures cause bristle brittleness and breakage. Apply the cleaning solution using gentle dabbing motions rather than vigorous scrubbing. Pat bristles dry with a clean towel instead of rubbing, which can cause bristle tangling or loss.

Natural bristles require longer drying times compared to synthetic alternatives, often taking 4-6 hours to dry completely. Place boar bristle brushes face-down on a clean towel in a well-ventilated area away from direct heat sources. This positioning prevents water from pooling in the ferrule area where bristles attach to the handle.

Round Brush and Paddle Brush Specific Techniques

Round brushes present unique cleaning challenges due to their cylindrical shape and dense bristle arrangement. Hair tends to wrap around the barrel, creating tight tangles that require systematic removal. Start by using a wide-tooth comb to gently lift hair from the bristles, working in sections around the brush circumference.

The curved surface of round brushes makes thorough rinsing difficult, requiring special attention to ensure complete cleaning solution removal. Rotate the brush continuously under running water while gently squeezing bristles to expel trapped cleaning solution. Ceramic and metal barrel brushes dry faster than wooden versions due to their non-porous surfaces.

Paddle brushes feature wide, flat surfaces that facilitate easier cleaning but often contain air cushions requiring careful handling. Avoid submerging cushioned paddle brushes completely, as water can penetrate the cushion mechanism and cause damage. Instead, clean these brushes by working cleaning solution through bristles using your fingers or a cleaning brush.

For paddle brushes with removable cushions, disassemble the brush according to manufacturer instructions for thorough cleaning. Clean each component separately and ensure complete drying before reassembly. This deep cleaning approach prevents bacterial growth in hidden areas while maintaining optimal brush performance, similar to how proper keyboard cleaning requires attention to hard-to-reach spaces.

Alternative Cleaning Methods

When traditional cleaning tools aren’t available, several alternative methods can effectively clean hairbrushes without compromising their condition. These techniques prove particularly useful for travel situations or when specific cleaning supplies are unavailable.

Cleaning Without a Toothbrush or Scrub Brush

A wide-tooth comb serves as an excellent substitute for removing hair and debris from brush bristles. Insert the comb between bristles and work systematically across the brush surface, lifting tangled hair with gentle upward motions. This technique works particularly well on paddle brushes and boar bristle brushes where traditional scrubbing might damage natural bristles.

Your fingers provide another effective cleaning tool when other implements aren’t available. Wet your hands thoroughly, then work your fingers through the bristles in circular motions to dislodge buildup. Fingernail cleaning allows precise removal of stubborn debris lodged between bristles, though this method requires more time than brush-based techniques.

Cotton swabs offer precision cleaning for detailed work around brush edges and between closely spaced bristles. Dip the swab in cleaning solution and carefully clean individual bristles or hard-to-reach areas. This method proves especially useful for synthetic bristle brushes with intricate bristle patterns.

Using Shampoo as a Cleaning Agent

Clarifying shampoo contains powerful cleansing agents designed to remove product buildup from hair, making it an ideal hairbrush cleaning solution. Mix one tablespoon of clarifying shampoo with warm water to create an effective cleaning solution that dissolves oils and styling product residue.

Regular shampoo also works effectively, though it requires slightly longer soaking times to achieve the same results. The surfactants in shampoo break down sebaceous oils and product buildup naturally, providing a gentle yet thorough cleaning action. Sulfate-free shampoos offer gentler cleaning for delicate natural bristle brushes while still providing adequate cleansing power.

Baby shampoo presents the mildest option for cleaning sensitive brush materials like natural boar bristles or wooden handles. Its gentle formulation prevents damage while effectively removing dirt and oils. Soak the brush for 10-15 minutes in baby shampoo solution before rinsing thoroughly with cool water.

Disinfecting with Rubbing Alcohol

Isopropyl alcohol at 70% concentration provides effective disinfection for hairbrushes without requiring extensive rinsing. Spray the alcohol directly onto clean, dry bristles and allow it to air dry completely. This method eliminates bacteria, fungi, and viruses that may accumulate on brush surfaces over time.

For thorough disinfection, combine alcohol cleaning with regular washing routines. Clean the brush with soap and water first, then apply the alcohol treatment as a final disinfecting step. This two-stage process ensures both physical debris removal and microbial elimination.

Alcohol-based hand sanitizer offers a convenient alternative when dedicated rubbing alcohol isn’t available. Choose sanitizers containing at least 60% alcohol content for effective disinfection. Apply generously to bristles and allow complete evaporation before using the brush.

Natural Cleaning Alternatives

White vinegar creates an effective natural cleaning solution that dissolves mineral deposits and product buildup while providing mild disinfection. Mix equal parts white vinegar and warm water for a gentle yet effective cleaning solution. The acidic nature of vinegar breaks down alkaline residues from styling products and hard water minerals.

Baking soda paste offers gentle abrasive action for removing stubborn buildup without scratching brush surfaces. Mix three parts baking soda with one part water to create a thick paste. Apply the paste to bristles using circular motions, then rinse thoroughly with warm water. This method works particularly well on plastic and synthetic bristle brushes.

Lemon juice provides natural acidic cleaning power while leaving a fresh scent. Mix fresh lemon juice with warm water in a 1:3 ratio for effective cleaning solution. The citric acid in lemon juice dissolves product buildup and provides mild antibacterial properties, similar to how lemon effectively cleans ovens through natural acidic action.

Tea tree oil adds natural antimicrobial properties to any cleaning solution. Add 5-10 drops of tea tree oil to your chosen cleaning mixture for enhanced disinfection. This essential oil provides antifungal and antibacterial benefits while leaving a pleasant, clean scent on freshly cleaned brushes.

i

Natural Cleaning Safety

Always test natural cleaning solutions on a small, inconspicuous area of your brush first. Some natural ingredients may react with certain brush materials or finishes.

Proper Drying and Storage

Proper drying prevents mold growth and bacterial buildup that can damage both your brush and hair health. After cleaning, shake excess water from the brush and gently tap bristles against a clean towel to remove remaining moisture. Never store wet brushes in enclosed spaces where humidity accumulates.

Air Drying Techniques

Air circulation ensures complete moisture evaporation and prevents fungal growth on natural bristles. Place freshly cleaned brushes in a well-ventilated area away from direct sunlight, which can warp plastic handles and damage natural bristles. Room temperature drying typically takes 2-4 hours depending on bristle density and humidity levels.

Avoid using hair dryers or heat sources to accelerate drying, as excessive heat damages bristle integrity and warps brush components. Instead, position brushes near open windows or use a fan to improve airflow. Patience during the drying process protects your investment and maintains brush performance.

Optimal Brush Positioning

Bristle-down positioning allows gravity to assist water drainage and prevents moisture from pooling in the brush base. Place brushes on a clean towel with bristles pointing downward, ensuring adequate spacing between multiple brushes. This positioning prevents water from seeping into the ferrule area where bristles attach to the handle.

For paddle brushes and wide-bristle designs, lean them against a stable surface at a 45-degree angle to promote drainage. Alternatively, use a brush drying rack or create a simple drying station using a clean dish rack. Proper positioning reduces drying time and prevents damage to brush components.

Storage Solutions for Cleanliness

Clean, dry storage environments maintain brush hygiene between uses and extend brush lifespan significantly. Store brushes in breathable containers or open drawers that allow continued air circulation. Avoid plastic bags or airtight containers that trap moisture and create breeding grounds for bacteria.

Designate separate storage areas for different brush types to prevent cross-contamination of styling products and debris. Natural bristle brushes require extra ventilation due to their porous nature, while synthetic brushes tolerate slightly more enclosed storage. Consider using drawer dividers or brush holders to maintain organization and prevent bristle damage.

Regular storage area cleaning prevents dust accumulation and maintains optimal hygiene standards. Wipe down storage surfaces weekly with a damp cloth, similar to maintaining cleanliness in other personal care areas like shower heads that require regular cleaning to prevent buildup.

When to Replace Your Hairbrush

Bristle integrity serves as the primary indicator for brush replacement timing. Replace brushes when bristles become bent, broken, or lose their original shape despite proper cleaning and care. Natural bristle brushes typically last 6-12 months with regular use, while high-quality synthetic brushes may last up to two years.

Persistent odors that remain after thorough cleaning indicate bacterial colonization within brush materials. Additionally, replace brushes immediately if you notice visible mold growth, cracked handles, or loose ferrules that cannot be repaired. These conditions compromise both brush effectiveness and hair health.

Monitor brush performance during daily use to identify declining effectiveness. Reduced detangling ability and increased hair breakage often signal the need for replacement. Furthermore, replace brushes after recovering from scalp infections or conditions to prevent recontamination and maintain optimal scalp health.

i

Storage Tip

Keep a rotation of 2-3 brushes to allow proper drying time between uses, especially in humid climates where extended drying periods are necessary.

Frequently Asked Questions

What is the best way to clean a hairbrush?

The best way to clean a hairbrush involves a two-step process: weekly maintenance and monthly deep cleaning. For weekly cleaning, remove all hair strands and rinse with warm soapy water. For monthly deep cleaning, soak the brush in a solution of warm water with a tablespoon of vinegar and baking soda for 10-15 minutes, then scrub gently with an old toothbrush to remove stubborn buildup.

How often should you clean your hairbrush?

You should clean your hairbrush weekly for basic maintenance and perform a deep clean monthly. Remove hair strands after every few uses, especially if you have long hair. People with oily hair or those who use styling products frequently may need to clean their brushes more often to prevent bacterial growth and product buildup.

How do you deep clean hair brushes with vinegar and baking soda?

To deep clean with vinegar and baking soda, create a cleaning solution by mixing 1 cup warm water, 1 tablespoon white vinegar, and 1 tablespoon baking soda. Soak the brush for 10-15 minutes, then use an old toothbrush to scrub between bristles. The vinegar breaks down product buildup while baking soda neutralizes odors and removes stubborn residue. Rinse thoroughly and air dry bristles down.

What happens if you don't clean your hairbrush?

Not cleaning your hairbrush leads to several problems: bacterial and fungal growth that can cause scalp irritation and infections, product buildup that transfers back to clean hair making it greasy, and reduced brush performance. Dirty brushes can also cause dandruff, folliculitis, and create an unpleasant odor. The accumulated oils and dead skin cells create an ideal breeding ground for harmful microorganisms.

How do I get the grey fuzz out of my hairbrush?

Grey fuzz in hairbrushes is typically dust, lint, and dead skin cells mixed with natural oils. Remove it by first pulling out all hair strands, then using tweezers or a comb to lift out the fuzz. Soak the brush in warm soapy water for 10 minutes, then scrub with an old toothbrush to dislodge remaining particles. For stubborn fuzz, use a vinegar solution to break down the buildup.

How to clean a hairbrush without a toothbrush?

You can clean a hairbrush without a toothbrush using several alternatives:

  • Wide-tooth comb to scrape between bristles
  • Cotton swabs for detailed cleaning around the base
  • Tweezers to remove stubborn hair and debris
  • Another clean hairbrush to scrub bristle-to-bristle
  • Soaking method – let cleaning solution do most of the work

How to clean a hairbrush with plastic bristles?

Plastic bristle brushes are the easiest to clean because they can handle more aggressive scrubbing. Remove hair, then wash with warm soapy water using dish soap or shampoo. Scrub thoroughly with a toothbrush to remove product buildup. Plastic bristles can also be soaked in stronger cleaning solutions like diluted bleach (1:10 ratio) for disinfection, but rinse thoroughly afterward.

How to clean a wooden hairbrush?

Wooden brushes require gentle cleaning to prevent damage. Never soak wooden brushes completely – instead, use a damp cloth with mild soap to clean the bristles and base. Work quickly and dry immediately with a towel, then air dry bristles down. Avoid harsh chemicals that can crack or warp the wood. Clean wooden brushes more frequently with lighter methods rather than deep soaking.

Can I use dish soap to clean my hairbrush?

Yes, dish soap is excellent for cleaning hairbrushes because it’s designed to cut through grease and oils. Use a few drops in warm water to create a cleaning solution. Dish soap effectively removes styling product buildup and natural oils without being too harsh on bristles. It’s particularly effective for plastic and synthetic bristle brushes.

How long should I soak my hairbrush?

Soak plastic and synthetic brushes for 10-15 minutes in cleaning solution for regular maintenance, or up to 30 minutes for heavy buildup. Natural bristle and wooden brushes should only be soaked for 5-10 minutes maximum to prevent damage. Always check the brush material and manufacturer recommendations before extended soaking.

What's the proper way to dry a hairbrush after cleaning?

Always dry hairbrushes bristles down on a clean towel to allow water to drain out rather than pooling in the base. This prevents mold and bacterial growth. Place in a well-ventilated area away from direct heat sources. Ensure the brush is completely dry before storing, especially wooden brushes which can warp or crack if stored damp.

Can dirty hairbrushes cause hair loss?

While dirty hairbrushes don’t directly cause permanent hair loss, they can contribute to temporary hair problems. Bacterial infections from contaminated brushes can cause folliculitis, leading to inflammation and temporary hair loss in affected areas. Additionally, product buildup can clog follicles and create an unhealthy scalp environment that may impede healthy hair growth.

How to clean natural boar bristle brushes?

Natural boar bristle brushes require extra gentle care. Use lukewarm water with a small amount of gentle shampoo, and clean quickly without prolonged soaking. Gently work the cleaning solution through the bristles with your fingers or a wide-tooth comb. Rinse thoroughly but briefly, then immediately shake out excess water and air dry bristles down. Never use harsh chemicals or hot water on natural bristles.

Leave a Comment

Your email address will not be published. Required fields are marked *