How to Clean Shower Head: Remove Limescale & Restore Flow
How to clean shower head effectively requires just white vinegar, a plastic bag, and basic household supplies to restore water pressure and remove limescale buildup. Furthermore, regular cleaning prevents mineral deposits from blocking spray holes and maintains optimal shower performance. Additionally, proper maintenance extends your shower head’s lifespan while ensuring better hygiene.
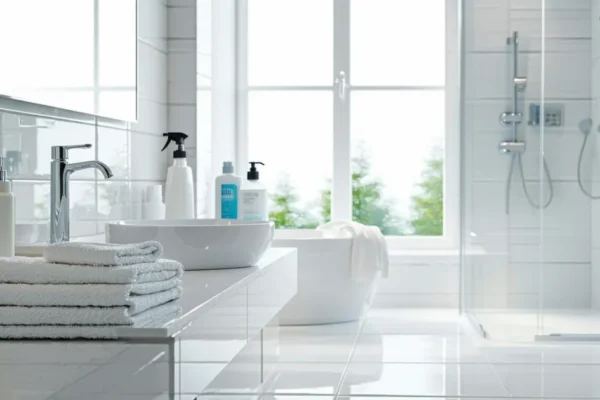
Most UK homes face hard water issues that cause stubborn limescale deposits on shower heads. Consequently, reduced water pressure and uneven spray patterns become common problems. However, simple cleaning methods using natural descalers can restore your shower head to perfect working condition.
This comprehensive guide covers both non-removal cleaning methods using vinegar bags and deep cleaning techniques requiring disassembly. Moreover, we’ll explore maintenance schedules and prevention strategies tailored for different shower head types. Whether you’re dealing with bathroom deep cleaning or routine maintenance, these proven methods deliver professional results.
TL;DR
- Vinegar bag method: Secure plastic bag filled with white vinegar around shower head, soak 4-8 hours, then scrub and rinse
- Deep cleaning: Remove shower head, disassemble parts, soak in vinegar solution, clear blocked holes with toothpick
- Prevention: Clean monthly in hard water areas, wipe dry after use, consider water softener systems
Why Clean Your Shower Head: Signs It Needs Attention
Your shower head requires regular cleaning when mineral deposits accumulate and disrupt water flow patterns. Therefore, recognising early warning signs prevents complete blockages and maintains optimal shower performance. Most importantly, timely maintenance saves money on replacement costs while ensuring hygienic bathing conditions.
Reduced Water Pressure and Weak Spray
Diminished water pressure signals that limescale buildup restricts water flow through internal channels. Consequently, your shower delivers weak, unsatisfying spray patterns that make rinsing difficult. Additionally, blocked passages force water through fewer openings, creating uneven pressure distribution across the shower head surface.
UK’s hard water contains high calcium and magnesium concentrations that crystallise inside shower heads over time. Subsequently, these mineral deposits narrow water pathways and reduce overall flow rates. Furthermore, pressure problems worsen gradually, making the decline less noticeable until cleaning becomes essential.
Uneven or Misdirected Water Flow
Irregular spray patterns indicate that mineral buildup blocks specific nozzles while leaving others partially clear. Moreover, water shoots sideways or creates gaps in coverage, disrupting your shower experience. These flow irregularities also waste water by directing streams away from your body.
Misdirected water streams often spray against shower walls or shower glass surfaces, creating unnecessary splashing and mess. Therefore, cleaning restores uniform water distribution and prevents bathroom water damage. Additionally, proper flow patterns improve soap rinsing and reduce shower time.
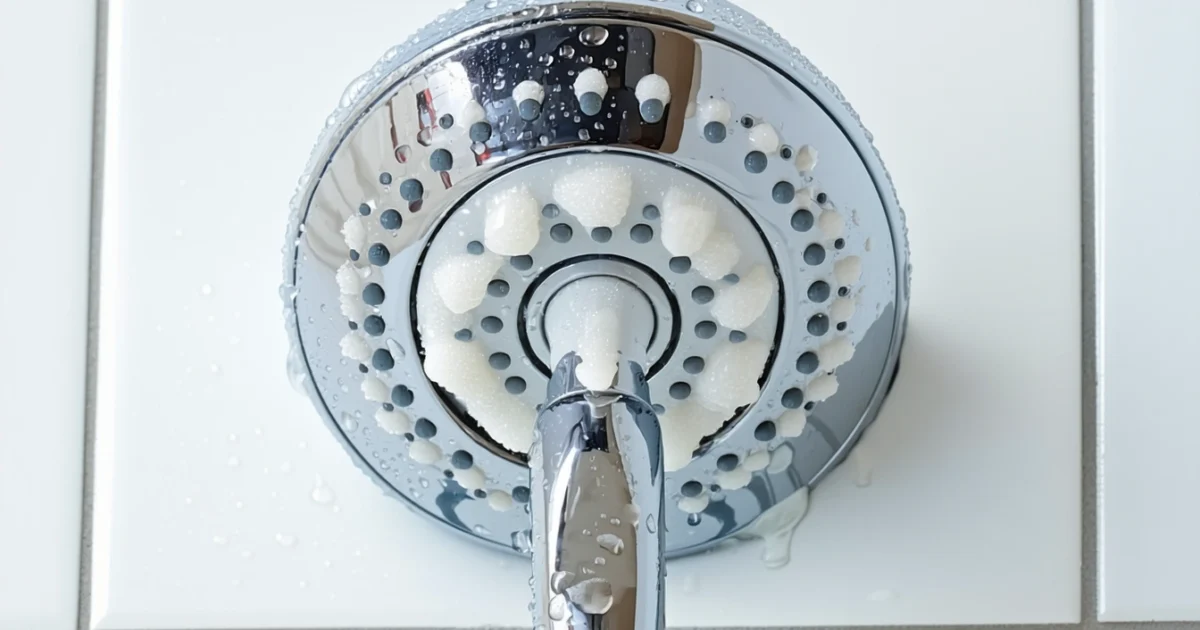
Visible Limescale and Mineral Buildup
White, chalky deposits on your shower head surface clearly indicate limescale accumulation requiring immediate attention. Similarly, crusty formations around nozzle openings show where mineral-rich water evaporates and leaves residue behind. These visible signs often accompany internal blockages that affect water flow.
Limescale appears more rapidly in areas with particularly hard water, sometimes forming noticeable deposits within weeks. However, regular cleaning prevents these buildups from hardening into stubborn, difficult-to-remove formations. Furthermore, addressing visible deposits early maintains your shower head’s appearance and functionality.
Blocked or Partially Blocked Spray Holes
Individual nozzles become completely or partially obstructed when mineral deposits accumulate within the tiny openings. Consequently, you’ll notice some holes producing no water while others deliver thin, weak streams. These blockages create an uneven shower experience and reduce overall water coverage.
Partially blocked holes often produce twisted or angled water streams that spray unpredictably. Therefore, examining your shower head closely reveals which specific nozzles need attention during cleaning. Additionally, counting functional versus blocked holes helps determine cleaning urgency and method selection.
Impact on Shower Experience and Hygiene
Dirty shower heads compromise both comfort and cleanliness by delivering inadequate water pressure for effective washing. Moreover, mineral buildup creates environments where bacteria and mould can thrive, potentially affecting your health. Poor water flow also makes thorough rinsing difficult, leaving soap residue on skin and hair.
Hygiene concerns extend beyond personal cleanliness to include the shower environment itself. Subsequently, blocked shower heads contribute to longer shower times, increased water usage, and higher energy bills. Furthermore, maintaining clean shower heads forms part of comprehensive bathroom deep cleaning routines that ensure optimal sanitation throughout your bathing space.
A blocked shower head can reduce water pressure by up to 75% and increase shower times by 3-5 minutes
What You'll Need: Essential Cleaning Supplies
Gathering the right supplies beforehand ensures efficient shower head cleaning and prevents damage to delicate components. Furthermore, having everything ready streamlines the process and reduces interruptions during cleaning sessions.
White Vinegar: The Natural Powerhouse
White vinegar serves as the most effective natural descaler for removing mineral deposits and limescale buildup. Additionally, its acidic properties dissolve calcium and magnesium deposits without harsh chemicals that might corrode shower head finishes. The acetic acid in vinegar breaks down stubborn mineral accumulations while remaining gentle on most shower head materials.
Standard household white vinegar contains 5% acetic acid, which provides optimal cleaning strength without excessive corrosiveness. Moreover, vinegar offers antimicrobial properties that eliminate bacteria and mould growth within shower head nozzles.
Securing and Scrubbing Tools
A plastic bag and elastic band create the perfect soaking chamber for attached shower heads that cannot be removed easily. Alternatively, cable ties provide stronger securing mechanisms for heavier shower heads or longer soaking periods. These tools enable hands-free cleaning while ensuring complete submersion in cleaning solution.
An old toothbrush or small scrubbing brush removes stubborn deposits from individual nozzles and crevices that soaking alone cannot eliminate. Specifically, soft-bristled brushes prevent scratching while providing sufficient abrasion to dislodge mineral buildup. The compact size allows precise cleaning of small openings and detailed areas.
Finishing and Drying Materials
A soft cloth or microfibre towel provides streak-free drying and polishing after cleaning completion. Consequently, microfibre materials trap moisture effectively while preventing water spots on shower head surfaces. These cloths also remove any remaining cleaning residue without leaving lint or fibres behind.
Microfibre towels prove particularly effective for chrome and stainless steel finishes that show water marks easily. Therefore, investing in quality microfibre cloths enhances your overall bathroom cleaning routine beyond just shower head maintenance.
Commercial Alternatives and When to Use Them
Commercial limescale removers offer stronger descaling action for severely blocked shower heads that resist vinegar treatment. However, these products require careful application and thorough rinsing to prevent damage to shower head finishes. Professional cleaners often contain stronger acids that dissolve mineral deposits more rapidly than natural alternatives.
Consider commercial products when dealing with extremely hard water areas or shower heads that haven’t been cleaned for extended periods. Nevertheless, always test commercial cleaners on inconspicuous areas first to ensure compatibility with your specific shower head material.
Material-Specific Safety Considerations
Chrome shower heads tolerate vinegar well but require gentle handling to prevent scratching the reflective surface. Meanwhile, brass and copper finishes need shorter soaking times as prolonged acid exposure can cause discolouration or pitting. Plastic shower heads generally withstand most cleaning solutions but may become brittle with excessive chemical exposure.
Brushed nickel and oil-rubbed bronze finishes require extra caution as aggressive cleaning can remove protective coatings and alter appearance. Subsequently, these materials benefit from gentler cleaning methods and shorter contact times with acidic solutions. Always consult manufacturer guidelines before applying any cleaning products to specialty finishes.
| Material | Vinegar Safe | Max Soak Time | Special Precautions |
|---|---|---|---|
| Chrome | Yes | 8 hours | Use soft cloths only |
| Brass/Copper | Limited | 2 hours | Test first, rinse thoroughly |
| Plastic | Yes | 6 hours | Avoid hot solutions |
| Brushed Nickel | Cautious | 1 hour | Gentle pressure only |
Method 1: Cleaning Without Removing the Shower Head
This non-removal method provides the most convenient approach for regular shower head maintenance. Additionally, this technique prevents potential damage from unscrewing delicate connections or overtightening during reinstallation.
Step-by-Step Cleaning Process
Begin by gathering a plastic bag large enough to completely enclose your shower head. Furthermore, ensure you have white vinegar, rubber bands or cable ties, and an old toothbrush for scrubbing stubborn deposits.
- Fill the plastic bag with enough white vinegar to completely submerge the shower head when secured
- Position the bag around the shower head, ensuring all nozzles sit below the vinegar surface
- Secure the bag tightly using rubber bands or cable ties around the shower arm
- Allow soaking for 4-8 hours, or overnight for heavy limescale buildup
- Remove the bag carefully and dispose of used vinegar down the drain
- Run hot water through the shower head for 2-3 minutes to flush loosened deposits
- Scrub remaining buildup gently with a soft toothbrush, focusing on individual nozzles
- Polish the surface with a soft, dry cloth to restore shine and prevent water spots
Optimising Soaking Duration
Light mineral deposits typically dissolve within 4 hours of vinegar contact. However, heavily calcified shower heads require overnight soaking to achieve complete cleaning. Moreover, extremely hard water areas may benefit from 12-hour soaking periods for optimal results.
Monitor the cleaning progress by checking deposit loosening after the initial 4-hour period. Subsequently, extend soaking time if white chalky residue remains visible on nozzle openings or shower head surfaces.
Post-Cleaning Water Flow Testing
Test water pressure and spray patterns immediately after cleaning to ensure complete blockage removal. Uneven spray patterns indicate remaining mineral deposits within internal passages. Therefore, repeat the vinegar soaking process for persistently blocked nozzles.
This bag method works exceptionally well as part of comprehensive bathroom deep cleaning routines. Similarly, combine this technique with shower glass cleaning for complete shower enclosure maintenance.
Pro Tip: Double-bag the vinegar solution to prevent leaks that could damage bathroom fixtures or flooring during extended soaking periods.
Troubleshooting Common Issues
Bags frequently slip during soaking due to inadequate securing methods. Consequently, use multiple rubber bands or cable ties positioned at different heights around the shower arm. Additionally, ensure the bag material remains intact throughout the soaking period to prevent vinegar spillage.
Some shower head designs feature complex geometries that trap air bubbles within the cleaning solution. Therefore, gently manipulate the bag to release trapped air and ensure complete vinegar submersion of all shower head components.
Method 2: Deep Cleaning by Removing the Shower Head
Complete shower head removal enables thorough cleaning of internal components that remain inaccessible during surface cleaning. Moreover, this disassembly method addresses mineral deposits within flow restrictors and filters that significantly impact water pressure and spray quality.
How to Safely Unscrew and Remove Shower Head
Turn off the water supply at the shower valve before beginning the removal process. Subsequently, wrap the shower arm connection with a soft cloth to prevent scratching during wrench application. Use an adjustable spanner or pipe wrench to grip the shower head base firmly whilst turning anticlockwise.
Apply steady pressure rather than forceful jerking motions to avoid damaging threaded connections. Additionally, spray penetrating oil on stubborn connections and allow 15-20 minutes for loosening before attempting removal again.
Disassemble Removable Parts
Separate the flow restrictor from the shower head inlet after successful removal. Furthermore, locate and extract any internal filters or screens that regulate water flow patterns. Modern shower heads typically contain multiple removable components including rubber washers and plastic flow regulators.
Place all disassembled parts in a clean container to prevent loss during the cleaning process. Consequently, photograph the disassembly sequence using your mobile phone to ensure correct reassembly order later.
Soak All Components in Vinegar Solution
Create a 50:50 white vinegar and water solution in a large bowl or basin. Then, submerge all shower head components completely in this cleaning mixture. The acidic properties of vinegar dissolve calcium carbonate deposits whilst remaining safe for rubber seals and plastic components.
Allow components to soak for 4-6 hours minimum for standard mineral buildup. However, heavily calcified parts may require overnight soaking to achieve complete deposit dissolution.
Scrub Individual Parts Thoroughly
Remove each component from the vinegar solution and scrub using an old toothbrush with soft bristles. Focus particular attention on threaded areas where mineral deposits commonly accumulate. Additionally, use a bottle brush for cleaning internal passages within the main shower head body.
Rinse components under running water between scrubbing sessions to remove loosened deposits. Furthermore, inspect each part for remaining white residue that indicates incomplete cleaning.
Clear Blocked Holes with Precision Tools
Insert a wooden toothpick or thin wire into each nozzle opening to dislodge stubborn mineral deposits. Avoid using metal tools that might damage plastic nozzles or enlarge spray holes beyond their designed specifications. Similarly, dental floss works effectively for clearing partially blocked openings without causing damage.
Work systematically across all nozzle openings to ensure uniform water flow restoration. Consequently, test each cleared hole by holding the shower head up to bright light to verify complete blockage removal.
Rinse Thoroughly and Reassemble Correctly
Flush all components under hot running water for 2-3 minutes to remove vinegar residue and loosened deposits. Subsequently, shake each part vigorously to expel trapped cleaning solution from internal chambers. Allow components to air dry completely before beginning reassembly.
Reassemble components in reverse order of disassembly using your reference photographs. Moreover, apply gentle hand-tightening to threaded connections without over-tightening that could damage rubber seals. This thorough cleaning method complements other bathroom deep cleaning techniques for comprehensive shower maintenance.
Test water flow immediately after reinstallation to verify successful cleaning and proper reassembly. Uneven spray patterns indicate incomplete cleaning or incorrect component positioning that requires immediate attention.
Tackling Stubborn Limescale and Mineral Deposits
Severe mineral buildup requires extended soaking times ranging from 4 to 12 hours for complete dissolution. Hard water deposits accumulate calcium carbonate and magnesium compounds that resist standard cleaning methods. Therefore, persistent limescale demands prolonged acid exposure to break down crystalline structures effectively.
Fill a plastic bag with undiluted white vinegar and secure it around the shower head using elastic bands. Additionally, ensure complete submersion of all nozzles and surfaces affected by mineral deposits. This extended soaking method penetrates deep into accumulated scale layers that shorter treatments cannot reach.
Using Commercial Descaling Products Safely
Commercial descalers contain stronger acids than household vinegar, including citric acid and hydrochloric acid formulations. However, these products require careful handling to prevent skin contact and adequate ventilation during application. Always wear rubber gloves and ensure bathroom windows remain open throughout the cleaning process.
Follow manufacturer dilution ratios precisely to avoid damaging chrome finishes or rubber seals. Furthermore, test commercial products on inconspicuous areas before full application to prevent unexpected surface reactions. Popular UK brands like Viakal and Cillit Bang offer effective limescale removal when used according to safety guidelines.
Gentle Scrubbing Techniques to Avoid Damage
Use soft-bristled toothbrushes or plastic scrubbers to remove loosened deposits without scratching delicate surfaces. Metal brushes and abrasive pads damage chrome plating and create microscopic scratches that accelerate future mineral accumulation. Consequently, gentle circular motions prove more effective than aggressive scrubbing for deposit removal.
Focus scrubbing efforts on areas where soaking has softened limescale buildup rather than forcing removal of hardened deposits. Moreover, rinse frequently during scrubbing to assess progress and prevent redeposition of dissolved minerals. This approach mirrors techniques used in comprehensive bathroom deep cleaning for optimal results.
When to Repeat the Cleaning Process
Heavily scaled shower heads may require multiple treatment cycles spaced 24 hours apart for complete restoration. Incomplete mineral removal indicates the need for additional soaking and gentle scrubbing sessions. Therefore, assess water flow patterns after each cleaning cycle to determine whether further treatment is necessary.
Repeat the entire cleaning process when spray patterns remain uneven or water pressure appears reduced. Additionally, consider upgrading to stronger commercial descalers if household vinegar proves insufficient after three treatment cycles. Persistent blockages may indicate internal component damage requiring professional replacement.
Dealing with Different Types of Mineral Deposits
Calcium carbonate deposits appear as white, chalky buildup that dissolves readily in acidic solutions like vinegar. Iron deposits create reddish-brown stains requiring specialized rust removers containing oxalic acid. Meanwhile, magnesium deposits form greyish scales that respond well to citric acid treatments available in most UK supermarkets.
Identify deposit types by color and texture to select appropriate cleaning agents for maximum effectiveness. Furthermore, combination deposits require sequential treatments targeting each mineral type individually. This systematic approach ensures complete removal of all mineral varieties affecting shower head performance, similar to methods used for cleaning shower glass surfaces in hard water areas.
Special Considerations for Different Shower Head Types
Different shower head designs require tailored cleaning approaches to achieve optimal results. Moreover, the material composition and internal mechanisms of various models influence both cleaning duration and technique selection.
Rainfall and Large Shower Heads
Rainfall shower heads contain significantly more nozzles than standard models, requiring extended soaking periods for complete mineral removal. Consequently, these oversized fixtures need 4-6 hours of vinegar treatment compared to the standard 2-3 hours. Additionally, their larger surface area traps more debris and requires thorough brushing of each spray zone.
Large shower heads often feature complex internal chambers that distribute water across multiple spray patterns. Therefore, submerge the entire head face in cleaning solution rather than relying on bag attachment methods. Furthermore, these units may require disassembly of face plates for access to internal components where mineral buildup accumulates most heavily.
Handheld Shower Heads
Handheld shower heads offer the easiest cleaning experience due to their removable design and flexible positioning. Simply unscrew these units from their mounting bracket and submerge completely in cleaning solution containers. This accessibility allows for thorough inspection of all surfaces and spray holes during the cleaning process.
The flexible hose connection enables positioning at optimal angles for detailed scrubbing and rinsing. Additionally, handheld models typically feature fewer internal components than fixed units, reducing cleaning complexity. However, inspect the connection points where mineral deposits often accumulate between the head and hose assembly.
Multi-Function Shower Heads
Multi-function shower heads contain internal mechanisms that redirect water flow between different spray settings. Each spray pattern utilizes specific nozzle groups that may accumulate minerals at varying rates. Consequently, test all spray functions after cleaning to ensure complete restoration of water flow patterns.
Clean these units by cycling through each spray setting during the soaking process to allow cleaning solution access to all internal pathways. Furthermore, the rotating mechanisms require gentle handling to prevent damage to delicate switching components. Some models feature removable spray face plates that facilitate deeper cleaning of internal chambers.
Material-Specific Cleaning Methods
Chrome shower heads resist corrosion but show water spots and fingerprints prominently, requiring final polishing with microfiber cloths. Brass fixtures develop natural patina over time and need gentler cleaning agents to preserve their finish integrity. Meanwhile, plastic shower heads may discolor from harsh chemicals, making white vinegar the safest cleaning option.
Avoid abrasive scrubbers on chrome surfaces to prevent scratching that dulls the reflective finish. Similarly, brass components require specialized metal cleaners for tarnish removal without damaging the underlying material. Plastic units benefit from warm water rinses that help dissolve mineral deposits without thermal shock that could cause cracking.
Electric Shower Unit Safety
Electric shower units require additional safety precautions due to their integrated heating elements and electrical components. Always switch off the unit at the isolator switch and allow complete cooling before beginning any cleaning procedures. Never submerge electric shower heads or allow cleaning solutions to contact electrical connections.
These units typically feature removable shower heads that detach from the main heating unit for safe cleaning. However, inspect manufacturer guidelines before removal to avoid voiding warranties or damaging sealing mechanisms. Additionally, ensure hands remain completely dry when handling electrical switches during the cleaning process, similar to safety protocols used when deep cleaning bathroom electrical fixtures.
Consider professional servicing for electric units showing signs of internal mineral buildup that affects heating performance. Furthermore, these systems may require specialized descaling products designed specifically for electric shower components to prevent damage to heating elements.
Testing and Maintenance After Cleaning
Proper testing ensures your shower head cleaning efforts have restored optimal performance. Begin by turning on the water supply and observing the initial flow patterns. Water should emerge smoothly without spurting or irregular spray patterns that indicate remaining blockages.
Checking Water Flow and Pressure
Run water at full pressure for two to three minutes to flush out loosened mineral deposits and cleaning solution residues. Additionally, test the flow at various pressure settings to ensure consistent performance across all levels. Water pressure should feel noticeably improved compared to pre-cleaning conditions.
Check each individual nozzle by holding your hand close to the shower head surface. Furthermore, blocked holes will produce weak or absent water streams that require additional cleaning attention. Any remaining white vinegar odour should dissipate within the first minute of operation.
Testing All Spray Functions
Multi-function shower heads require comprehensive testing of each spray pattern and mode. Rotate through all available settings including massage, rainfall, and mist functions to verify complete restoration. Each pattern should activate smoothly without sticking or incomplete transitions between modes.
Test the swivel mechanism and angle adjustments to ensure cleaning hasn’t affected mechanical components. Moreover, spray patterns should maintain their intended shape and coverage area without irregular dispersal that suggests internal component damage.
Cleaning Frequency Guidelines
Monthly cleaning becomes essential in hard water areas where mineral buildup accelerates rapidly. However, soft water regions may extend cleaning intervals to every six to eight weeks depending on usage frequency and local water quality conditions.
UK households in areas with calcium carbonate levels above 200mg/L should implement weekly maintenance routines to prevent severe mineral accumulation. Conversely, regions with naturally soft water can maintain optimal performance with less frequent deep cleaning sessions, similar to maintenance schedules for deep cleaning bathroom fixtures.
Daily Prevention Strategies
Simple daily habits prevent mineral buildup and extend cleaning intervals significantly. After each shower session, run water for 30 seconds at full pressure to flush soap residues and loose mineral deposits from nozzle openings.
Wipe down the shower head exterior with a dry cloth to remove water droplets that leave mineral spots during evaporation. Additionally, ensure adequate bathroom ventilation to reduce humidity levels that accelerate mineral crystallization on metal surfaces.
- Run water briefly after each use
- Wipe exterior surfaces dry
- Maintain proper ventilation
- Remove soap buildup weekly
- Check spray patterns regularly
Professional Replacement Indicators
Several warning signs indicate when cleaning efforts cannot restore proper function and professional replacement becomes necessary. Persistent low water pressure despite thorough cleaning suggests internal component failure or severe mineral damage beyond repair capabilities.
Cracked or damaged nozzle plates that leak water irregularly require immediate replacement to prevent water waste and potential damage to surrounding areas. Furthermore, corroded internal mechanisms that affect spray pattern consistency indicate structural deterioration that cleaning cannot address.
Electrical shower units showing signs of heating element malfunction or electrical component corrosion require professional assessment and potential replacement for safety reasons. Never attempt repairs on electric units without qualified technician expertise, particularly when mineral buildup affects heating performance or electrical connections.
Preventing Future Limescale Buildup
Prevention strategies significantly reduce the frequency of intensive cleaning sessions while extending shower head lifespan. Moreover, proactive maintenance prevents mineral accumulation that causes permanent damage to internal components and spray mechanisms.
Daily Maintenance Habits
Daily wiping and drying after each use prevents water droplets from evaporating and leaving mineral deposits on external surfaces. Simply use a microfibre cloth to remove moisture from the shower head face and connecting joints immediately after showering.
This simple habit eliminates 90% of visible limescale formation on chrome and stainless steel finishes. Furthermore, dry surfaces resist bacterial growth and soap scum accumulation that compound cleaning challenges over time.
Water Softening Solutions
Installing water softener systems addresses the root cause of limescale problems by removing calcium and magnesium ions from incoming water supplies. These systems prove particularly beneficial in areas with hard water ratings above 200mg/L calcium carbonate equivalent.
Ion exchange softeners replace mineral ions with sodium ions, significantly reducing scale formation throughout your plumbing system. Additionally, softened water improves soap effectiveness and reduces cleaning product requirements across your entire home.
Weekly Prevention Routine
Regular weekly maintenance cleaning prevents heavy mineral accumulation that requires aggressive removal methods. Consequently, brief weekly attention maintains optimal water flow and spray patterns without intensive scrubbing or chemical treatments.
- Rinse shower head with hot water for 30 seconds
- Wipe exterior surfaces with damp cloth
- Check spray pattern consistency
- Remove any visible soap residue
- Inspect connection points for early mineral buildup
Weekly maintenance takes less than two minutes but prevents the need for monthly deep cleaning sessions. Similarly, this routine helps identify developing problems before they require professional intervention or replacement.
Anti-Limescale Technology
Choosing shower heads with anti-limescale features provides built-in protection against mineral accumulation. Modern designs incorporate silicone nozzles, self-cleaning mechanisms, and mineral-resistant coatings that maintain performance in hard water conditions.
Silicone spray nozzles flex during water flow, naturally dislodging mineral deposits before they solidify. Additionally, these flexible materials resist calcium buildup that permanently blocks traditional rigid nozzles in metal shower heads.
Chrome-plated brass constructions with anti-bacterial treatments resist both mineral accumulation and microbial growth. Therefore, investing in quality fixtures reduces long-term maintenance requirements and extends operational lifespan significantly.
Understanding Local Water Conditions
Understanding your local water hardness levels enables targeted prevention strategies appropriate for your specific mineral content. UK water companies provide annual water quality reports showing calcium carbonate concentrations and pH levels affecting limescale formation rates.
| Water Hardness Level | mg/L CaCO₃ | Cleaning Frequency |
|---|---|---|
| Soft | 0-60 | Monthly deep clean |
| Moderately soft | 61-120 | Bi-weekly maintenance |
| Slightly hard | 121-180 | Weekly attention |
| Moderately hard | 181-250 | Twice weekly care |
| Hard | 251-350 | Daily maintenance |
| Very hard | 350+ | Daily plus water softening |
Areas with very hard water require both daily maintenance and water treatment systems for effective limescale prevention. Conversely, soft water areas can maintain shower heads with minimal weekly attention and occasional deep cleaning sessions.
Contact your local water supplier for detailed hardness information, or use home testing kits to measure mineral content accurately. This knowledge helps you select appropriate cleaning products, maintenance schedules, and bathroom cleaning routines that prevent rather than react to limescale problems.
Frequently Asked Questions
How often should I clean my shower head in the UK?
In the UK’s hard water areas, clean your shower head monthly to prevent limescale buildup. For softer water regions, cleaning every 2-3 months is sufficient. However, if you notice reduced water pressure or visible mineral deposits, clean immediately regardless of your schedule.
Can I use other cleaning solutions besides white vinegar?
Yes, you can use lemon juice or citric acid solution as natural alternatives to white vinegar. Commercial limescale removers also work effectively, but vinegar is the most cost-effective and environmentally friendly option for regular maintenance.
Is it safe to soak my shower head in vinegar overnight?
Yes, soaking for 4-8 hours or overnight is safe and often more effective for stubborn limescale. However, avoid soaking for more than 24 hours as prolonged exposure to acid may damage certain finishes or rubber seals in some shower heads.
What should I do if the vinegar bag method doesn't work?
If the vinegar bag method fails to restore water flow, try the deep cleaning method by removing and disassembling the shower head. Use a toothpick to clear individual blocked holes and soak components in a stronger vinegar solution. For severely blocked heads, consider professional cleaning or replacement.
Can I clean my shower head without removing it from the wall?
Absolutely! The vinegar bag method allows you to clean your shower head without removal. Simply secure a plastic bag filled with white vinegar around the shower head using a rubber band or cable tie, ensuring the head is fully submerged.
Will cleaning my shower head improve water pressure?
Yes, removing limescale and mineral deposits will significantly improve water pressure by clearing blocked passages and spray holes. However, if pressure remains low after cleaning, you may have broader plumbing issues that require professional attention.
How do I prevent limescale buildup on my shower head?
- Wipe dry after each use to prevent water spots
- Install a water softener system for hard water areas
- Clean monthly with vinegar solution
- Consider upgrading to a self-cleaning shower head
- Use a daily shower spray to prevent mineral buildup
What tools do I need to clean my shower head properly?
- White vinegar (main cleaning agent)
- Plastic bag and rubber band for soaking method
- Old toothbrush for scrubbing
- Toothpick for clearing blocked holes
- Adjustable spanner (if removing shower head)
- Cloth or sponge for wiping
You May Also Like
How to Clean Hardwood Floors: Complete UK Guide 2026
How to Clean a Shower Curtain: Complete UK Guide 2026